Node-REDのノードを開発してみる その5(wsl-ubuntuノード)
はじめに
今回はNode-REDでWSLのUbuntu環境を起動してコマンドを実行できる、wsl-ubuntuノードを開発してみました。
私はROSを起動するのにWSLのUbuntu環境を利用しています。コマンドを実行するためにターミナルを起動するのが面倒だったので、Node-REDでも実行できるようにしてみました。
▼今回開発したノードはすでに公開済みです。パレットの管理からインストールできます。
https://flows.nodered.org/node/@background404/node-red-contrib-wsl-ubuntu
▼以前の記事はこちら
Node-REDのノードを開発してみる その4(dualshock4ノード)
はじめに 今回はNode-REDと、PS4のコントローラであるDUALSHOCK 4で通信できる、dualshock4ノードを開発してみました。 2年ほど前からESP32とDUALSHOCK 4で通信して、…
Node-RED MCU用のノードを作成してみる その3(Serialノード)
はじめに 今回はNode-RED MCU用のSerialノードを作成してみました。デバッガツールとは元々シリアル通信を行っているのですが、他のポートでのシリアル通信を行うことが…
コマンドの確認
事前にコマンドプロンプトでWSLのUbuntu環境のターミナルを呼び出す方法を確認しておきました。
▼MicrosoftのWSLコマンドに関するページはこちら
https://learn.microsoft.com/ja-jp/windows/wsl/basic-commands
▼よく使うコマンドはこちらにまとまっていました。
https://qiita.com/matsujirushi/items/08e7d3940c5ad35a2462
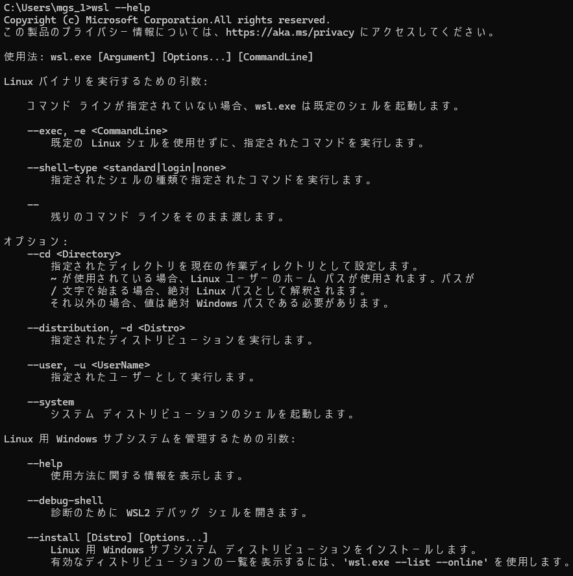
ただし、ドキュメントではすべてのコマンドが網羅されていないようでした。Helpを確認した方がよさそうです。
▼wsl --helpを実行すると、引数やオプションが大量に表示されます。この表示を参考にしています。
▼WSLでUbuntuの環境はインストール済みです。
WSL2を使ってみる その3(Ubuntu 20.04、ROS Noetic、Open Manipulator)
はじめに 今回はWSL2のUbuntu 20.04に、ROSをインストールしてみました。 前回構築したのはWSL2のUbuntu 22.04です。WSL2で複数のバージョンのUbuntu環境をインストー…
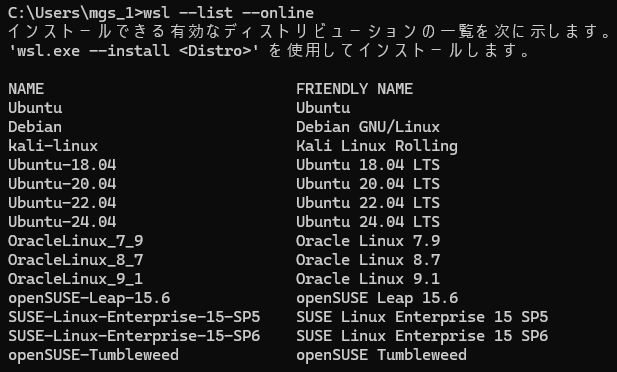
以下のコマンドでインストール可能なディストリビューションを表示できます。
wsl --list --online▼Ubuntu以外にもOracleLinuxなどがあります。今回はUbuntuのみを対象にします。
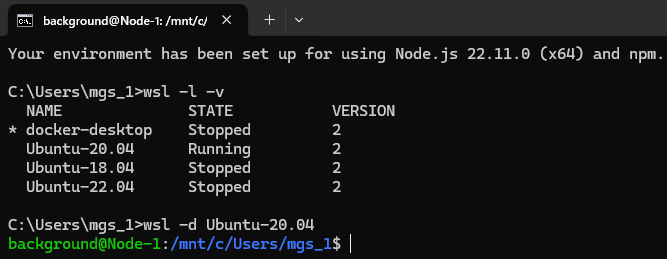
以下のコマンドでインストールされているディストリビューションを確認して、Ubuntu 20.04を起動してみました。
wsl -l -v
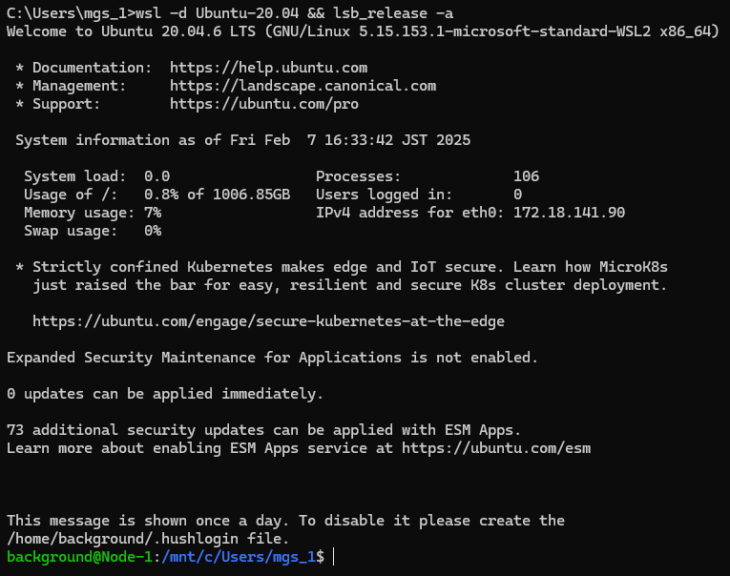
wsl -d Ubuntu-20.04▼簡単に起動することができました。
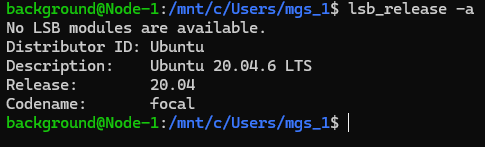
▼lsb_release -aで確認しても、Ubuntu 20.04になっています。
▼ただし、&&をつけても連続で実行されないようでした。
オプションで渡して、コマンドを実行できるようにしました。いろいろ試した結果、以下の形式では実行できました。
wsl -d Ubuntu-20.04 --cd ~ -e bash -c "<コマンド>"--cd ~はホームディレクトリに移動してからコマンドを実行するためです。
▼--cd ~が無いと、Windowsのユーザーディレクトリが表示されているような感じでした。
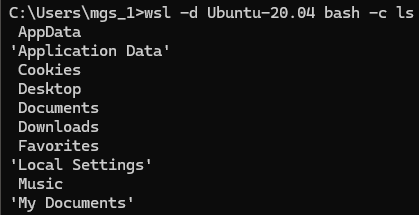
▼--cd ~があると、ホームディレクトリの中身が表示されています。

空白区切りのコマンドを実行する場合は、ダブルクォーテーションが必要なようでした。
▼"ls -a"で隠しファイルも表示されています。

▼ls -aだと隠しファイルが表示されていません。

▼ダブルクォーテーションが無いと、一行のコマンドとして認識されていないようでした。

sudo付きのコマンドの場合は、パスワードの入力が求められます。
▼パスワードの入力が必要です。

パスワードも含めて一行のコマンドで実行する方法を探していたのですが、パイプで渡す方法を見つけました。
▼以下のページで見つけました。WSL用ではありません。
以下のコマンドの形式で実行してみました。
wsl -d Ubuntu-20.04 bash -c "echo <password> | sudo -S fdisk -l"▼以下のように実行できました。
lsでも試してみました。
wsl -d Ubuntu-20.04 --cd ~ bash -c "echo <password> | sudo -S ls"▼こちらも実行できました。

ノードの開発方針
コマンドで実行できることは確認できたので、ノードとしてまとめていきます。
▼コードはGitHubのリポジトリをご覧ください。
https://github.com/404background/node-red-contrib-wsl-ubuntu
python-venvノードを開発したときは、Node.jsのchild_processでコマンドを実行していました。今回も同様の仕組みで実装することにしました。
▼python-venvノードについては、開発の変遷と仕組みについてQiitaにまとめています。
https://qiita.com/background/items/d2e05e8d85427761a609
sudoで実行する際はパスワードが必要だったので、コマンドにsudoが含まれる場合はechoでコマンドを渡すようにします。
パスワードはノードの設定画面で設定するのですが、フローをエクスポートしたときにパスワードが含まれないよう、クレデンシャルとして保存します。
▼Node-REDのクレデンシャルについてはこちら
https://nodered.jp/docs/creating-nodes/credentials
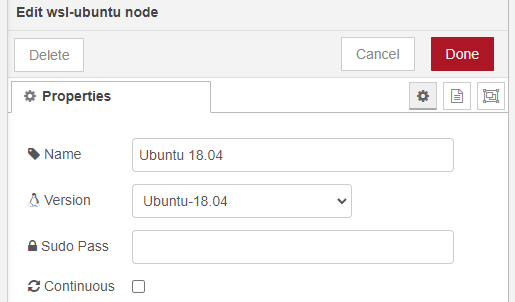
また、プルダウンでUbuntuのバージョンを選択できるようにすることにしました。Oracle Linuxなどの他のディストリビューションは使ったことが無いので、要望があれば追加しようと思います。
動作を確認する
開発したノードの動作を確認してみました。
▼まずは以下のフローで確認してみました。

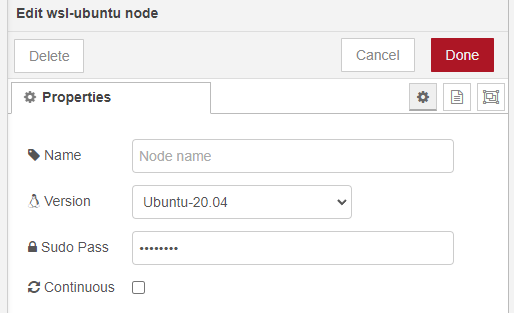
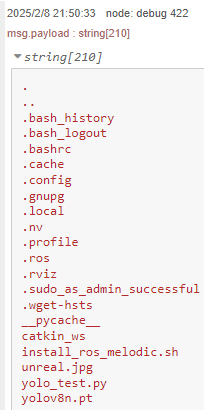
[{"id":"22bda52609441b1a","type":"debug","z":"d6fad9e77ecc8414","name":"debug 422","active":true,"tosidebar":true,"console":false,"tostatus":false,"complete":"payload","targetType":"msg","statusVal":"","statusType":"auto","x":2090,"y":260,"wires":[]},{"id":"3f367ca2f000f0d2","type":"wsl-ubuntu","z":"d6fad9e77ecc8414","name":"","distro":"Ubuntu-18.04","continuous":false,"x":1910,"y":260,"wires":[["22bda52609441b1a"]]},{"id":"29483d4c3f21b75b","type":"inject","z":"d6fad9e77ecc8414","name":"","props":[{"p":"payload"}],"repeat":"","crontab":"","once":false,"onceDelay":0.1,"topic":"","payload":"ls -a","payloadType":"str","x":1750,"y":260,"wires":[["3f367ca2f000f0d2"]]},{"id":"0831cf4218015037","type":"inject","z":"d6fad9e77ecc8414","name":"","props":[{"p":"payload"}],"repeat":"","crontab":"","once":false,"onceDelay":0.1,"topic":"","payload":"cat /etc/os-release","payloadType":"str","x":1710,"y":300,"wires":[["3f367ca2f000f0d2"]]}]▼Ubuntuのバージョン、sudoで実行するときのパスワード、順次出力するかどうかを設定できます。
▼パスワードは入力しても伏せられた状態です。
▼ls -aはホームディレクトリで実行したときの結果が出力されています。
▼Ubuntuのバージョンも表示されています。
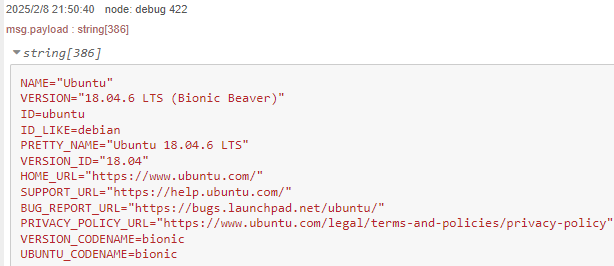
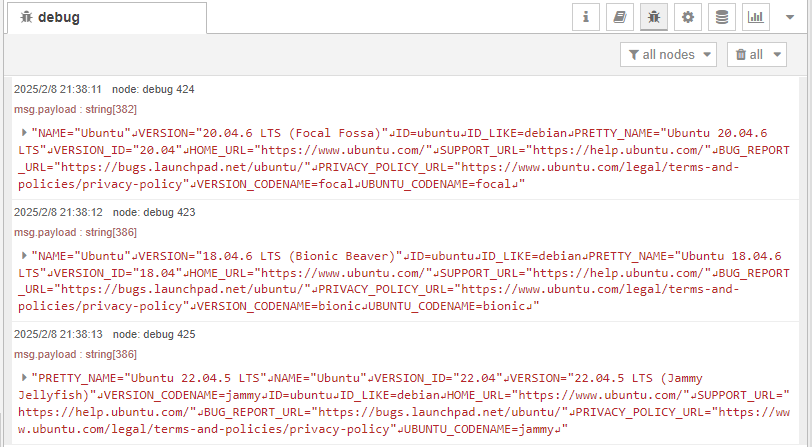
OSを確認するコマンドをそれぞれのUbuntuのバージョンで確認してみました。
▼フローはこちら
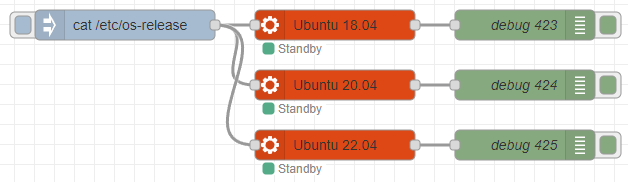
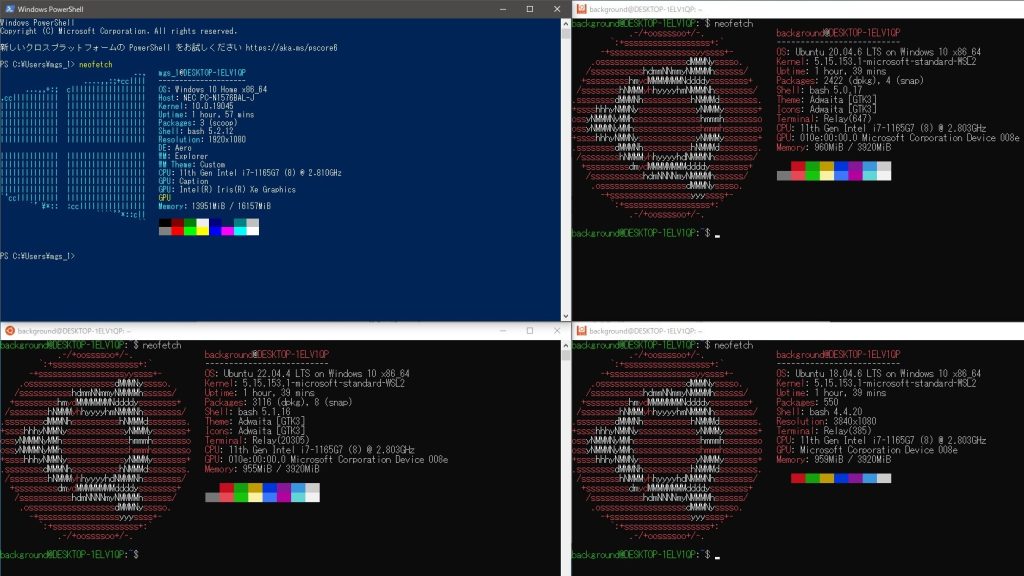
[{"id":"3a8e71067ee68d8a","type":"inject","z":"d6fad9e77ecc8414","name":"","props":[{"p":"payload"}],"repeat":"","crontab":"","once":false,"onceDelay":0.1,"topic":"","payload":"cat /etc/os-release","payloadType":"str","x":1650,"y":460,"wires":[["93a7f6dcd84db5bd","b1ba1e1d36737469","975fa3d0b5bb677d"]]},{"id":"93a7f6dcd84db5bd","type":"wsl-ubuntu","z":"d6fad9e77ecc8414","name":"Ubuntu 18.04","distro":"Ubuntu-18.04","continuous":false,"x":1860,"y":460,"wires":[["c7c049ed52d24e92"]]},{"id":"c7c049ed52d24e92","type":"debug","z":"d6fad9e77ecc8414","name":"debug 423","active":true,"tosidebar":true,"console":false,"tostatus":false,"complete":"false","statusVal":"","statusType":"auto","x":2050,"y":460,"wires":[]},{"id":"b1ba1e1d36737469","type":"wsl-ubuntu","z":"d6fad9e77ecc8414","name":"Ubuntu 20.04","distro":"Ubuntu-20.04","continuous":false,"x":1860,"y":520,"wires":[["a1b88682599eb2b3"]]},{"id":"a1b88682599eb2b3","type":"debug","z":"d6fad9e77ecc8414","name":"debug 424","active":true,"tosidebar":true,"console":false,"tostatus":false,"complete":"false","statusVal":"","statusType":"auto","x":2050,"y":520,"wires":[]},{"id":"975fa3d0b5bb677d","type":"wsl-ubuntu","z":"d6fad9e77ecc8414","name":"Ubuntu 22.04","distro":"Ubuntu-22.04","continuous":false,"x":1860,"y":580,"wires":[["294aa3d23136bb91"]]},{"id":"294aa3d23136bb91","type":"debug","z":"d6fad9e77ecc8414","name":"debug 425","active":true,"tosidebar":true,"console":false,"tostatus":false,"complete":"false","statusVal":"","statusType":"auto","x":2050,"y":580,"wires":[]}]▼ノード毎にバージョンが異なっています。
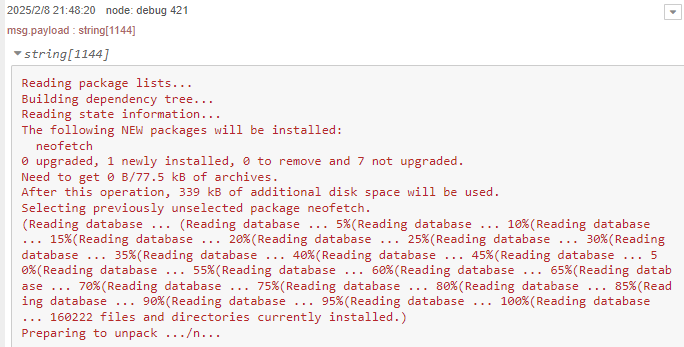
neofetchのinstall、実行、removeも確認しました。
▼フローはこちら

[{"id":"0052134041cae703","type":"debug","z":"d6fad9e77ecc8414","name":"debug 421","active":true,"tosidebar":true,"console":true,"tostatus":false,"complete":"payload","targetType":"msg","statusVal":"","statusType":"auto","x":2050,"y":100,"wires":[]},{"id":"b94bb0de54a6bcb9","type":"inject","z":"d6fad9e77ecc8414","name":"neofetch","props":[{"p":"payload"}],"repeat":"","crontab":"","once":false,"onceDelay":0.1,"topic":"","payload":"neofetch","payloadType":"str","x":1700,"y":100,"wires":[["8b94f9eab569d6b0"]]},{"id":"6b6a44c6b62ec740","type":"inject","z":"d6fad9e77ecc8414","name":"sudo apt-get remove neofetch -y","props":[{"p":"payload"}],"repeat":"","crontab":"","once":false,"onceDelay":0.1,"topic":"","payload":"sudo apt-get remove neofetch -y","payloadType":"str","x":1630,"y":140,"wires":[["8b94f9eab569d6b0"]]},{"id":"662b401f3815e8a8","type":"inject","z":"d6fad9e77ecc8414","name":"sudo apt-get install neofetch","props":[{"p":"payload"}],"repeat":"","crontab":"","once":false,"onceDelay":0.1,"topic":"","payload":"sudo apt-get install neofetch","payloadType":"str","x":1640,"y":60,"wires":[["8b94f9eab569d6b0"]]},{"id":"8b94f9eab569d6b0","type":"wsl-ubuntu","z":"d6fad9e77ecc8414","name":"","distro":"Ubuntu-20.04","continuous":false,"x":1870,"y":100,"wires":[["0052134041cae703"]]}]▼apt-getを利用したパッケージのインストールができています。
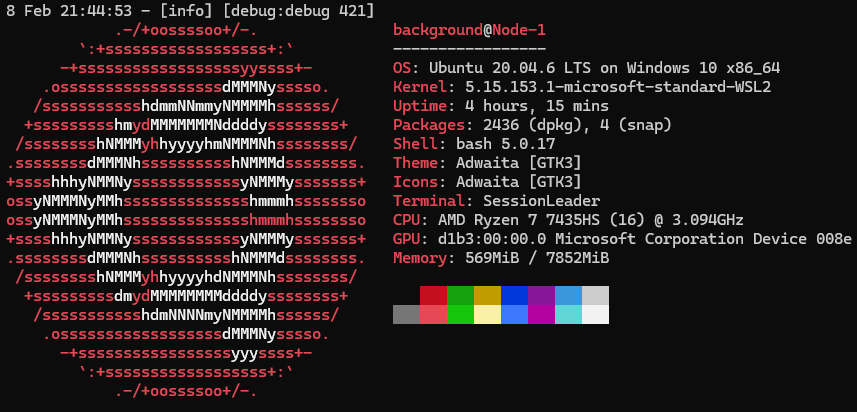
neofetchは行数が多くてデバッグウィンドウに表示されなかったので、システムコンソールに表示するようにしました。
▼以下のように表示されました。
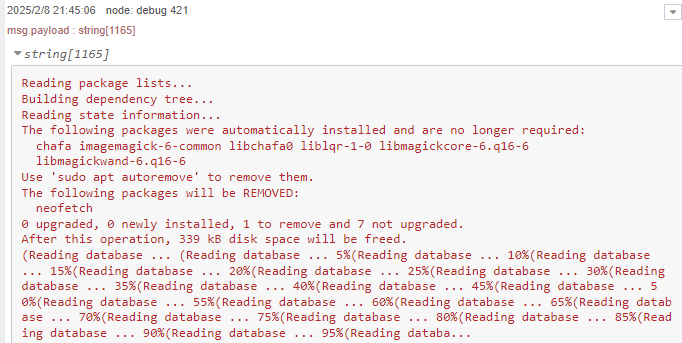
▼removeもできました。
最後に
WSLのUbuntu環境でコマンドを実行できるようになったので、ROSも利用できるか試したいところです。
Linuxのコマンドに詳しいわけでは無いので、詳しく知っておきたいなと思っています。
▼環境構築用に簡単なシェルスクリプトを書いたことがあるぐらいなので、勉強中です。