Node-RED MCU用のノードを作成してみる その3(Serialノード)
はじめに
今回はNode-RED MCU用のSerialノードを作成してみました。デバッガツールとは元々シリアル通信を行っているのですが、他のポートでのシリアル通信を行うことができます。
なお、今回作成したノードはnpmやGitHubに公開しています。Node-REDのパレットの管理からインストールすることもできます。
▼npmでのページはこちら
https://www.npmjs.com/package/@background404/node-red-contrib-mcu-serial
▼GitHubでのページはこちら
https://github.com/404background/node-red-contrib-mcu-serial
記事ではバージョン0.2.0の内容になっています。
Peter Hoddieさんからissueに報告を頂きまして、現在機能を追加中です。
最新版はリポジトリをご覧ください。
https://github.com/404background/node-red-contrib-mcu-serial/issues/1
https://github.com/404background/node-red-contrib-mcu-serial/issues/3
▼以前の記事はこちら
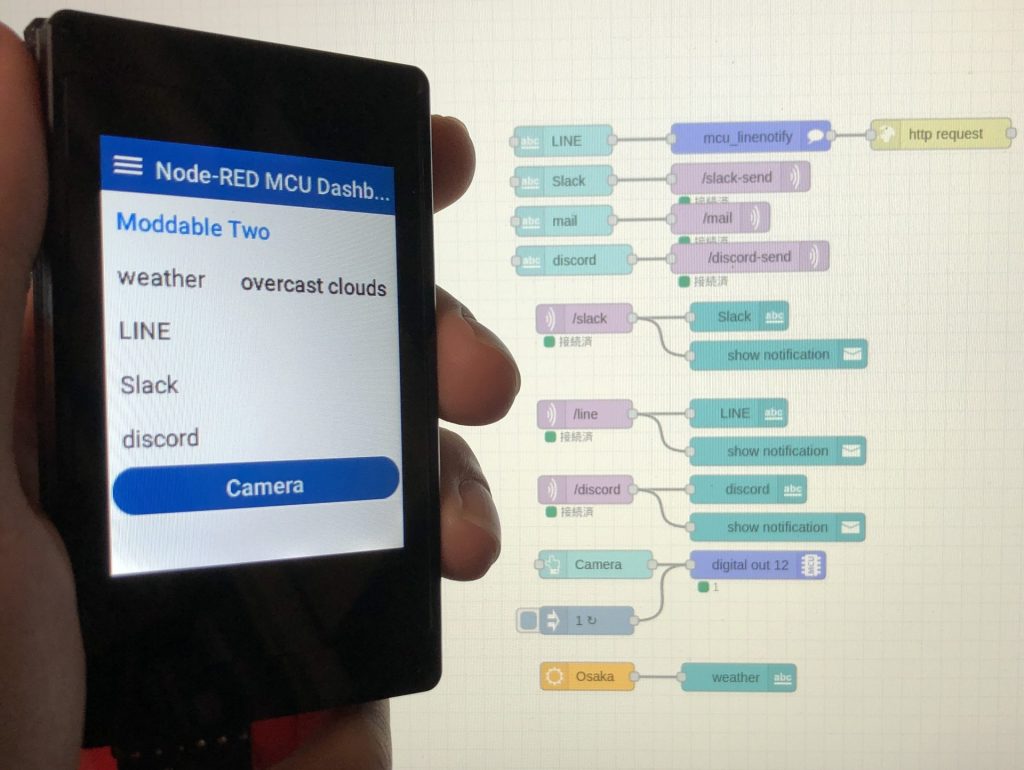
Node-RED MCU用のノードを作成してみる その1(LINE Notify)
はじめに 以前の記事にて、ハッカソンで使っていたNode-RED関連の情報について紹介しました。その後もNode-REDで作成したフローをマイコンに書き込める、Node-RED MCUを…
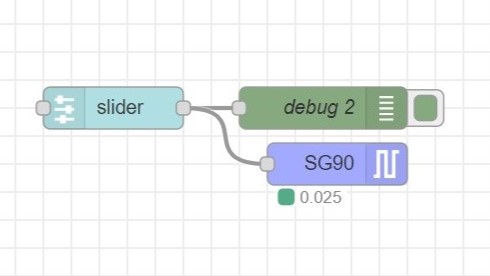
Node-RED MCU用のノードを作成してみる その2(Servoノード)
はじめに 以前Node-RED MCU用のServoノードの作成について、Qiitaに記事を投稿しました。その時点ではPWM outノードと一緒に使う前提で、msg.payloadの加工程度のことし…
▼Node-REDとNode-RED MCUの簡単な紹介はこちら
書籍紹介:『はじめてのNode-RED』/『はじめてのNode-RED MCU Edition』
Node-REDとは 一言でいうと、Node-REDはプログラミングが簡単にできるツールです。ビジュアルプログラミングの一種で、視覚的にわかりやすくなっています。 ▼百聞は一見…

functionノードでの動作確認
Node-RED MCUメンバーの方々が、funcitonノードでのSerialクラスの検証をされていました。その記事がありますので、詳細はそちらをご覧ください。
私も記事を参考にプログラムを書き込んだところ、動作していました。
▼こちらの記事です。
https://qiita.com/NWLab/items/5360eff7b8e2685e925a
https://qiita.com/mshioji/items/a750a5d713ab4d54c4cf
Moddable SDKのドキュメントにも、Serialクラスのサンプルプログラムがあります。
▼コールバックやプロパティについてはこちらをご覧ください。
https://github.com/Moddable-OpenSource/moddable/blob/public/documentation/io/io.md#serial
コールバックの中にonReadable()があります。シリアル通信で受信したときの処理を、このonReadable()に記述します。
ノードを作成する
ファイル構成
主なファイルは以下の5つです。
- package.json:Node-REDで読み込むファイルの指定
- manifest.json:Node-RED MCUで読み込むファイルの指定
- node/mcu_serial.js:Node-REDでの機能の設定
- node/mcu_serial.html:Node-REDでの表示の設定
- node/serial.js:マイコンに書き込むプログラムの設定
▼図示するとこんな感じです。
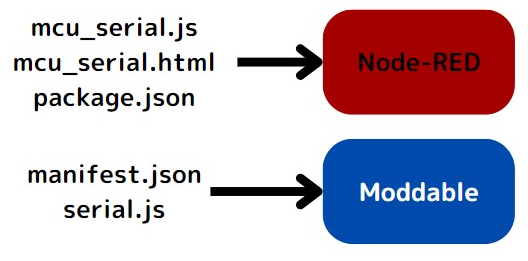
ちなみに、mcu_serial.jsにserial.jsの内容を記述すると、Node-RED側でエラーが出てビルドできません。Moddable SDKのクラスが含まれているからです。これを回避するために、ファイルを分けています。
また、このファイル構成は、node-red-mcuリポジトリのi2cノードの構成を参考にしています。i2cノードにはinとoutの二種類が用意されており、今回のSerialノードもinとoutを用意します。
▼i2cノードはこちら
https://github.com/phoddie/node-red-mcu/tree/main/nodes/mcu/i2c
pwmノードが分かりやすいのですが、クラスの宣言が重複しないようにcacheに値をセットするようになっています。Serialノードを作成するときも同じ仕組みを適用していたのですが、Serial inとSerial outでファイルを分けているとcacheが共有されていないようでした。Serialクラスはすでに宣言されているというエラーが出ていました。
i2cノードに倣って、1つのファイルにまとめると解決しました。
▼pwmノードはこちら
https://github.com/phoddie/node-red-mcu/blob/main/nodes/mcu/pwm/pwm.js
moddable_manifestについて
これまではnode_types.jsonにmanifest.jsonを追加する必要がありました。ユーザーにとって使いにくいのが懸念されていたのですが、htmlファイルにmoddable_manifestを加えることで回避する仕組みがあるようです。
▼Xでコメントを頂きました。
▼こちらで議論されていたようです。
https://github.com/phoddie/node-red-mcu/discussions/106#discussioncomment-5434299
そのことを踏まえて、プログラムにmoddable_manifestを追加しています。他の部分は、ピン番号やポート、ボーレートなどの数値を入力するようになっています。
▼プログラムはこちら
<script type="text/javascript">
    RED.nodes.registerType('mcu_serial_in',{
        category: 'MCU',
        color: '#a2aaff',
        defaults: {
            name: {value:""},
            tx: {value:"", required: true},
            rx: {value:"", required: true},
            baud: {value: "115200"},
            port: {value: "", required: true},
            moddable_manifest: {
                value: {
                    include: [
                        {
                            "git": "https://github.com/404background/node-red-contrib-mcu-serial.git"
                        }
                    ]
                }
            }
        },
        inputs: 0,
        outputs: 1,
        icon: "serial.svg",
		align: "left",
        paletteLabel: 'Serial in',
        label: function() {
            return this.name||"serial in"
        }
    })
</script>

<script type="text/javascript">
    RED.nodes.registerType('mcu_serial_out',{
        category: 'MCU',
        color: '#a2aaff',
        defaults: {
            name: {value:""},
            tx: {value:"", required: true},
            rx: {value:"", required: true},
            baud: {value: "115200"},
            port: {value: "", required: true},
            moddable_manifest: {
                value: {
                    include: [
                        {
                            "git": "https://github.com/404background/node-red-contrib-mcu-serial.git"
                        }
                    ]
                }
            }
        },
        inputs: 1,
        outputs: 0,
        icon: "serial.svg",
		align: "right",
        paletteLabel: 'Serial out',
        label: function() {
            return this.name||"serial_out"
        }
    })
</script>


<script type="text/html" data-template-name="mcu_serial_in">
    <div class="form-row">
        <label for="node-input-name"><i class="fa fa-tag"></i> Name</label>
        <input type="text" id="node-input-name" placeholder="Name"><br>
        <label for="node-input-tx"><i class="fa fa-tag"></i> TX</label>
		<input type="number" id="node-input-tx" style="width:60px"><br>
        <label for="node-input-rx"><i class="fa fa-tag"></i> RX</label>
		<input type="number" id="node-input-rx" style="width:60px"><br>
        <label for="node-input-port"><i class="fa fa-tag"></i> Port</label>
		<input type="number" id="node-input-port" style="width:60px"><br>
        <label for="node-input-baud"><i class="fa fa-tag"></i> Baud</label>
		<input type="number" id="node-input-baud" style="width:100px"><br>
    </div>
</script>

<script type="text/html" data-template-name="mcu_serial_out">
    <div class="form-row">
        <label for="node-input-name"><i class="fa fa-tag"></i> Name</label>
        <input type="text" id="node-input-name" placeholder="Name"><br>
        <label for="node-input-tx"><i class="fa fa-tag"></i> TX</label>
		<input type="number" id="node-input-tx" style="width:60px"><br>
        <label for="node-input-rx"><i class="fa fa-tag"></i> RX</label>
		<input type="number" id="node-input-rx" style="width:60px"><br>
        <label for="node-input-port"><i class="fa fa-tag"></i> Port</label>
		<input type="number" id="node-input-port" style="width:60px"><br>
        <label for="node-input-baud"><i class="fa fa-tag"></i> Baud</label>
		<input type="number" id="node-input-baud" style="width:100px"><br>
    </div>
</script>
serial.jsについて
issueにて報告を頂きまして、複数のノードを配置した場合にも対応できるよう修正しました。Serial_inクラス、Serial_outクラスでSerialクラスのaddを呼び出しています。
また、ハイライトしている10行目の部分で、Serialクラスを呼び出しています。
▼プログラムはこちら
import {Node} from "nodered"
let cache

class Serial {
	static add(config, reader) {
		const cachePort = 'mcu_serial' + Number(config.port);
		cache ??= new Map;
		let serial = cache.get(cachePort);
		if (!serial) {
			serial = new device.io.Serial({
				baud: Number(config.baud),
				port: Number(config.port),
				receive: Number(config.rx),
				transmit: Number(config.tx),
				onReadable() {
					let msg = String.fromArrayBuffer(this.read());
					msg = msg.trimEnd()
					this.readers.forEach(reader => {
						reader.send({payload: msg})
					});
				}
			})
			cache.set(cachePort, serial)
			serial.readers = [];
		}
		if (reader)
			serial.readers.push(reader);
		return serial;
	}
}

class Serial_in extends Node {
	onStart(config) {
		super.onStart(config)

		try {
			Serial.add(config, this);
		}
		catch {
			this.status({fill: "red", shape: "dot", text: "node-red:common.status.error"})
		}
	}

	static type = "mcu_serial_in"
	static {
		RED.nodes.registerType(this.type, this)
	}
}


class Serial_out extends Node {
	#serial

	onStart(config) {
		super.onStart(config)

		try {
			this.#serial = Serial.add(config);
		}
		catch {
			this.status({fill: "red", shape: "dot", text: "node-red:common.status.error"})
		}
	}

	onMessage(msg, done) {
		if (msg.payload != null){
			this.#serial.write(ArrayBuffer.fromString(msg.payload + "\n"))
		}
		this.send(msg)
		done()
	}

	static type = "mcu_serial_out"
	static {
		RED.nodes.registerType(this.type, this)
	}
}
その他のファイル
他のファイルはシンプルな内容になっています。
▼mcu_serial.jsはこちら。ノードを作成しています。
module.exports = function(RED) {
    function Serial_in(config) {
        RED.nodes.createNode(this, config)
		console.log(config)
    }
    RED.nodes.registerType("mcu_serial_in", Serial_in)

    function Serial_out(config) {
        RED.nodes.createNode(this, config)
		console.log(config)
    }
    RED.nodes.registerType("mcu_serial_out", Serial_out)
}
▼manifest.jsonはこちら。serial.jsの位置を指定しています。
{
	"modules": {
		"mcu_serial": "./node/serial"
	},
	"preload": "mcu_serial"
}
ローカル環境にインストールする
Node-REDのpackage.jsonがあるディレクトリで、以下のコマンドを実行すると、作成したノードをインストールすることができます。
npm install フォルダのパス
▼categoryはMCUにしているので、Node-RED MCU pluginのノードに並んで追加されます。

▼実際に並べるとこんな感じ。
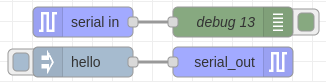
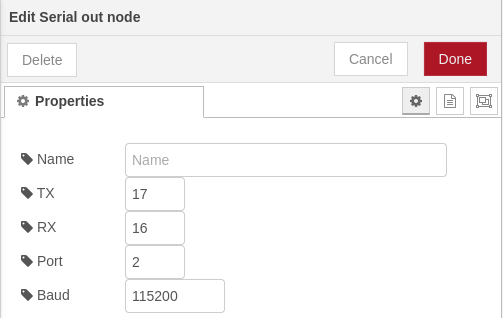
▼ノードの編集画面では、ピン番号やポート、ボーレートを入力できるようになっています。
動作確認
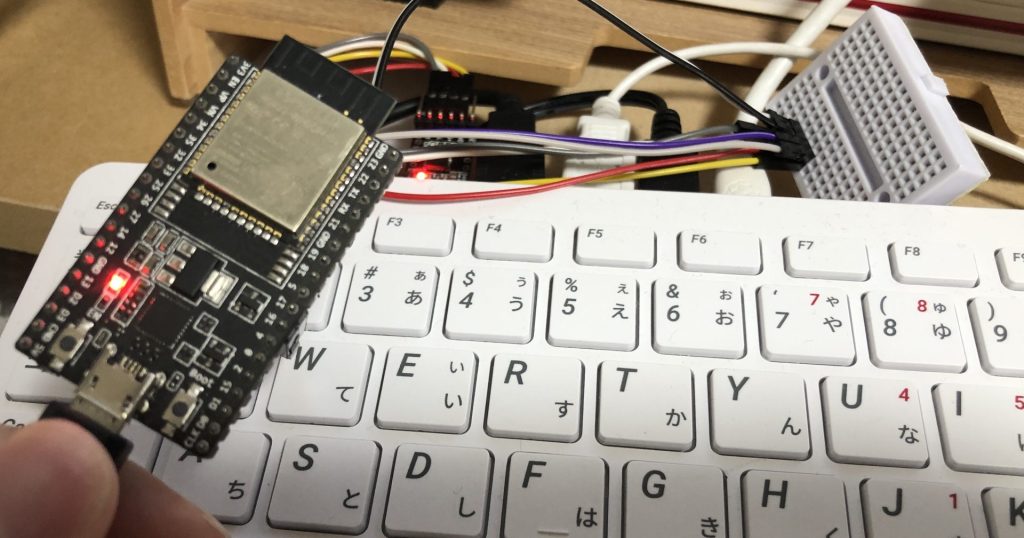
Raspberry Pi 400のUSB端子にUART変換器を挿し、マイコンのピンと接続しました。
▼UART変換器はこちらと同じタイプです。
マイコンのピン指定は以下の通りです。
- Port2
- TX:17
- RX:16
- Port1
- TX:32
- RX:33
▼Moddable TwoとESP32の開発ボードで検証しました。

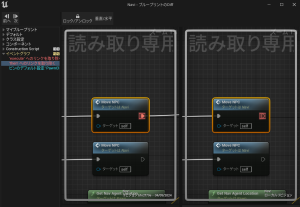
Raspberry Pi 400のNode-REDでSerial inノードとSerial outノードを配置し、通信してみました。
▼ちゃんと通信できているようです。
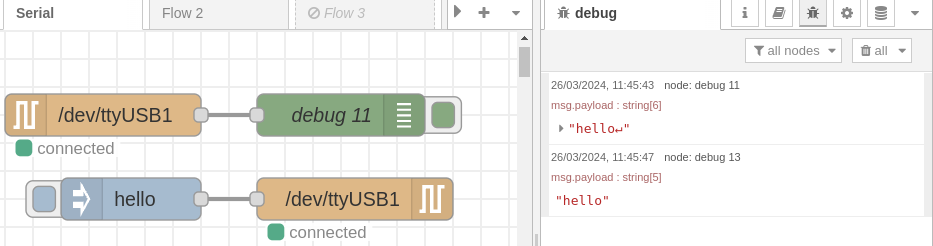
▼複数のノード、ポートでも試してみたところ、ちゃんと動作していました。
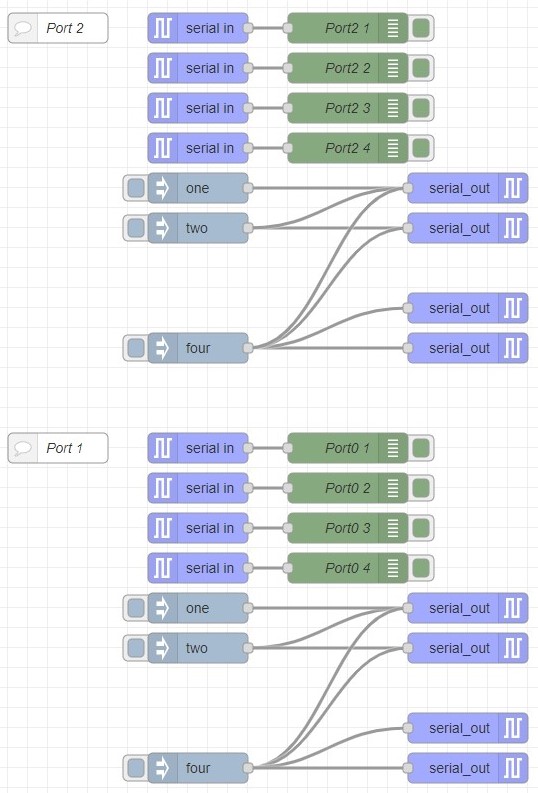
▼サンプルフローはこちら
[{"id":"c89a7915711bfdeb","type":"mcu_serial_in","z":"2eb8ae4cb799d590","name":"","tx":"17","rx":"16","baud":"115200","port":"2","_mcu":{"mcu":true},"x":290,"y":280,"wires":[["8b1fa7b8a67af26b"]]},{"id":"339b61347fce7654","type":"mcu_serial_out","z":"2eb8ae4cb799d590","name":"","tx":"17","rx":"16","baud":"115200","port":"2","_mcu":{"mcu":true},"x":560,"y":320,"wires":[]},{"id":"c2ecbb9ad97eb951","type":"mcu_serial_in","z":"2eb8ae4cb799d590","name":"","tx":"17","rx":"16","baud":"115200","port":"2","_mcu":{"mcu":true},"x":290,"y":240,"wires":[["3e015ac89dd2d7c7"]]},{"id":"2a8a61ef546a55a5","type":"mcu_serial_out","z":"2eb8ae4cb799d590","name":"","tx":"17","rx":"16","baud":"115200","port":"2","_mcu":{"mcu":true},"x":560,"y":360,"wires":[]},{"id":"29b69e6ea1d47b25","type":"mcu_serial_out","z":"2eb8ae4cb799d590","name":"","tx":"17","rx":"16","baud":"115200","port":"2","_mcu":{"mcu":true},"x":560,"y":440,"wires":[]},{"id":"ac9bc3d9e001354c","type":"mcu_serial_out","z":"2eb8ae4cb799d590","name":"","tx":"17","rx":"16","baud":"115200","port":"2","_mcu":{"mcu":true},"x":560,"y":480,"wires":[]},{"id":"876dad9e9d96429e","type":"mcu_serial_in","z":"2eb8ae4cb799d590","name":"","tx":"17","rx":"16","baud":"115200","port":"2","_mcu":{"mcu":true},"x":290,"y":200,"wires":[["b9bd6be923e97f86"]]},{"id":"acea8e5c05d25374","type":"mcu_serial_in","z":"2eb8ae4cb799d590","name":"","tx":"17","rx":"16","baud":"115200","port":"2","_mcu":{"mcu":true},"x":290,"y":160,"wires":[["9277468d9337d91c"]]},{"id":"d2c338a2a7c651a7","type":"mcu_serial_out","z":"2eb8ae4cb799d590","name":"","tx":"32","rx":"33","baud":"115200","port":"1","_mcu":{"mcu":true},"x":560,"y":740,"wires":[]},{"id":"4ac79b2549d24954","type":"mcu_serial_in","z":"2eb8ae4cb799d590","name":"","tx":"32","rx":"33","baud":"115200","port":"1","_mcu":{"mcu":true},"x":290,"y":580,"wires":[["d29834a11cc8e2ad"]]},{"id":"e21beb58cbcd545f","type":"mcu_serial_out","z":"2eb8ae4cb799d590","name":"","tx":"32","rx":"33","baud":"115200","port":"1","_mcu":{"mcu":true},"x":560,"y":780,"wires":[]},{"id":"371bcdb0d5ebb8f0","type":"mcu_serial_out","z":"2eb8ae4cb799d590","name":"","tx":"32","rx":"33","baud":"115200","port":"1","_mcu":{"mcu":true},"x":560,"y":860,"wires":[]},{"id":"e4eb27aab5762f9f","type":"mcu_serial_out","z":"2eb8ae4cb799d590","name":"","tx":"32","rx":"33","baud":"115200","port":"1","_mcu":{"mcu":true},"x":560,"y":900,"wires":[]},{"id":"305d1470cfcd1b67","type":"comment","z":"2eb8ae4cb799d590","name":"Port 1","info":"","_mcu":{"mcu":true},"x":150,"y":580,"wires":[]},{"id":"6f42bcd6ce0555eb","type":"comment","z":"2eb8ae4cb799d590","name":"Port 2","info":"","_mcu":{"mcu":true},"x":150,"y":160,"wires":[]},{"id":"3d6157a653b67692","type":"inject","z":"2eb8ae4cb799d590","name":"","props":[{"p":"payload"},{"p":"topic","vt":"str"}],"repeat":"","crontab":"","once":false,"onceDelay":0.1,"topic":"","payload":"one","payloadType":"str","_mcu":{"mcu":true},"x":290,"y":320,"wires":[["339b61347fce7654"]]},{"id":"177c2c3449b7cf91","type":"inject","z":"2eb8ae4cb799d590","name":"","props":[{"p":"payload"},{"p":"topic","vt":"str"}],"repeat":"","crontab":"","once":false,"onceDelay":0.1,"topic":"","payload":"two","payloadType":"str","_mcu":{"mcu":true},"x":290,"y":360,"wires":[["2a8a61ef546a55a5","339b61347fce7654"]]},{"id":"65ae2dc4ee97c76a","type":"inject","z":"2eb8ae4cb799d590","name":"","props":[{"p":"payload"},{"p":"topic","vt":"str"}],"repeat":"","crontab":"","once":false,"onceDelay":0.1,"topic":"","payload":"four","payloadType":"str","_mcu":{"mcu":true},"x":290,"y":480,"wires":[["ac9bc3d9e001354c","29b69e6ea1d47b25","2a8a61ef546a55a5","339b61347fce7654"]]},{"id":"c5f1494b658b3189","type":"inject","z":"2eb8ae4cb799d590","name":"","props":[{"p":"payload"},{"p":"topic","vt":"str"}],"repeat":"","crontab":"","once":false,"onceDelay":0.1,"topic":"","payload":"two","payloadType":"str","_mcu":{"mcu":true},"x":290,"y":780,"wires":[["d2c338a2a7c651a7","e21beb58cbcd545f"]]},{"id":"d9f4cd3b754be5c0","type":"inject","z":"2eb8ae4cb799d590","name":"","props":[{"p":"payload"},{"p":"topic","vt":"str"}],"repeat":"","crontab":"","once":false,"onceDelay":0.1,"topic":"","payload":"one","payloadType":"str","_mcu":{"mcu":true},"x":290,"y":740,"wires":[["d2c338a2a7c651a7"]]},{"id":"ea5592c8964b4472","type":"inject","z":"2eb8ae4cb799d590","name":"","props":[{"p":"payload"},{"p":"topic","vt":"str"}],"repeat":"","crontab":"","once":false,"onceDelay":0.1,"topic":"","payload":"four","payloadType":"str","_mcu":{"mcu":true},"x":290,"y":900,"wires":[["d2c338a2a7c651a7","e21beb58cbcd545f","371bcdb0d5ebb8f0","e4eb27aab5762f9f"]]},{"id":"8b1fa7b8a67af26b","type":"debug","z":"2eb8ae4cb799d590","name":"Port2 4","active":true,"tosidebar":true,"console":false,"tostatus":false,"complete":"payload","targetType":"msg","statusVal":"","statusType":"auto","_mcu":{"mcu":true},"x":440,"y":280,"wires":[]},{"id":"3e015ac89dd2d7c7","type":"debug","z":"2eb8ae4cb799d590","name":"Port2 3","active":true,"tosidebar":true,"console":false,"tostatus":false,"complete":"payload","targetType":"msg","statusVal":"","statusType":"auto","_mcu":{"mcu":true},"x":440,"y":240,"wires":[]},{"id":"b9bd6be923e97f86","type":"debug","z":"2eb8ae4cb799d590","name":"Port2 2","active":true,"tosidebar":true,"console":false,"tostatus":false,"complete":"payload","targetType":"msg","statusVal":"","statusType":"auto","_mcu":{"mcu":true},"x":440,"y":200,"wires":[]},{"id":"9277468d9337d91c","type":"debug","z":"2eb8ae4cb799d590","name":"Port2 1","active":true,"tosidebar":true,"console":false,"tostatus":false,"complete":"payload","targetType":"msg","statusVal":"","statusType":"auto","_mcu":{"mcu":true},"x":440,"y":160,"wires":[]},{"id":"3c1959db7312756a","type":"debug","z":"2eb8ae4cb799d590","name":"Port0 4","active":true,"tosidebar":true,"console":false,"tostatus":false,"complete":"payload","targetType":"msg","statusVal":"","statusType":"auto","_mcu":{"mcu":true},"x":440,"y":700,"wires":[]},{"id":"b417cd6de3aa689b","type":"debug","z":"2eb8ae4cb799d590","name":"Port0 3","active":true,"tosidebar":true,"console":false,"tostatus":false,"complete":"payload","targetType":"msg","statusVal":"","statusType":"auto","_mcu":{"mcu":true},"x":440,"y":660,"wires":[]},{"id":"4fa1b84c726a7d14","type":"debug","z":"2eb8ae4cb799d590","name":"Port0 2","active":true,"tosidebar":true,"console":false,"tostatus":false,"complete":"payload","targetType":"msg","statusVal":"","statusType":"auto","_mcu":{"mcu":true},"x":440,"y":620,"wires":[]},{"id":"d29834a11cc8e2ad","type":"debug","z":"2eb8ae4cb799d590","name":"Port0 1","active":true,"tosidebar":true,"console":false,"tostatus":false,"complete":"payload","targetType":"msg","statusVal":"","statusType":"auto","_mcu":{"mcu":true},"x":440,"y":580,"wires":[]},{"id":"d6bd987f16963f4e","type":"mcu_serial_in","z":"2eb8ae4cb799d590","name":"","tx":"32","rx":"33","baud":"115200","port":"1","_mcu":{"mcu":true},"x":290,"y":620,"wires":[["4fa1b84c726a7d14"]]},{"id":"5e44451b2d96f012","type":"mcu_serial_in","z":"2eb8ae4cb799d590","name":"","tx":"32","rx":"33","baud":"115200","port":"1","_mcu":{"mcu":true},"x":290,"y":660,"wires":[["b417cd6de3aa689b"]]},{"id":"1041e276a55d5f3d","type":"mcu_serial_in","z":"2eb8ae4cb799d590","name":"","tx":"32","rx":"33","baud":"115200","port":"1","_mcu":{"mcu":true},"x":290,"y":700,"wires":[["3c1959db7312756a"]]}]▼動作はこんな感じです。
最後に
今回作成したSerialノードは、外部ノードでModdable SDKの機能を使うことを目的に試してみました。動作を確認できたので、同じ仕組みで他の機能を持ったノードも作成できるかもしれません。
このSerialノードは、現在対応中の機能を追加すると複雑になりそうだなと思っています。この記事に書いた内容の方がシンプルなので、もしノードを作成したいという方がいらっしゃったら参考にしていただけたらと思います。
なかなか珍しい取り組みだとは思いますが...
趣味的ロボット研究所をもっと見る
購読すると最新の投稿がメールで送信されます。