Pythonでテキストを翻訳する(Googletrans、Node-RED)
はじめに
今回はPythonでGoogletransを利用した翻訳を試してみました。
書いてはいないのですが、これまで翻訳するのにdeep-translatorも使ったことがあります。他にも簡単に使えるものが無いか探していたときに、Googletransを見つけました。
Node-REDのpython-venvノードでも簡単に利用できるフローを作成しました。
▼以前の記事はこちら
関連情報
▼PyPIのページはこちら
https://pypi.org/project/googletrans
『Googletrans is a free and unlimited python library』と書かれていました。非公式のパッケージなので、Google側が仕様を変更すると使えなくなる可能性があるようです。
Auto language detection機能も使えるようです。Google Translate Ajax APIを利用しているため、オフライン環境だと実行できないということがありました。
▼APIのドキュメントはこちら
https://py-googletrans.readthedocs.io/en/latest
▼translate.google.comのページはこちら
https://translate.google.com/?sl=auto&tl=ja&op=translate
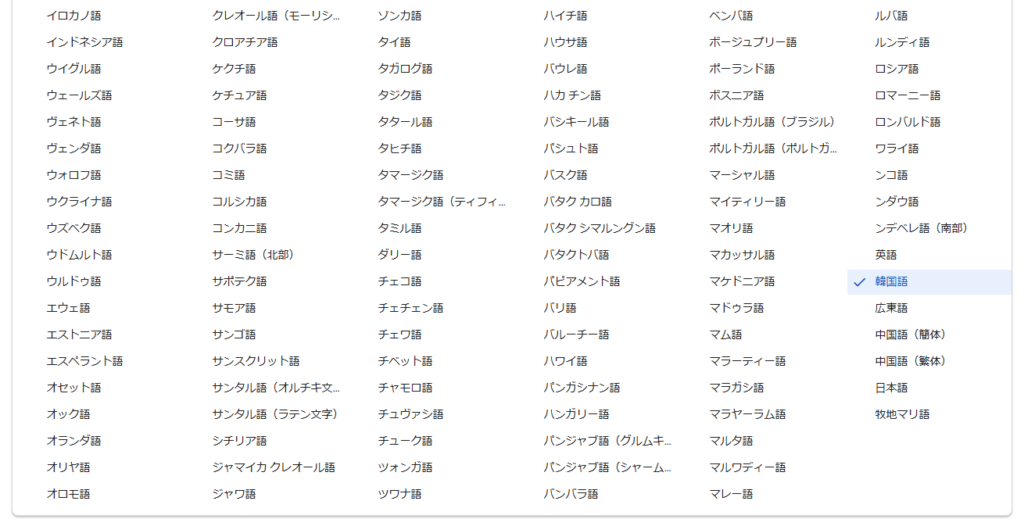
▼translate.google.comのページで翻訳できる言語として表示されたものの一部。知らない言語が大量にありました。
Pythonで実行する
環境を構築する
実行環境はWindows 11のノートPC、Pythonのバージョンは3.12.6です。
まずはPythonの仮想環境を作成して、パッケージをインストールします。以下のコマンドを実行しました。
python -m venv pyenv
cd pyenv
.\Scripts\activate
pip install googletrans
▼Pythonの仮想環境について、詳しくは以下の記事をご覧ください。
サンプルプログラムを実行する
PyPIのページのサンプルプログラムを試してみました。対話モードで実行するようなコードだったので、.pyファイルとして作成しました。
# https://pypi.org/project/googletrans/

import asyncio
from googletrans import Translator

async def translate_text():
    async with Translator() as translator:
        result = await translator.translate('안녕하세요.')
        print(result)  # <Translated src=ko dest=en text=Good evening. pronunciation=Good evening.>

        result = await translator.translate('안녕하세요.', dest='ja')
        print(result)  # <Translated src=ko dest=ja text=こんにちは。 pronunciation=Kon'nichiwa.>

        result = await translator.translate('veritas lux mea', src='la')
        print(result)  # <Translated src=la dest=en text=The truth is my light pronunciation=The truth is my light>

asyncio.run(translate_text())
▼ハングル文字が英語と日本語に翻訳されたり、ラテン語が英語に翻訳されたりしています。

言語の検出も試してみました。以下のコードも.pyファイルとして実行できるようにしています。
import asyncio
from googletrans import Translator

async def detect_languages():
    async with Translator() as translator:
        result = await translator.detect('이 문장은 한글로 쓰여졌습니다.')
        print(result)  # <Detected lang=ko confidence=0.27041003>

        result = await translator.detect('この文章は日本語で書かれました。')
        print(result)  # <Detected lang=ja confidence=0.64889508>

        result = await translator.detect('This sentence is written in English.')
        print(result)  # <Detected lang=en confidence=0.22348526>

        result = await translator.detect('Tiu frazo estas skribita en Esperanto.')
        print(result)  # <Detected lang=eo confidence=0.10538048>

asyncio.run(detect_languages())
▼以下のように検出されていました。

コマンドでも実行できると書かれていたのですが、エラーが起きていました。
▼googletransからtranslateをインポートしようとしてエラーが起きているようです。

▼gTTSの場合は実行ファイルが仮想環境に追加されて、コマンドで実行できるようになっていました。
仮想環境のScriptsフォルダにtranslate.exeがあったので、7-zipで開いてみました。
▼.exeファイルが.pyファイルとして表示されています。

▼確かにTranslatorではなくtranslateとしてインポートされていました。修正する必要があるのかもしれません。

▼GitHubのリポジトリがあったので、時間があるときに見てみようかなと思います。
https://github.com/ssut/py-googletrans
Node-REDで利用する
injectノードで実行する
私が開発したpython-venvノードを利用して、PythonのコードをNode-REDで実行してみました。
▼年末に開発の変遷を書きました。
https://qiita.com/background/items/d2e05e8d85427761a609
▼まずはPythonを実行するためのフローを作成しました。

[{"id":"b141a64b0f8a1a08","type":"inject","z":"22eb2b8f4786695c","name":"","props":[],"repeat":"","crontab":"","once":false,"onceDelay":0.1,"topic":"","x":1570,"y":1100,"wires":[["f9913854e887bb20"]]},{"id":"adf376b9ee2b5f4a","type":"debug","z":"22eb2b8f4786695c","name":"debug 356","active":true,"tosidebar":true,"console":false,"tostatus":false,"complete":"false","statusVal":"","statusType":"auto","x":1870,"y":1100,"wires":[]},{"id":"f9913854e887bb20","type":"venv","z":"22eb2b8f4786695c","venvconfig":"015784e9e3e0310a","name":"","code":"import asyncio\nfrom googletrans import Translator\n\nasync def translate_text():\n async with Translator() as translator:\n result = await translator.translate('Hello, World!', src='en', dest='ja')\n print(result)\n\nasyncio.run(translate_text())","continuous":false,"x":1710,"y":1100,"wires":[["adf376b9ee2b5f4a"]]},{"id":"e82d77a5fe1489c1","type":"pip","z":"22eb2b8f4786695c","venvconfig":"015784e9e3e0310a","name":"","arg":"googletrans","action":"install","tail":false,"x":1710,"y":1040,"wires":[["9867b2268a7e2118"]]},{"id":"54b670cc83b78668","type":"inject","z":"22eb2b8f4786695c","name":"","props":[],"repeat":"","crontab":"","once":false,"onceDelay":0.1,"topic":"","x":1570,"y":1040,"wires":[["e82d77a5fe1489c1"]]},{"id":"9867b2268a7e2118","type":"debug","z":"22eb2b8f4786695c","name":"debug 357","active":true,"tosidebar":true,"console":false,"tostatus":false,"complete":"false","statusVal":"","statusType":"auto","x":1870,"y":1040,"wires":[]},{"id":"015784e9e3e0310a","type":"venv-config","venvname":"AI","version":"3.10"}]▼サンプルプログラムをもとに、翻訳するテキストと言語を渡しています。

▼結果が表示されました!

textだけ取得したかったので、以下のようにコードを変更しました。result.textを取得しています。
import asyncio
from googletrans import Translator

async def translate_text():
    async with Translator() as translator:
        result = await translator.translate('Hello, World!', src='en', dest='ja')
        print(result.text)

asyncio.run(translate_text())
▼textだけ取得できました!

http requestノードと組み合わせてみる
せっかくNode-REDで利用できるなら他のノードと組み合わせようということで、http requestノードと組み合わせてみました。
Getリクエストで取得したHTMLファイルから要素を取り出して、Googletransで翻訳します。今回はhttps://example.comを対象にしました。
▼まずは以下のフローでHTML形式のデータを取り出しました。

[{"id":"3cc6ec3f1ffb3148","type":"html","z":"22eb2b8f4786695c","name":"","property":"payload","outproperty":"payload","tag":"h1, p","ret":"html","as":"single","chr":"_","x":1490,"y":1220,"wires":[["24a8f14fbdf801d1"]]},{"id":"9077cd796bd1f229","type":"http request","z":"22eb2b8f4786695c","name":"","method":"GET","ret":"txt","paytoqs":"ignore","url":"https://example.com","tls":"","persist":false,"proxy":"","insecureHTTPParser":false,"authType":"","senderr":false,"headers":[],"x":1330,"y":1220,"wires":[["3cc6ec3f1ffb3148","28fcbc78d7599a7a"]]},{"id":"01dd2c5e87e46b56","type":"inject","z":"22eb2b8f4786695c","name":"","props":[],"repeat":"","crontab":"","once":false,"onceDelay":0.1,"topic":"","x":1170,"y":1220,"wires":[["9077cd796bd1f229"]]},{"id":"24a8f14fbdf801d1","type":"debug","z":"22eb2b8f4786695c","name":"debug 359","active":true,"tosidebar":true,"console":false,"tostatus":false,"complete":"false","statusVal":"","statusType":"auto","x":1650,"y":1220,"wires":[]},{"id":"28fcbc78d7599a7a","type":"debug","z":"22eb2b8f4786695c","name":"debug 360","active":true,"tosidebar":true,"console":false,"tostatus":false,"complete":"false","statusVal":"","statusType":"auto","x":1510,"y":1180,"wires":[]}]▼htmlノードではh1、pの要素を取得しています。

▼以下のように表示されました。

▼htmlノードの出力は配列に入っていることが分かります。

splitノードで配列を分割してから、Pythonで処理するようにしてみました。
▼全体のフローはこちら

[{"id":"3cc6ec3f1ffb3148","type":"html","z":"22eb2b8f4786695c","name":"","property":"payload","outproperty":"payload","tag":"h1, p","ret":"html","as":"single","chr":"_","x":1490,"y":1220,"wires":[["24a8f14fbdf801d1","501dd26ec56cfc97"]]},{"id":"9077cd796bd1f229","type":"http request","z":"22eb2b8f4786695c","name":"","method":"GET","ret":"txt","paytoqs":"ignore","url":"https://example.com","tls":"","persist":false,"proxy":"","insecureHTTPParser":false,"authType":"","senderr":false,"headers":[],"x":1330,"y":1220,"wires":[["3cc6ec3f1ffb3148","28fcbc78d7599a7a"]]},{"id":"01dd2c5e87e46b56","type":"inject","z":"22eb2b8f4786695c","name":"","props":[],"repeat":"","crontab":"","once":false,"onceDelay":0.1,"topic":"","x":1170,"y":1220,"wires":[["9077cd796bd1f229"]]},{"id":"24a8f14fbdf801d1","type":"debug","z":"22eb2b8f4786695c","name":"debug 359","active":true,"tosidebar":true,"console":false,"tostatus":false,"complete":"false","statusVal":"","statusType":"auto","x":1650,"y":1220,"wires":[]},{"id":"28fcbc78d7599a7a","type":"debug","z":"22eb2b8f4786695c","name":"debug 360","active":true,"tosidebar":true,"console":false,"tostatus":false,"complete":"false","statusVal":"","statusType":"auto","x":1510,"y":1180,"wires":[]},{"id":"501dd26ec56cfc97","type":"split","z":"22eb2b8f4786695c","name":"","splt":"\\n","spltType":"str","arraySplt":1,"arraySpltType":"len","stream":false,"addname":"","property":"payload","x":1310,"y":1300,"wires":[["d6e7b34557df2849"]]},{"id":"eb43099b8c989866","type":"debug","z":"22eb2b8f4786695c","name":"debug 361","active":true,"tosidebar":true,"console":false,"tostatus":false,"complete":"false","statusVal":"","statusType":"auto","x":1610,"y":1300,"wires":[]},{"id":"d6e7b34557df2849","type":"venv","z":"22eb2b8f4786695c","venvconfig":"015784e9e3e0310a","name":"","code":"import asyncio\nfrom googletrans import Translator\n\nasync def translate_text():\n async with Translator() as translator:\n result = await translator.translate(msg['payload'], src='en', dest='ja')\n print(result.text)\n\nasyncio.run(translate_text())","continuous":false,"x":1450,"y":1300,"wires":[["eb43099b8c989866"]]},{"id":"015784e9e3e0310a","type":"venv-config","venvname":"AI","version":"3.10"}]コードは翻訳するテキストだけ変更して、msg.paylodの値を受け取るようにしました。
import asyncio
from googletrans import Translator

async def translate_text():
    async with Translator() as translator:
        result = await translator.translate(msg['payload'], src='en', dest='ja')
        print(result.text)

asyncio.run(translate_text())
▼実行すると、配列の要素がそれぞれ翻訳されました!

最後に
ノードとして実行していると、入力と出力が分かりやすくていいですね。テキストを入力すると、翻訳結果が出力されるようになっています。
言語の設定もNode-REDからの入力を受け付けることができます。ノードをコピー&ペーストして、簡単に使いまわすことができそうです。

