Control Microcontrollers with Voice (Node-RED, Gemma2, Faster Whisper, XIAO ESP32C3)
Introduction
In this article, I tried to control a small robot using a microcontroller by voice. This is a summary of what I have tried before.
To operate the robot by voice, I recorded the voice, extracted the text, judged the situation from the text, and sent out operation commands. I made all the process calls in Node-RED.
I have not used Chat GPT much, but I had a lot of help in creating this program. I used Python, JavaScript, and C++, so it was a lot of work…
Note that this time I am running it on a Windows 10 laptop. All AI tools are run locally.
Creating Flows in Node-RED
First, the overall process flow is shown in the Node-RED flow.
▼Here is the flow.
[{"id":"90e8f4d49463a350","type":"ollama-chat","z":"3bccaf6e46d3dbf5","name":"Chat","x":250,"y":760,"wires":[["e7ac6c0c24a72f71","bbfaf3102b39c3a4"]]},{"id":"e7ac6c0c24a72f71","type":"debug","z":"3bccaf6e46d3dbf5","name":"debug 63","active":false,"tosidebar":true,"console":false,"tostatus":false,"complete":"payload","targetType":"msg","statusVal":"","statusType":"auto","x":420,"y":760,"wires":[]},{"id":"bbfaf3102b39c3a4","type":"change","z":"3bccaf6e46d3dbf5","name":"","rules":[{"t":"set","p":"payload","pt":"msg","to":"payload.message.content","tot":"msg"}],"action":"","property":"","from":"","to":"","reg":false,"x":420,"y":760,"wires":[["0c528e893c93fbe9","e5c06a2515200630"]]},{"id":"0c528e893c93fbe9","type":"debug","z":"3bccaf6e46d3dbf5","name":"debug 64","active":true,"tosidebar":true,"console":false,"tostatus":false,"complete":"false","statusVal":"","statusType":"auto","x":600,"y":760,"wires":[]},{"id":"426d021a3762f146","type":"venv","z":"3bccaf6e46d3dbf5","venvconfig":"5bb32f2738f10b5a","name":"","code":"import pyaudio\nimport wave\n\ndef record_audio(filename=\"recorded_audio.wav\", duration=3):\n chunk = 1024 # Number of bytes per chunk\n sample_format = pyaudio.paInt16 # 16-bit audio\n channels = 1 # Mono\n rate = 44100 # Sampling rate\n\n p = pyaudio.PyAudio() # Initialize the interface\n\n # Open the stream and start recording immediately\n stream = p.open(format=sample_format,\n channels=channels,\n rate=rate,\n frames_per_buffer=chunk,\n input=True)\n\n frames = [] # List to store audio data\n\n # Record for the specified duration\n for _ in range(0, int(rate / chunk * duration)):\n data = stream.read(chunk)\n frames.append(data)\n\n # Stop and close the stream\n stream.stop_stream()\n stream.close()\n p.terminate()\n\n # Save the recorded data to a file\n with wave.open(filename, 'wb') as wf:\n wf.setnchannels(channels)\n wf.setsampwidth(p.get_sample_size(sample_format))\n wf.setframerate(rate)\n wf.writeframes(b''.join(frames))\n\n# Immediately start recording and save the audio\nrecord_audio()\n","continuous":false,"x":390,"y":420,"wires":[["9624e4572541a91c"]]},{"id":"7b4c42b178603253","type":"inject","z":"3bccaf6e46d3dbf5","name":"","props":[{"p":"payload"},{"p":"topic","vt":"str"}],"repeat":"","crontab":"","once":false,"onceDelay":0.1,"topic":"","payload":"","payloadType":"date","x":240,"y":420,"wires":[["426d021a3762f146"]]},{"id":"a8c32402f13f0724","type":"pip","z":"3bccaf6e46d3dbf5","venvconfig":"5bb32f2738f10b5a","name":"","arg":"pyaudio","action":"list","tail":false,"x":310,"y":220,"wires":[["bcd377496bd62266","bb753ef73b34bf57"]]},{"id":"1a4a24308399d4f9","type":"inject","z":"3bccaf6e46d3dbf5","name":"","props":[{"p":"payload"},{"p":"topic","vt":"str"}],"repeat":"","crontab":"","once":false,"onceDelay":0.1,"topic":"","payload":"","payloadType":"date","x":160,"y":220,"wires":[["a8c32402f13f0724"]]},{"id":"6db4c6573d2abe81","type":"debug","z":"3bccaf6e46d3dbf5","name":"debug 71","active":true,"tosidebar":true,"console":false,"tostatus":false,"complete":"false","statusVal":"","statusType":"auto","x":480,"y":260,"wires":[]},{"id":"9208f3a0304d90e5","type":"template","z":"3bccaf6e46d3dbf5","name":"","field":"payload","fieldType":"msg","format":"handlebars","syntax":"mustache","template":"{\n \"model\": \"gemma2:2b-instruct-fp16\",\n \"messages\": [\n {\n \"role\": \"user\",\n \"content\": \"{{payload}}\"\n }\n ]\n}","output":"json","x":600,"y":620,"wires":[["90e8f4d49463a350"]]},{"id":"04f7c3e871bf4209","type":"inject","z":"3bccaf6e46d3dbf5","name":"","props":[{"p":"payload"}],"repeat":"","crontab":"","once":false,"onceDelay":0.1,"topic":"","payload":"前に進め!","payloadType":"str","x":240,"y":580,"wires":[["fe5db020697da1bc"]]},{"id":"fe5db020697da1bc","type":"template","z":"3bccaf6e46d3dbf5","name":"","field":"payload","fieldType":"msg","format":"handlebars","syntax":"mustache","template":"あなたはロボットのオペレーターです。\n音声をテキストに変換して短い命令を送っているので、同音異義語が混じっている可能性があります。\n漢字ではなく、ひらがなで判断してください。\n\n前に進むという文脈の場合はGを返してください。\n後ろに進むという文脈の場合はBを返してください。\n停止するという文脈の場合はSを返してください。\n終了するという文脈の場合もSを返してください。\n右に回転するという文脈の場合はRを返してください。\n左に回転するという文脈の場合はLを返してください。\nそれ以外の文脈ではNを返してください。\n\n停止または終了の意味合いが含まれる場合は、Sだけ返すことを優先してください。\n命令:{{payload}}","output":"str","x":440,"y":620,"wires":[["9208f3a0304d90e5"]]},{"id":"4929b442771d9bd3","type":"mqtt out","z":"3bccaf6e46d3dbf5","name":"","topic":"servo/control","qos":"","retain":"","respTopic":"","contentType":"","userProps":"","correl":"","expiry":"","broker":"f414466379b9f58d","x":450,"y":860,"wires":[]},{"id":"1cc1a4d6f98f8b95","type":"inject","z":"3bccaf6e46d3dbf5","name":"","props":[{"p":"payload"}],"repeat":"","crontab":"","once":false,"onceDelay":0.1,"topic":"","payload":"G","payloadType":"str","x":270,"y":860,"wires":[["4929b442771d9bd3"]]},{"id":"842b15fa75b3cbee","type":"inject","z":"3bccaf6e46d3dbf5","name":"","props":[{"p":"payload"}],"repeat":"","crontab":"","once":false,"onceDelay":0.1,"topic":"","payload":"S","payloadType":"str","x":270,"y":900,"wires":[["4929b442771d9bd3"]]},{"id":"da214776fa4ba1f4","type":"inject","z":"3bccaf6e46d3dbf5","name":"","props":[{"p":"payload"}],"repeat":"","crontab":"","once":false,"onceDelay":0.1,"topic":"","payload":"後退せよ!","payloadType":"str","x":240,"y":620,"wires":[["fe5db020697da1bc"]]},{"id":"eab8b0caade795fe","type":"inject","z":"3bccaf6e46d3dbf5","name":"","props":[{"p":"payload"}],"repeat":"","crontab":"","once":false,"onceDelay":0.1,"topic":"","payload":"停止せよ","payloadType":"str","x":240,"y":660,"wires":[["fe5db020697da1bc"]]},{"id":"9624e4572541a91c","type":"venv","z":"3bccaf6e46d3dbf5","venvconfig":"5bb32f2738f10b5a","name":"","code":"from faster_whisper import WhisperModel\n\nmodel_size = \"tiny\"\n\n# Run on GPU with FP16\n# model = WhisperModel(model_size, device=\"cpu\", compute_type=\"float16\")\n# or run on GPU with INT8\n# model = WhisperModel(model_size, device=\"cuda\", compute_type=\"int8_float16\")\n\n# or run on CPU with INT8\nmodel = WhisperModel(model_size, device=\"cpu\", compute_type=\"int8\")\n\nsegments, info = model.transcribe(\"recorded_audio.wav\", beam_size=5, language=\"ja\")\n\n# print(\"Detected language '%s' with probability %f\" % (info.language, info.language_probability))\n\nfor segment in segments:\n # print(\"[%.2fs -> %.2fs] %s\" % (segment.start, segment.end, segment.text))\n path = \"faster-whisper.txt\"\n with open(path, mode='w', encoding='UTF-8') as f:\n f.write(segment.text)\n # print(segment.text)","continuous":false,"x":610,"y":420,"wires":[["8f6e80629720a2e3","cdc828a977a99f29"]]},{"id":"bcd377496bd62266","type":"pip","z":"3bccaf6e46d3dbf5","venvconfig":"5bb32f2738f10b5a","name":"","arg":"faster-whisper","action":"install","tail":false,"x":450,"y":220,"wires":[["6db4c6573d2abe81"]]},{"id":"bb753ef73b34bf57","type":"debug","z":"3bccaf6e46d3dbf5","name":"debug 80","active":true,"tosidebar":true,"console":false,"tostatus":false,"complete":"false","statusVal":"","statusType":"auto","x":300,"y":260,"wires":[]},{"id":"8f6e80629720a2e3","type":"debug","z":"3bccaf6e46d3dbf5","name":"debug 81","active":false,"tosidebar":true,"console":false,"tostatus":false,"complete":"false","statusVal":"","statusType":"auto","x":760,"y":420,"wires":[]},{"id":"cdc828a977a99f29","type":"file in","z":"3bccaf6e46d3dbf5","name":"","filename":"faster-whisper.txt","filenameType":"str","format":"utf8","chunk":false,"sendError":false,"encoding":"none","allProps":false,"x":430,"y":520,"wires":[["fe5db020697da1bc","df872dce2ebc6ac4"]]},{"id":"df872dce2ebc6ac4","type":"debug","z":"3bccaf6e46d3dbf5","name":"debug 82","active":true,"tosidebar":true,"console":false,"tostatus":false,"complete":"false","statusVal":"","statusType":"auto","x":640,"y":520,"wires":[]},{"id":"4058856e36873d5a","type":"inject","z":"3bccaf6e46d3dbf5","name":"","props":[{"p":"payload"},{"p":"topic","vt":"str"}],"repeat":"","crontab":"","once":false,"onceDelay":0.1,"topic":"","payload":"","payloadType":"date","x":240,"y":520,"wires":[["cdc828a977a99f29"]]},{"id":"6c096f85b7750d85","type":"debug","z":"3bccaf6e46d3dbf5","name":"debug 84","active":true,"tosidebar":true,"console":false,"tostatus":false,"complete":"false","statusVal":"","statusType":"auto","x":440,"y":820,"wires":[]},{"id":"e5c06a2515200630","type":"function","z":"3bccaf6e46d3dbf5","name":"function 1","func":"msg.payload = msg.payload.replace(/\\r?\\n/g,\"\")\nmsg.payload = msg.payload.replace(\" \",\"\")\n\nreturn msg;","outputs":1,"timeout":0,"noerr":0,"initialize":"","finalize":"","libs":[],"x":260,"y":820,"wires":[["4929b442771d9bd3","6c096f85b7750d85"]]},{"id":"a0a8aad03900ad58","type":"comment","z":"3bccaf6e46d3dbf5","name":"録音:pyaudio","info":"","x":420,"y":380,"wires":[]},{"id":"9f1eb0d7108010c6","type":"comment","z":"3bccaf6e46d3dbf5","name":"文字起こし:Faster Whisper","info":"","x":680,"y":380,"wires":[]},{"id":"b1b2e9e68627be1b","type":"comment","z":"3bccaf6e46d3dbf5","name":"命令文の作成","info":"","x":230,"y":480,"wires":[]},{"id":"372f8e309ea8f287","type":"comment","z":"3bccaf6e46d3dbf5","name":"動作命令の送信:Ollama","info":"","x":270,"y":720,"wires":[]},{"id":"56b7b27d48211a8c","type":"comment","z":"3bccaf6e46d3dbf5","name":"開始","info":"","x":210,"y":380,"wires":[]},{"id":"5bb32f2738f10b5a","type":"venv-config","venvname":"audio","version":"3.8"},{"id":"f414466379b9f58d","type":"mqtt-broker","name":"","broker":"localhost","port":"1883","clientid":"","autoConnect":true,"usetls":false,"protocolVersion":"4","keepalive":"60","cleansession":true,"autoUnsubscribe":true,"birthTopic":"","birthQos":"0","birthRetain":"false","birthPayload":"","birthMsg":{},"closeTopic":"","closeQos":"0","closeRetain":"false","closePayload":"","closeMsg":{},"willTopic":"","willQos":"0","willRetain":"false","willPayload":"","willMsg":{},"userProps":"","sessionExpiry":""}]
The blue venv nodes are from the python-venv node. It is a node I developed that allows you to create and run a Python virtual environment in Node-RED.
I found a bug while using it this time, I will fix it when I have time… (Already fixed)
▼For more information about python-venv, see here. It has been updated a lot and is much easier to use.
▼Multiple virtual environments can be created and selected. In this case, I created a virtual environment named audio for Python 3.8.

▼Installation of packages in the virtual environment can be done at the pip node.

I introduce each of these processes.
Recording audio with Python
When I was researching how to record in Node-RED, I found that on Linux it was executing commands in the exec node, or recording with the microphone in the UI node, and so on. I remember that if I tried to save the audio recorded by the UI node to a file and play it back as is, it sounded like slow audio.
This time I decided to record with a Python program using pyaudio in the python-venv node. I asked Chat GPT to write the program.
▼I recorded the audio from the microphone and was able to save it to a file.

When I ran it, I found an error.
▼UnicodeDecodeError.

The error was not a problem with the Python program itself, but with the python-venv node, which could not be executed if it contained Japanese characters.
▼If even a single character contained Japanese, it could not be executed.

I think the Python program I input on Node-RED is failing due to the character encoding of the Python program once saving it to a file and then running it. I will address this issue at a later date… (Already fixed)
Now, I asked Chat GPT to output the following program without including Japanese.
▼Here is the program.
import pyaudio
import wave

def record_audio(filename="recorded_audio.wav", duration=3):
    chunk = 1024  # Number of bytes per chunk
    sample_format = pyaudio.paInt16  # 16-bit audio
    channels = 1  # Mono
    rate = 44100  # Sampling rate

    p = pyaudio.PyAudio()  # Initialize the interface

    # Open the stream and start recording immediately
    stream = p.open(format=sample_format,
                    channels=channels,
                    rate=rate,
                    frames_per_buffer=chunk,
                    input=True)

    frames = []  # List to store audio data

    # Record for the specified duration
    for _ in range(0, int(rate / chunk * duration)):
        data = stream.read(chunk)
        frames.append(data)

    # Stop and close the stream
    stream.stop_stream()
    stream.close()
    p.terminate()

    # Save the recorded data to a file
    with wave.open(filename, 'wb') as wf:
        wf.setnchannels(channels)
        wf.setsampwidth(p.get_sample_size(sample_format))
        wf.setframerate(rate)
        wf.writeframes(b''.join(frames))

# Immediately start recording and save the audio
record_audio()
▼pyaudio should be installed in the pip node.

▼I wrote it in a venv node. Python intellisense is applied, so it is as easy to write as in a normal editor.

A short audio recording of only 3 seconds is made and saved in a file named recorded_audio.wav. This file will probably be saved in the current directory when Node-RED is started. If you want to be sure to specify where to save the file, change the path to an absolute path.
Transcribing with Faster Whisper
▼I have used Whisper with Python in a previous article.
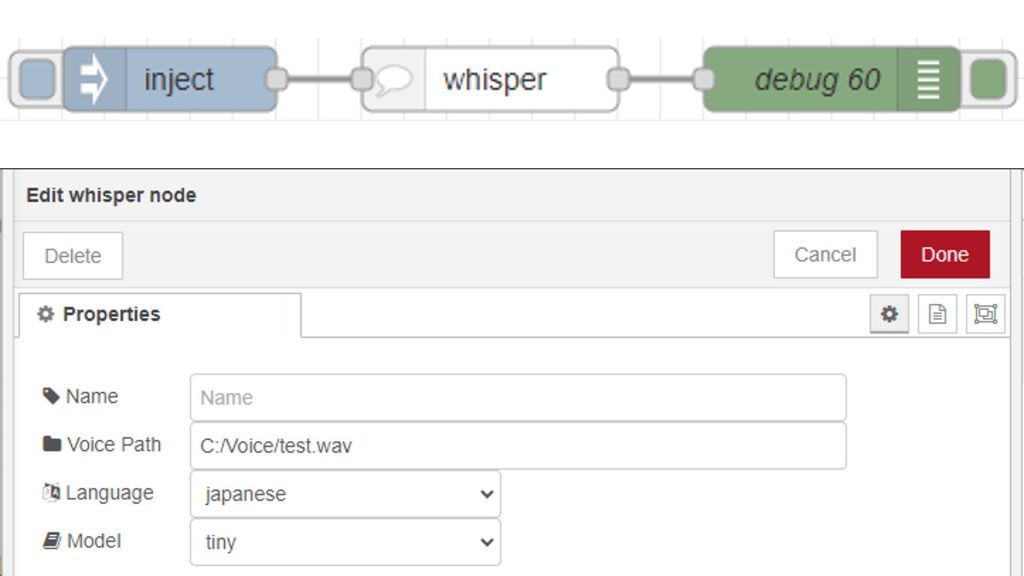
▼Using the same mechanism as the python-venv node, I also created a node that can be used with Node-RED.
At first I was using this Whisper node to process the data, but it was taking about 6 seconds to process even with tiny models.
I wanted to speed up the process even more, so I researched and found Faster Whisper.
▼Here is the page of Faster Whisper.
https://github.com/SYSTRAN/faster-whisper
I could run this program with Python as well, and there was a sample in the README.
▼Here is the program, WhisperModel should be changed to match your environment. I am running on CPU, not GPU.
from faster_whisper import WhisperModel

model_size = "tiny"

# Run on GPU with FP16
# model = WhisperModel(model_size, device="cpu", compute_type="float16")
# or run on GPU with INT8
# model = WhisperModel(model_size, device="cuda", compute_type="int8_float16")

# or run on CPU with INT8
model = WhisperModel(model_size, device="cpu", compute_type="int8")

segments, info = model.transcribe("recorded_audio.wav", beam_size=5, language="ja")

for segment in segments:
    path = "faster-whisper.txt"
    with open(path, mode='w', encoding='UTF-8') as f:
        f.write(segment.text)
The results of the Faster Whisper process are saved once in a file. This was also the case when Whisper was run in Node-RED, but the text was garbled when Japanese characters were included.
If you load the saved file later, you can avoid the garbled characters.
▼Faster Whisper should be installed with pip node.

▼I wrote the program in the venv node.

With the tiny model of Faster Whisper, I was able to process the recorded audio in about 2 seconds. However, the accuracy is not so good because of the emphasis on speed. The lack of context may have been a factor, as the sentences were short to begin with, and homonyms were often used.
Conditional judgment with Gemma2
Try running at the command prompt
▼In this article, I installed the software and can run it.
In this case, I use the 2b-instruct-fp16 model from Gemma2's 2B model. This is an INSTRUCT model suitable for directives and prioritizes speed of processing over accuracy.
Before running it in Node-RED, I tried to see if I could make a conditional decision after giving the situation at the command prompt.
▼I installed gemma2:2b-instruct-fp16.

I specified that you are the operator of the robot, and that in the context of forward movement, G is sent, and in the context of backward movement, B is sent.
▼G is sent for forward movement and B is sent for backward movement.
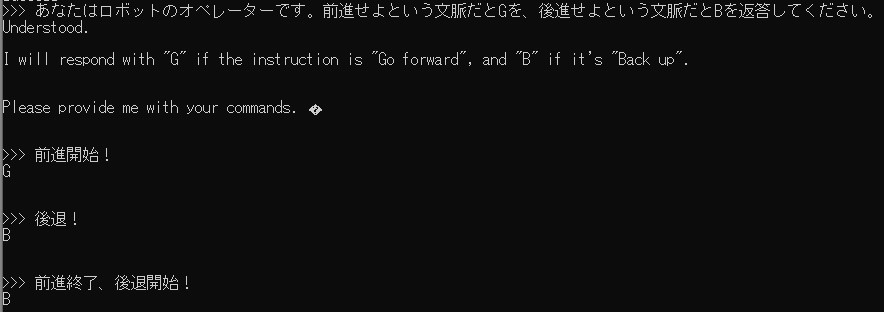
I added a further condition to send S when stopping.
▼I wanted S to be returned when exiting, but B was returned when exiting backward.
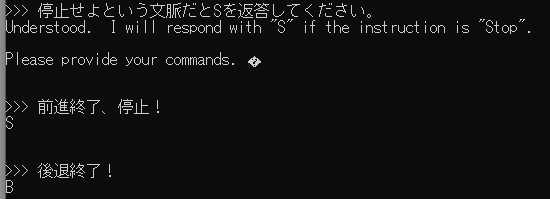
▼Adding a condition for termination as well, S was sent.

This way, the results of the decision can be checked while interacting with the robot, and additional conditions can be added to the robot's operation.
Judging conditions
▼This is the processing of the part up to the Chat node.

I run Faster Whisper to read the text saved in a file and pass it to the first template node. At this time, I also include the conditional decisions necessary to manipulate the robot.
▼Here is the content of the template node. I give instructions such as return G for forward movement, S for stop, and so on.

In mustache notation, variables are supposed to be placed inside {{}}.
How to set up this conditional judgment was a matter of ingenuity, and sometimes unexpected answers were returned. In addition, Faster Whisper often returned homonyms, so I told it to use hiragana for judging.
The judgment by AI in this part is a black box, so we won't know if it will be judged well or not until we try it. Fortunately, it runs quickly, so I tried it many times.
I use the second template node to pass the model and message to the Chat node of the ollama node.
▼content is a variable and I assign the text from the first template node.

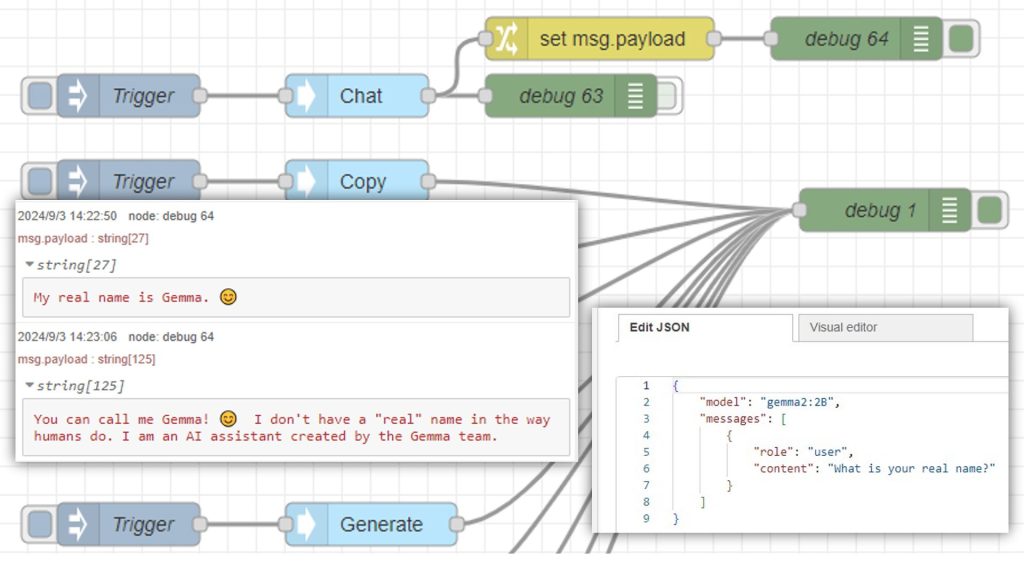
I connected it to the Chat node and checked it with the debug node.
▼I think it is judging by words.
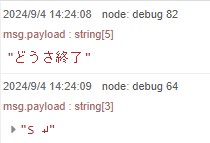
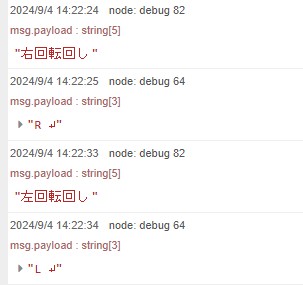


▼The words right and left themselves seem to be easily recognized. Since the instruction is short, there may also be a need to utter words that can be clearly pronounced by humans.
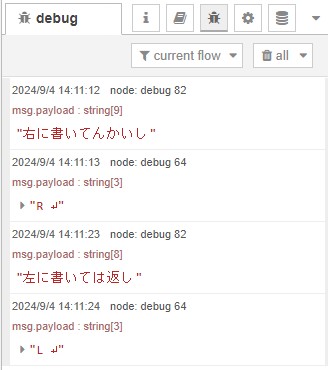
▼With the end of the right rotation, the R was sent and then the S was sent. I would like only S to be sent.

Send command
▼This is the processing of this part.

There is a Gemma2 reply text in msg.payload.message.content, so take this out.
▼Here is the content of the change node

Since the change node value contained newline characters and white space, I wrote a JavaScript program to remove them in the function node.
▼Here is the content of the function node

Finally, the mqtt out node sends an instruction to servo/control. This is received by the robot.
Enables robots to be operated via MQTT communication
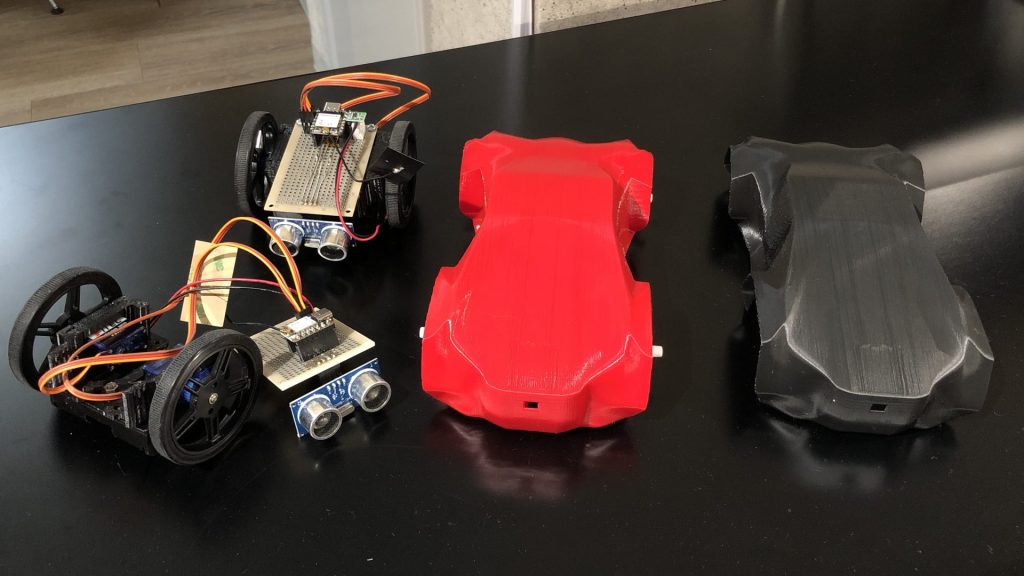
I use the small two-wheeled robot I created previously, Komagoma 4, as the target of operation. The microcontroller is an XIAO ESP32C3, so Wi-Fi and Bluetooth are also available.
▼The KomaGoma 4 was exhibited at an event. Each machine can be made for less than 3,000 yen.
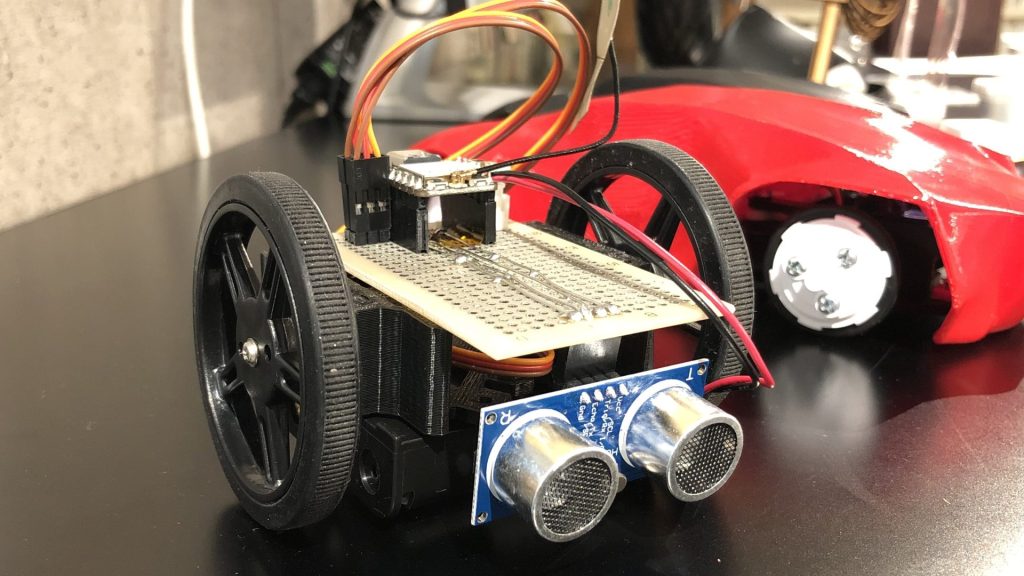
▼I recently published 3D data on Thingverse.
https://www.thingiverse.com/thing:6746264
I asked Chat GPT to write a program to write in the Arduino IDE. I wanted to use the values from the accelerometer and ultrasonic sensor later, so they are sent via MQTT communication.
▼The program is here.Please change the Wi-Fi SSID, password, and the IP address of the PC running the MQTT broker accordingly.
#include <WiFi.h>
#include <PubSubClient.h>
#include <NewPing.h>
#include <Wire.h>
#include <MPU6050.h>

const char* ssid = "<your SSID>";
const char* password = "<your password>";
const char* mqtt_server = "<your IP>>";

// サーボモータのピン設定
const int ServoPin1 = D1;
const int ServoPin2 = D2;
const int DutyMax = 2300;
const int DutyMin = 700;
int speed1 = 0;
int speed2 = 0;

// 超音波センサーのピン設定
const int triggerPin = D10;
const int echoPin = D9;
NewPing sonar(triggerPin, echoPin, 200);  // 最大距離は200cm

// MPU6050設定
MPU6050 mpu;
int16_t ax_offset = 0, ay_offset = 0, az_offset = 0;
int16_t gx_offset = 0, gy_offset = 0, gz_offset = 0;

WiFiClient espClient;
PubSubClient client(espClient);

// サーボモータの速度制御関数
void ServoSpeed(int pin, int speed) {  // speed: -10 ~ 10
  if (speed != 0) {
    int Duty = map(speed, -10, 10, DutyMin, DutyMax);
    digitalWrite(pin, HIGH);
    delayMicroseconds(Duty);
    digitalWrite(pin, LOW);
    delayMicroseconds(20000 - Duty);  // 20ms周期
  }
}

// MQTT再接続関数
void reconnect() {
  while (!client.connected()) {
    Serial.print("MQTT接続を試みています...");
    if (client.connect("ESP32Client")) {
      Serial.println("接続成功");
      client.subscribe("servo/control");  // サーボ制御のトピックを購読
    } else {
      Serial.print("失敗、rc=");
      Serial.print(client.state());
      Serial.println(" 5秒後に再試行します");
      delay(5000);
    }
  }
}

// MQTTのコールバック関数
void callback(char* topic, byte* payload, unsigned int length) {
  String message;
  for (int i = 0; i < length; i++) {
    message += (char)payload[i];
  }
  Serial.println(message);

  if (message == "G") {
    speed1 = 10;
    speed2 = -10;
  } else if (message == "B") {
    speed1 = -10;
    speed2 = 10;
  } else if (message == "S") {
    speed1 = 0;
    speed2 = 0;
  } else if (message == "R") {
    speed1 = 3;
    speed2 = 3;
  } else if (message == "L") {
    speed1 = -3;
    speed2 = -3;
  }
}

void setup() {
  Serial.begin(115200);

  // サーボモータの初期化
  pinMode(ServoPin1, OUTPUT);
  pinMode(ServoPin2, OUTPUT);
  ServoSpeed(ServoPin1, 0);
  ServoSpeed(ServoPin2, 0);

  // MPU6050の初期化
  Wire.begin();
  mpu.initialize();
  if (!mpu.testConnection()) {
    Serial.println("MPU6050接続に失敗しました");
  }

  // MPU6050のキャリブレーション
  Serial.println("MPU6050をキャリブレーション中...");
  mpu.CalibrateAccel(6);
  mpu.CalibrateGyro(6);
  Serial.println("キャリブレーション完了");

  // WiFi接続
  Serial.print("WiFiに接続中");
  WiFi.begin(ssid, password);
  while (WiFi.status() != WL_CONNECTED) {
    delay(500);
    Serial.print(".");
  }
  Serial.println("\nWiFiに接続しました");

  // MQTTサーバー設定と接続
  client.setServer(mqtt_server, 1883);
  client.setCallback(callback);
  reconnect();
}

void loop() {
  // センサーデータをMQTTで送信
  char msg[50];

  ServoSpeed(ServoPin1, speed1);
  ServoSpeed(ServoPin2, speed2);

  if (!client.connected()) {
    reconnect();
  }
  client.loop();

  // 超音波センサーから距離を取得
  float distance = sonar.ping_cm();
  if (distance == 0) distance = 200;  // 最大距離

  // 距離データ送信
  snprintf(msg, sizeof(msg), "%.2f", distance);
  client.publish("sensor/distance", msg);

  // MPU6050から加速度と角速度を取得
  int16_t ax_raw, ay_raw, az_raw;
  int16_t gx_raw, gy_raw, gz_raw;
  mpu.getAcceleration(&ax_raw, &ay_raw, &az_raw);
  mpu.getRotation(&gx_raw, &gy_raw, &gz_raw);

  // 加速度データをgに変換 (±2gレンジの場合)
  float ax = ax_raw / 16384.0;
  float ay = ay_raw / 16384.0;
  float az = az_raw / 16384.0;

  // 角速度データを°/sに変換 (±250°/sレンジの場合)
  float gx = gx_raw / 131.0;
  float gy = gy_raw / 131.0;
  float gz = gz_raw / 131.0;

  // 加速度データ送信
  snprintf(msg, sizeof(msg), "%.2f,%.2f,%.2f", ax, ay, az);
  client.publish("sensor/acceleration", msg);

  // 角速度データ送信
  snprintf(msg, sizeof(msg), "%.2f,%.2f,%.2f", gx, gy, gz);
  client.publish("sensor/gyro", msg);
}
67~82行目でサーボモーターの速度を変更しています。Node-REDから送られてきたMQTT通信で送られてきた動作命令によって分岐しています。
▼Please refer to this article for more information about Node-RED's MQTT communication.
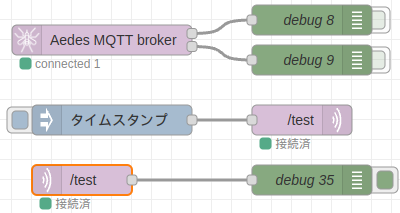
▼The MQTT broker is started and the mqtt in node receives the sensor values.

▼The values are sent to the debug window. I asked Chat GPT to adjust the value so that it is close to 0 in the static state.

Test Operation
I operated it by voice.
▼It is not running, but the motor is rotating. The sensor values are also being acquired.
▼When rotated, it looks like this.
For example, in the context of a start, such as “start of movement” or “ begin to move,” a G was sent and the robot moved forward. It would be interesting to see how far the AI would be able to correctly judge them, rather than strictly judging these areas like regular expressions.
In addition, the recognition accuracy of the voice was sometimes poor unless it was clearly pronounced or voiced. There may also be a need to make it easier for the human side to recognize.
Conclusion
Even on my laptop, I was able to process it in a few seconds. I think a PC with a better GPU would be able to increase both accuracy and speed.
Each process is independent as a node, and the AI model can be easily changed, so it seems that it can be easily customized to suit the situation in which it is used.
▼I am thinking that the accelerometer values that I have made available to the microcontroller this time could be sent to the Unreal Engine to do something like a digital twin.


