Trying Out Jetson Xavier Part 6 (YOLO, Switching CUDA Versions, and GPU Processing)
Introduction
In this post, I tried object detection using YOLO on a Jetson Xavier. Since the Jetson Xavier has high GPU performance, I built an environment to leverage the GPU for execution. It was a bit complicated due to the older OS and the architecture being different from a standard PC.
▼Previous articles:
Trying Out Jetson Xavier Part 1 (JetPack 5.1.5 Setup)
Info This article is translated from Japanese to English. Introduction I’ve been participating in the TechSeeker Hackathon 2025 recently, and as a participant …
Trying Out Ollama Part 5 (Multimodal Processing of Images and Text with llama3.2-vision)
Info This article is translated from Japanese to English. Introduction In this post, I tried multimodal processing of images and text using llama3.2-vision wit…
Building the Environment
Switching CUDA Versions
Since I will be running YOLO with Python, I first created and activated a Python virtual environment.
python -m venv pyenv
cd pyenv/
source bin/activate
▼For more details on creating Python virtual environments, see this article:
Create Python Virtual Environments (venv, Windows)
Info This article is translated from Japanese to English. Introduction In this post, I have summarized how to create a Python virtual environment.I was researc…
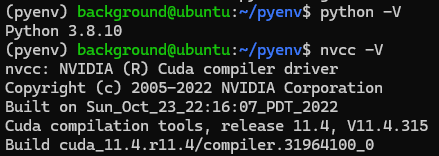
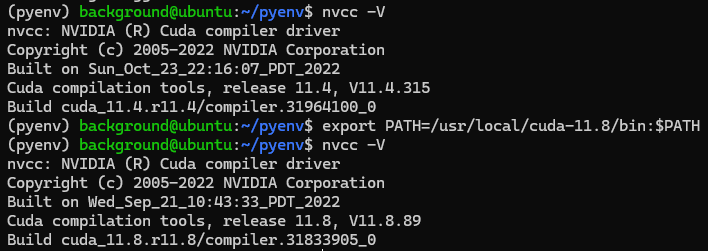
I checked the versions of Python and CUDA.
▼Python 3.8 and CUDA 11.4 were installed.
I couldn't find CUDA 11.4 in previous PyTorch versions, but CUDA 11.8 was available, so I decided to install CUDA 11.8 and then install PyTorch.
▼Previous PyTorch versions:
https://pytorch.org/get-started/previous-versions
▼I have previously experimented with switching CUDA versions in a WSL2 environment:
Switching Between Multiple CUDA Versions (WSL2 Ubuntu 22.04)
Info This article is translated from Japanese to English. Introduction In this post, I experimented with switching CUDA versions within a WSL2 Ubuntu 22.04 env…
▼CUDA 11.8 download page:
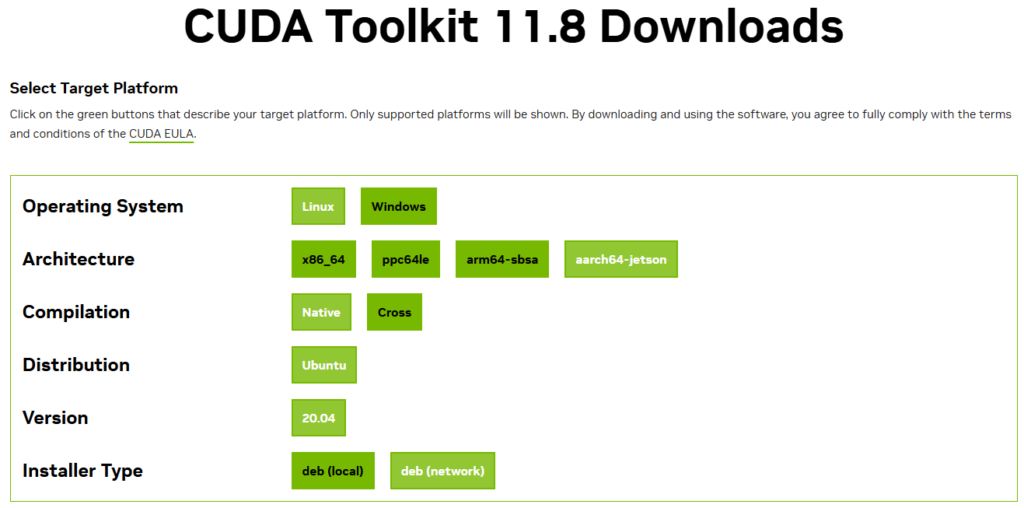
Since the architecture is Jetson Xavier, the target is "aarch64-jetson." I executed the displayed commands to install CUDA 11.8.
wget https://developer.download.nvidia.com/compute/cuda/repos/ubuntu2004/arm64/cuda-keyring_1.0-1_all.deb
sudo dpkg -i cuda-keyring_1.0-1_all.deb
sudo apt-get update
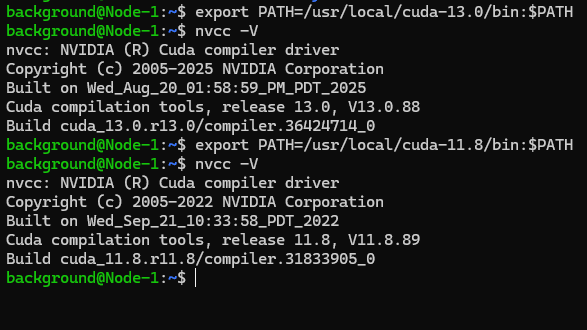
sudo apt-get -y install cuda-toolkit-11-8I set the environment variables and checked if the version switched.
export PATH=/usr/local/cuda-11.8/bin:$PATH▼It successfully switched to CUDA 11.8.
I also added the export command to my .bashrc file for persistence.
Installing Packages
Up to this point, it felt similar to working with WSL2, but I struggled with installing the Python packages.
First, the installation commands on the PyTorch website didn't work because the torch versions didn't match, and even when I made progress, it would display that Python 3.9 or higher was required.
▼I kept encountering errors like these.
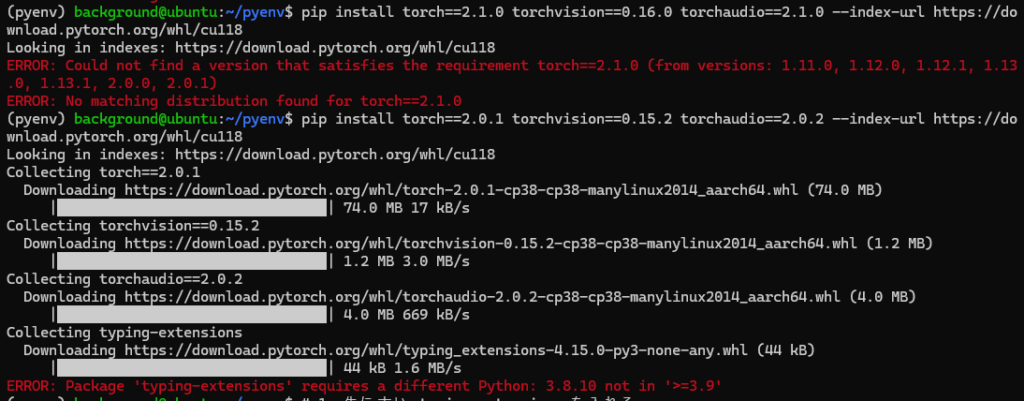
Ultimately, I asked Gemini and was able to temporarily install PyTorch with the following command, but CUDA was not enabled in the Python code. I ended up reinstalling it later.
pip install "typing-extensions<4.13.0"
pip install torch==2.0.1 torchvision==0.15.2 torchaudio==2.0.2 --index-url https://download.pytorch.org/whl/cu118
Next, I tried to install the Ultralytics package to use YOLO, but I couldn't install the latest version.
▼The following error occurred.
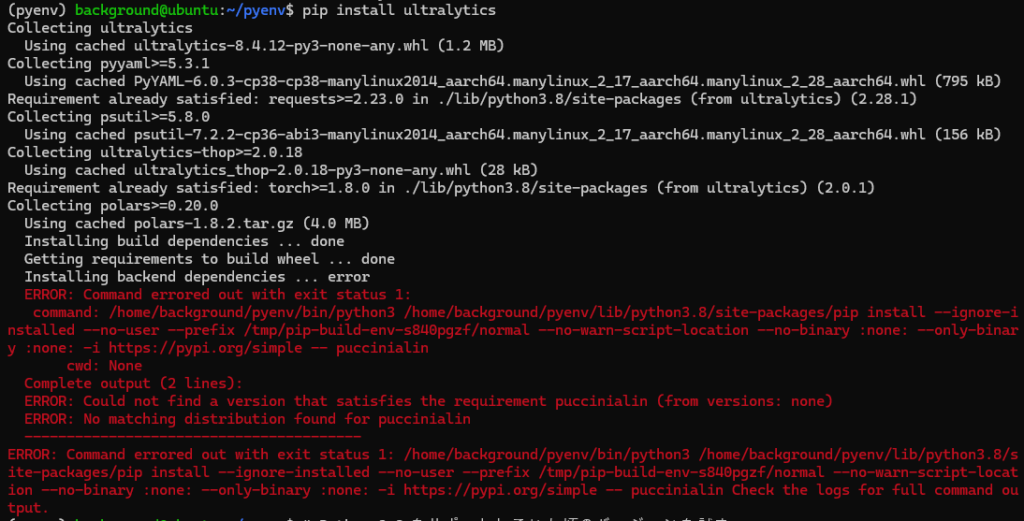
I was able to install an older version of Ultralytics.
pip install "ultralytics<8.1.0"I reinstalled other packages using older versions as well.
pip install "typing-extensions<4.13.0"
pip install "numpy<2.0.0"
pip install https://developer.download.nvidia.com/compute/redist/jp/v51/pytorch/torch-2.1.0a0+41361538.nv23.06-cp38-cp38-linux_aarch64.whl
For torchvision, I needed to build it from source due to architectural issues, but the Jetson Xavier completely froze when I tried to build it all at once. I managed to install it by installing the necessary build packages, setting up swap memory, and building it incrementally.
sudo apt-get update
sudo apt-get install -y libjpeg-dev zlib1g-dev libpython3-dev libavcodec-dev libavformat-dev libswscale-dev libopenblas-base libopenmpi-dev
I set up the swap memory with the following commands:
sudo fallocate -l 8G /swapfile
sudo chmod 600 /swapfile
sudo mkswap /swapfile
sudo swapon /swapfile
free -h
▼The swap memory was successfully added.

I built torchvision with these commands:
pip install --upgrade setuptools pip wheel
git clone --branch v0.16.1 https://github.com/pytorch/vision torchvision
cd torchvision
export BUILD_VERSION=0.16.1
export FORCE_CUDA=1
export MAX_JOBS=1
python3 setup.py install
I checked if CUDA was available in Python using the following command:
cd ..
python3 -c "import torch; import torchvision; print('CUDA Available:', torch.cuda.is_available()); print('Torchvision Version:', torchvision.__version__)"
▼It was now available.

Testing Object Detection
After setting up the environment, I tested whether I could actually perform object detection using the GPU.
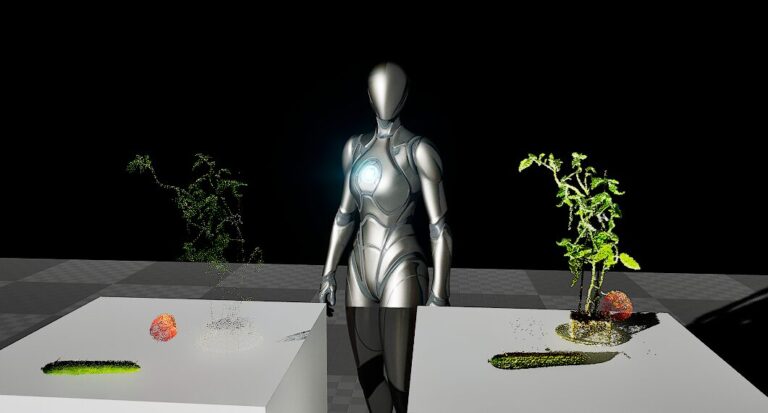
▼I tested it on a screenshot from Unreal Engine, similar to what I’ve done before.
Object Detection with YOLO Part 4 (GPU Setup, CUDA 12.6)
Info This article is translated from Japanese to English. Introduction In this post, I tried object detection with YOLO using a GPU.According to the Ultralytic…
I downloaded the image and created a Python script.
curl -O https://404background.com/wp-content/uploads/2024/10/unreal-768x413.jpg
sudo nano yolo_test.py
I saved the following code to perform detection using yolov8n.pt.
from ultralytics import YOLO
model = YOLO("yolov8n.pt")
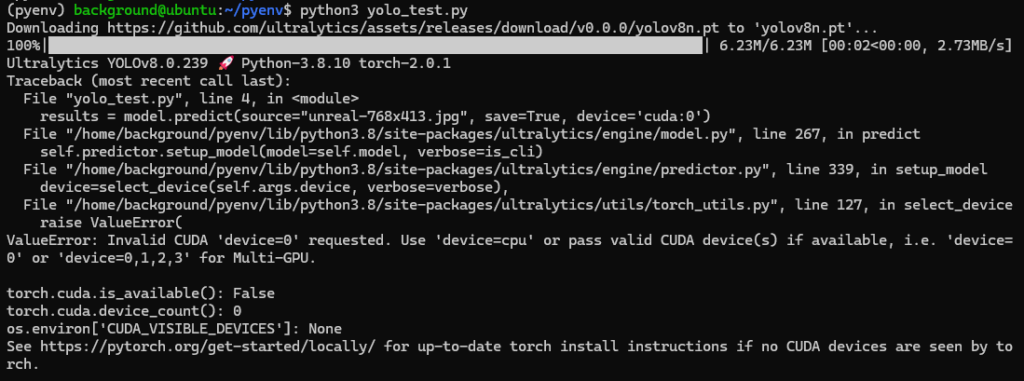
results = model.predict(source="unreal-768x413.jpg", save=True, device='cuda:0')I ran the code.
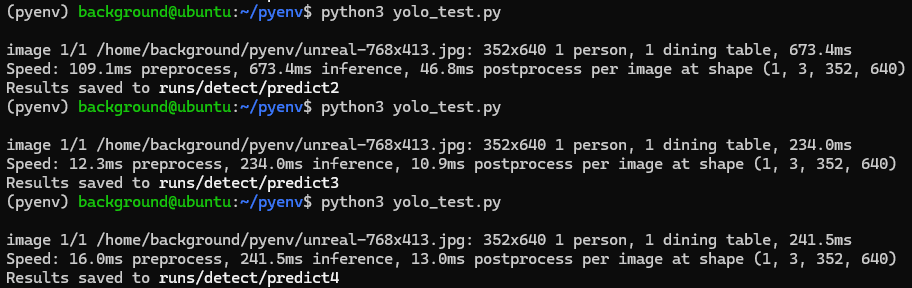
python3 yolo_test.py▼It seemed to run without any issues.

▼When it wasn't running on the GPU, an error would appear saying it was running on the CPU instead.
▼I ran it several times, and the processing time was consistently around 250ms.
I accessed the Jetson Xavier via Remote Desktop to check the detection results.
▼I configured the Remote Desktop connection in this article:
Trying Out Jetson Xavier Part 5 (NoMachine and Remote Desktop Connection)
Info This article is translated from Japanese to English. Introduction In this post, I tried using NoMachine to establish a remote desktop connection from my P…
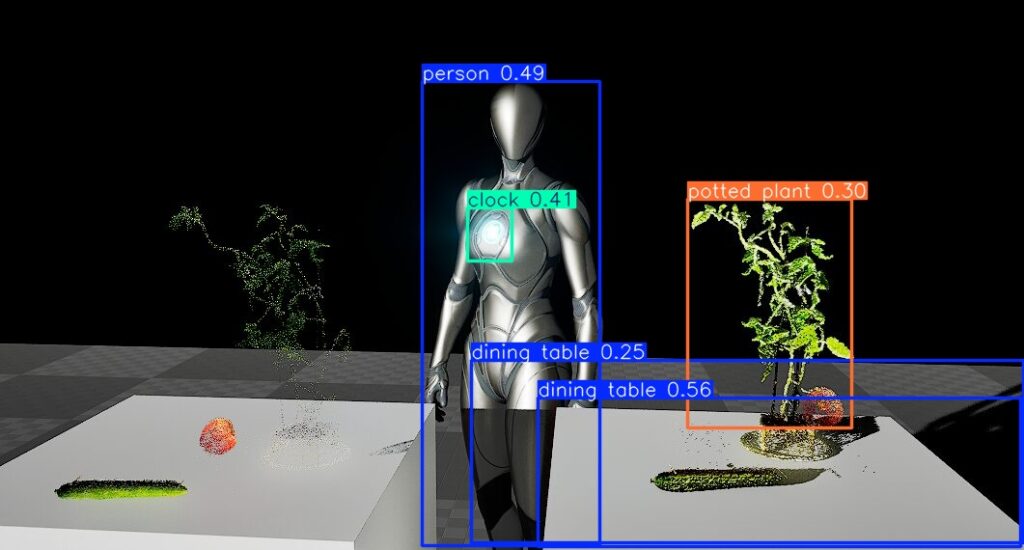
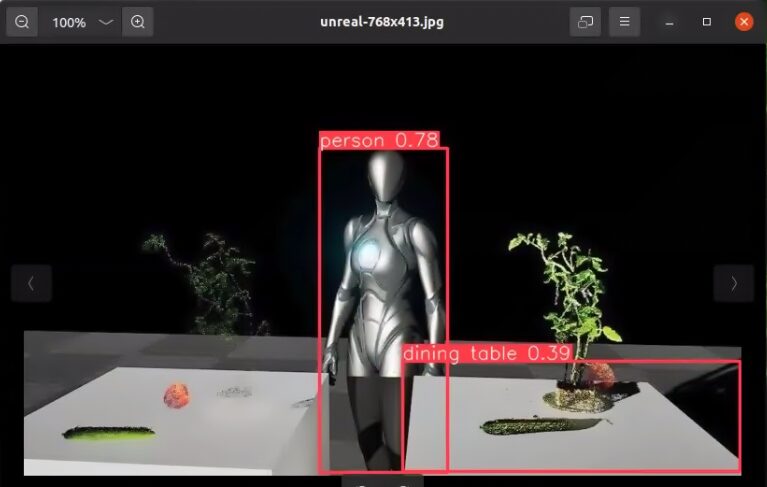
▼The detection result image appeared as follows.
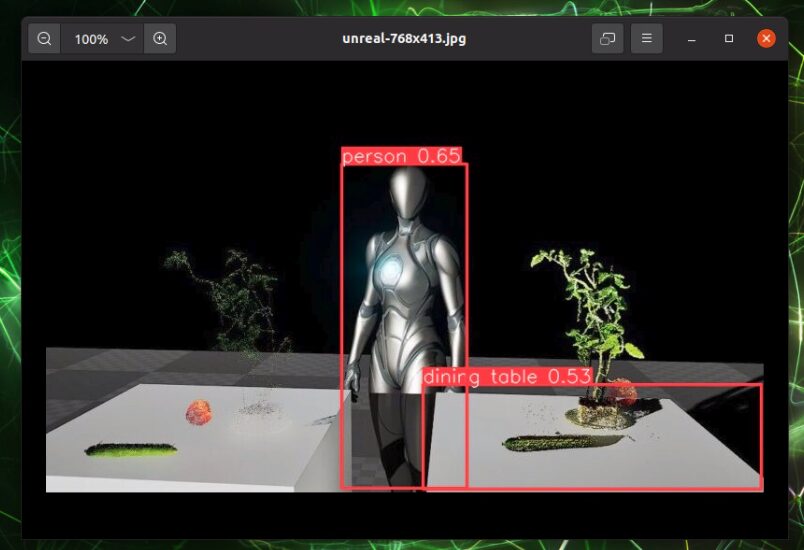
Unlike previous results, the bounding boxes were all the same color. This might be because I'm using an older Ultralytics package.
I also tried with yolov8s.pt.
▼The processing time was similar to yolov8n.pt.
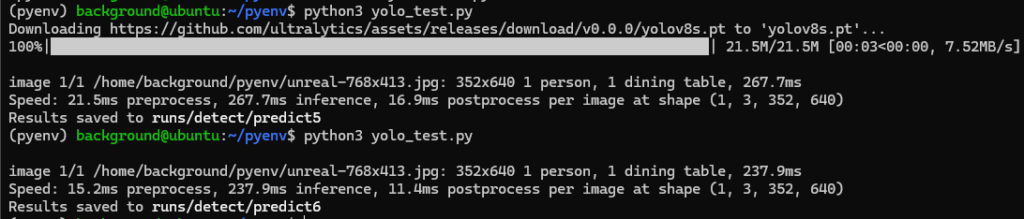
▼There wasn't much of a difference.
I also tried yolo11s.pt, but the model wouldn't download, possibly due to the older version of Ultralytics. Since I mainly use YOLOv8—which is widely used in academic papers—I think the model version I have is sufficient.
Finally
I often struggle with environment setup because the Jetson Xavier's OS is old. Due to the architecture issues, I make sure to specify that I am using a Jetson Xavier when asking AI for help.
Now that I've confirmed I can run it on the GPU, I want to try real-time detection on camera feeds.
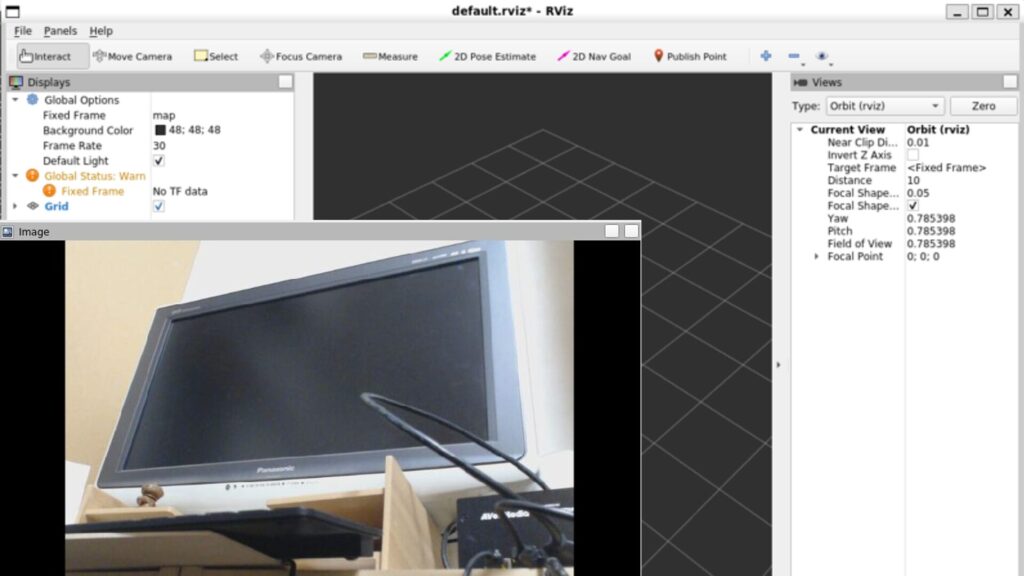
▼I’ve already confirmed that I can transmit camera footage using ROS. In my research, I separate processing between a PC for image processing and a PC for robot control.
Trying Out Jetson Xavier Part 3 (ROS Environment Setup and Publishing USB Camera Video)
Info This article is translated from Japanese to English. Introduction In this post, I set up a ROS environment on the Jetson Xavier and tried publishing video…