Image Recognition via Python Part 1 (EasyOCR and Node-RED)
Introduction
In this post, I experimented with text recognition in images using EasyOCR.
There are various OCR software options available, and I have previously tried Tesseract. However, my impression was that EasyOCR is faster for real-time processing when utilizing a GPU. Since real-time performance is crucial when integrating with robots, I decided to use EasyOCR this time.
▼I am using a gaming laptop purchased for around 100,000 yen, running Windows 11.
Shopping: New Laptop and SSD Expansion (ASUS TUF Gaming A15)
Info This article is translated from Japanese to English. Introduction In this post, I’ll be talking about replacing my PC after my previous one broke down. I …


▼Previous articles:
Searching with Python and Summarizing with a Local LLM (Ollama, Node-RED)
Info This article is translated from Japanese to English. Introduction In this post, I experimented with a Python-based search program to automate information …
Trying Out Faster Whisper (Running on GPU, Python, and Node-RED)
Info This article is translated from Japanese to English. Introduction In this post, I tried performing transcription using Faster Whisper.I had tried it befor…
Testing the Sample Program
▼The GitHub repository can be found here:
https://github.com/JaidedAI/EasyOCR
I tested the detection on images found in the examples folder of the repository. To make it easier to connect with other processes later, I executed it within Node-RED.
To run Python in Node-RED, I used the python-venv node that I developed. This node allows you to create a Python virtual environment and execute code as a Node-RED node.
▼I wrote about the development history at the end of last year (Japanese):
https://qiita.com/background/items/d2e05e8d85427761a609
▼Here is the flow:
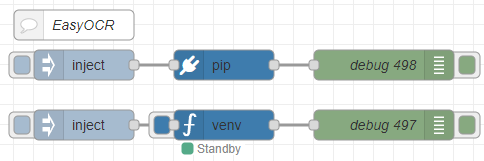
[{"id":"ab8b8f1c9268bd5d","type":"inject","z":"22eb2b8f4786695c","name":"","props":[],"repeat":"","crontab":"","once":false,"onceDelay":0.1,"topic":"","x":1670,"y":5160,"wires":[["51acb05020d7cfc6"]]},{"id":"52591f1d7b841cb4","type":"debug","z":"22eb2b8f4786695c","name":"debug 497","active":true,"tosidebar":true,"console":false,"tostatus":false,"complete":"false","statusVal":"","statusType":"auto","x":1970,"y":5160,"wires":[]},{"id":"51acb05020d7cfc6","type":"venv","z":"22eb2b8f4786695c","venvconfig":"015784e9e3e0310a","name":"","code":"import easyocr\nreader = easyocr.Reader(['ja','en']) # this needs to run only once to load the model into memory\nresult = reader.readtext('japanese.jpg', detail = 0)\nprint(result)","continuous":true,"x":1810,"y":5160,"wires":[["52591f1d7b841cb4"]]},{"id":"68628c5f9a74045a","type":"inject","z":"22eb2b8f4786695c","name":"","props":[],"repeat":"","crontab":"","once":false,"onceDelay":0.1,"topic":"","x":1670,"y":5100,"wires":[["766be88958c2dc88"]]},{"id":"c86aacdcde1a4936","type":"debug","z":"22eb2b8f4786695c","name":"debug 498","active":true,"tosidebar":true,"console":false,"tostatus":false,"complete":"false","statusVal":"","statusType":"auto","x":1970,"y":5100,"wires":[]},{"id":"766be88958c2dc88","type":"pip","z":"22eb2b8f4786695c","venvconfig":"015784e9e3e0310a","name":"","arg":"easyocr","action":"install","tail":false,"x":1810,"y":5100,"wires":[["c86aacdcde1a4936"]]},{"id":"1c2f22ce893dc276","type":"comment","z":"22eb2b8f4786695c","name":"EasyOCR","info":"","x":1660,"y":5060,"wires":[]},{"id":"015784e9e3e0310a","type":"venv-config","venvname":"AI","version":"3.10"}]I used the pip node to install the packages and the venv node to run the code.
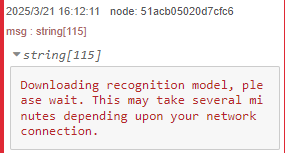
▼It appears the model is downloaded during the first run.
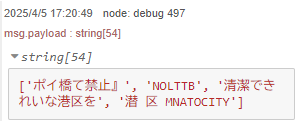
▼The detection results were displayed.
Testing Real-Time Detection
While consulting with ChatGPT, I had it write code to perform real-time text recognition on a camera feed.
▼Here is the flow:

[{"id":"be623682b80adf45","type":"inject","z":"22eb2b8f4786695c","name":"","props":[],"repeat":"","crontab":"","once":false,"onceDelay":0.1,"topic":"","x":1670,"y":5440,"wires":[["ab79b655be32b76e"]]},{"id":"ef1fc126fdc67a72","type":"debug","z":"22eb2b8f4786695c","name":"debug 501","active":true,"tosidebar":true,"console":false,"tostatus":false,"complete":"false","statusVal":"","statusType":"auto","x":1970,"y":5440,"wires":[]},{"id":"ab79b655be32b76e","type":"venv","z":"22eb2b8f4786695c","venvconfig":"015784e9e3e0310a","name":"","code":"import cv2\nimport easyocr\n\n# EasyOCRのリーダーを作成(GPU使用)\nreader = easyocr.Reader(['ja', 'en'], gpu=True)\n\n# カメラを起動\ncap = cv2.VideoCapture(1)\n\nwhile True:\n # フレームを取得\n ret, frame = cap.read()\n if not ret:\n break\n\n # 画像サイズを縮小(処理速度向上)\n scale = 0.5\n frame_resized = cv2.resize(frame, None, fx=scale, fy=scale)\n\n # EasyOCRでテキスト検出\n results = reader.readtext(frame_resized)\n\n # 検出した情報を保存するリスト\n detections = []\n\n for bbox, text, prob in results:\n # バウンディングボックスの座標を元のサイズに変換\n (top_left, top_right, bottom_right, bottom_left) = bbox\n top_left = tuple(map(int, [x / scale for x in top_left]))\n bottom_right = tuple(map(int, [x / scale for x in bottom_right]))\n\n # 辞書形式でデータ保存\n detection = {\n \"text\": text,\n \"confidence\": round(prob, 2),\n \"bbox\": {\n \"top_left\": top_left,\n \"bottom_right\": bottom_right\n }\n }\n detections.append(detection)\n\n # バウンディングボックスを描画\n cv2.rectangle(frame, top_left, bottom_right, (0, 255, 0), 2)\n\n # 結果を出力(ロボットの状況判断に使いやすい形式)\n if detections:\n print(detections)\n\n # 画面に表示\n cv2.imshow(\"Real-Time OCR\", frame)\n\n # 'q'キーで終了\n if cv2.waitKey(1) & 0xFF == ord('q'):\n break\n\n# 後処理\ncap.release()\ncv2.destroyAllWindows()\n","continuous":true,"x":1810,"y":5440,"wires":[["ef1fc126fdc67a72"]]},{"id":"015784e9e3e0310a","type":"venv-config","venvname":"AI","version":"3.10"}]▼The code is set to use the GPU. The package installation might be the same as what I did for YOLO previously.
Object Detection with YOLO Part 4 (GPU Setup, CUDA 12.6)
Info This article is translated from Japanese to English. Introduction In this post, I tried object detection with YOLO using a GPU.According to the Ultralytic…
I proceeded to run it.
▼Detection failed when the text was too small or when the camera was tilted. It’s also possible the focus was off.
▼However, I was eventually able to detect text. The coordinates are also output.
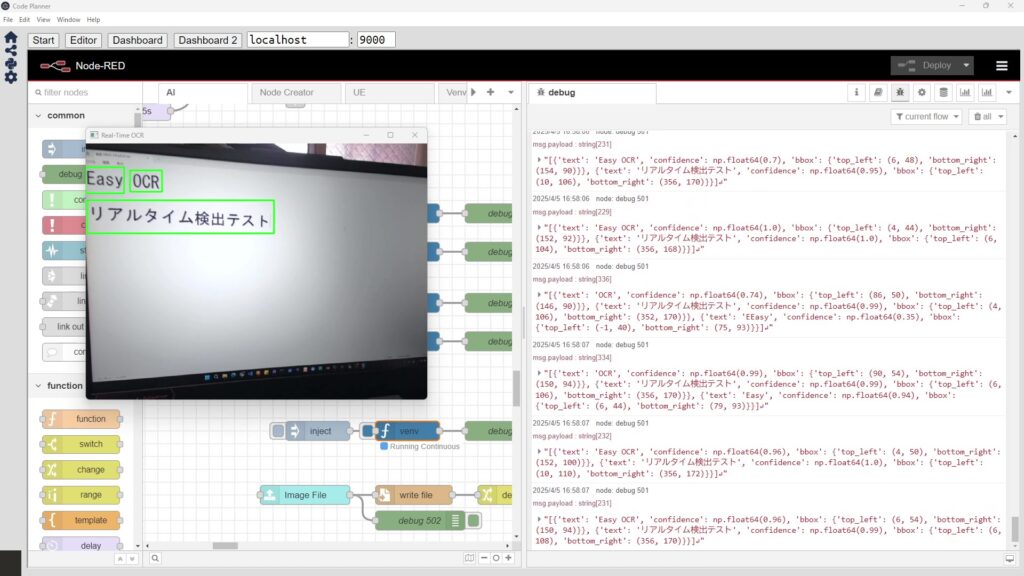
While it doesn't quite recognize text as naturally as a human does yet, it seems usable if the camera gets close enough.
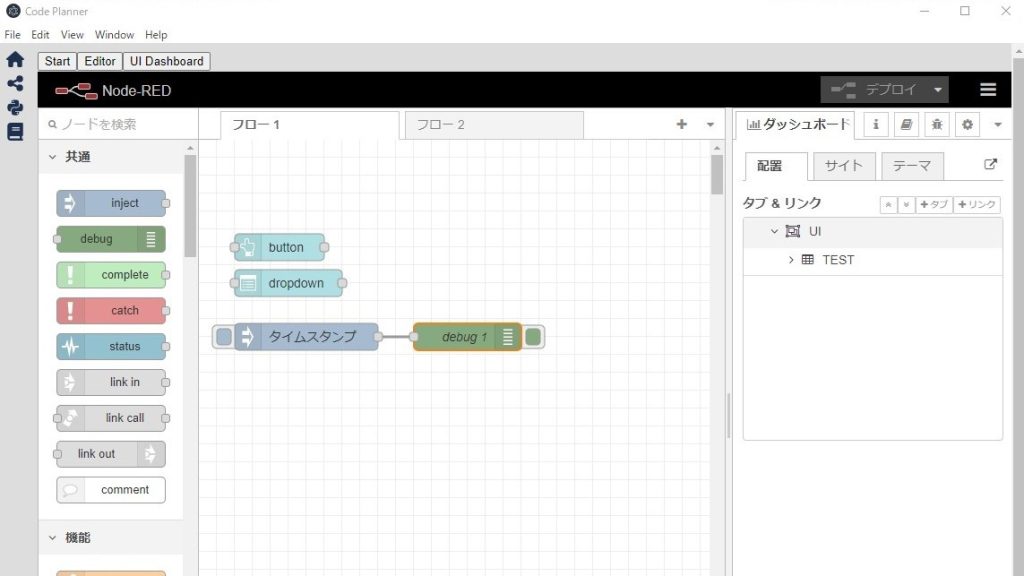
Combining with Node-RED Nodes
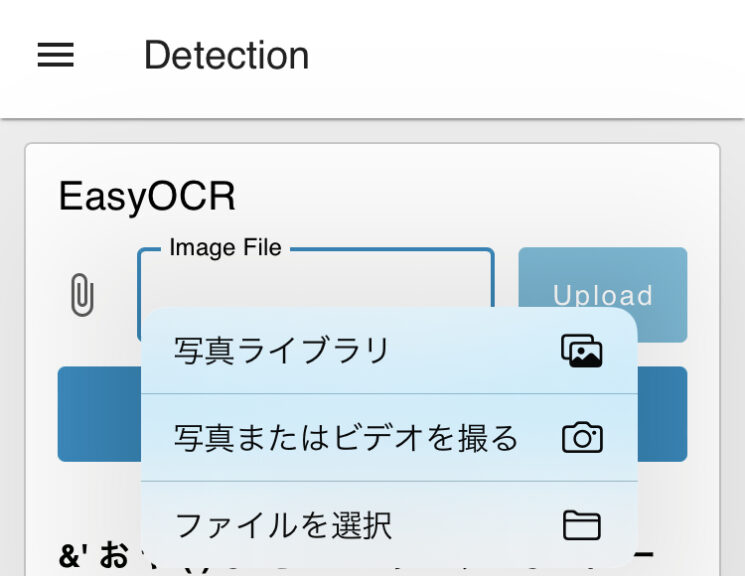
I tried using a node in Node-RED Dashboard 2.0 that allows file uploads.
▼Here is the flow:
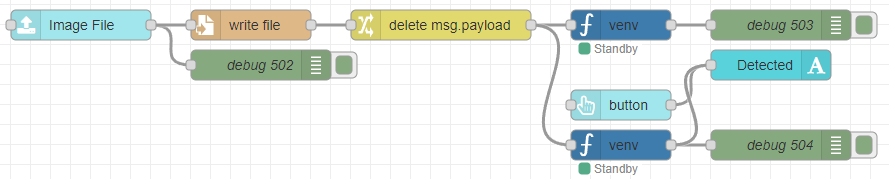
[{"id":"de65b33ef65b664a","type":"ui-file-input","z":"22eb2b8f4786695c","group":"5b61894784d153dc","name":"","order":2,"width":0,"height":0,"topic":"topic","topicType":"msg","label":"Image File","icon":"paperclip","allowMultiple":false,"accept":"","className":"","x":1650,"y":5540,"wires":[["82a4b71fdab324fe","0dbc0d221e20ea71"]]},{"id":"0dbc0d221e20ea71","type":"file","z":"22eb2b8f4786695c","name":"","filename":"file.name","filenameType":"msg","appendNewline":true,"createDir":true,"overwriteFile":"true","encoding":"none","x":1820,"y":5540,"wires":[["ac97631b10166266"]]},{"id":"82a4b71fdab324fe","type":"debug","z":"22eb2b8f4786695c","name":"debug 502","active":true,"tosidebar":true,"console":false,"tostatus":false,"complete":"true","targetType":"full","statusVal":"","statusType":"auto","x":1830,"y":5580,"wires":[]},{"id":"73522a73e80f97ef","type":"debug","z":"22eb2b8f4786695c","name":"debug 503","active":true,"tosidebar":true,"console":false,"tostatus":false,"complete":"false","statusVal":"","statusType":"auto","x":2350,"y":5540,"wires":[]},{"id":"48a5f9b42fe1b4b6","type":"venv","z":"22eb2b8f4786695c","venvconfig":"015784e9e3e0310a","name":"","code":"import easyocr\n\n# EasyOCRのリーダー(GPU使用)\nreader = easyocr.Reader(['ja', 'en'], gpu=True)\n\n# 画像ファイルのOCR処理\nimage_path = msg['file']['name'] # 画像パスを取得\nresults = reader.readtext(image_path, detail=0) # detail=0 で文字のみ取得\n\n# 文字列として出力\nfor text in results:\n print(f\"{text}\\n\", end='')\n","continuous":false,"x":2190,"y":5540,"wires":[["73522a73e80f97ef"]]},{"id":"ac97631b10166266","type":"change","z":"22eb2b8f4786695c","name":"","rules":[{"t":"delete","p":"payload","pt":"msg"}],"action":"","property":"","from":"","to":"","reg":false,"x":2010,"y":5540,"wires":[["48a5f9b42fe1b4b6","ae8ae8f4453c7652"]]},{"id":"45ff17b9119baf32","type":"ui-text","z":"22eb2b8f4786695c","group":"5b61894784d153dc","order":4,"width":0,"height":0,"name":"","label":"Detected","format":"{{msg.payload}}","layout":"col-center","style":false,"font":"","fontSize":16,"color":"#717171","wrapText":true,"className":"","x":2340,"y":5580,"wires":[]},{"id":"d1d9632cd29dcefb","type":"ui-button","z":"22eb2b8f4786695c","group":"5b61894784d153dc","name":"","label":"button","order":3,"width":0,"height":0,"emulateClick":false,"tooltip":"","color":"","bgcolor":"","className":"","icon":"","iconPosition":"left","payload":"","payloadType":"str","topic":"topic","topicType":"msg","buttonColor":"","textColor":"","iconColor":"","enableClick":true,"enablePointerdown":false,"pointerdownPayload":"","pointerdownPayloadType":"str","enablePointerup":false,"pointerupPayload":"","pointerupPayloadType":"str","x":2190,"y":5620,"wires":[["45ff17b9119baf32"]]},{"id":"ae8ae8f4453c7652","type":"venv","z":"22eb2b8f4786695c","venvconfig":"015784e9e3e0310a","name":"","code":"import easyocr\nimport cv2\nimport numpy as np\n\n# 画像の前処理関数\ndef preprocess_image(image_path):\n # 画像を読み込む\n image = cv2.imread(image_path)\n\n # グレースケールに変換\n gray = cv2.cvtColor(image, cv2.COLOR_BGR2GRAY)\n\n # ノイズ除去\n gray = cv2.fastNlMeansDenoising(gray, None, 30, 7, 21)\n\n # 二値化(しきい値処理)\n _, binary_image = cv2.threshold(gray, 150, 255, cv2.THRESH_BINARY)\n\n # サイズ変更(拡大)\n resized_image = cv2.resize(binary_image, None, fx=1.5, fy=1.5, interpolation=cv2.INTER_CUBIC)\n\n # 前処理した画像を返す\n return resized_image\n\n# EasyOCRのリーダー(GPU使用)\nreader = easyocr.Reader(['ja', 'en'], gpu=True)\n\n# 画像ファイルのOCR処理\nimage_path = msg['file']['name'] # 画像パスを取得\n\n# 前処理を施した画像を取得\npreprocessed_image = preprocess_image(image_path)\n\n# 前処理後の画像を一時的に保存してOCR処理を行う(後で削除することも可能)\npreprocessed_image_path = 'processed_image.jpg'\ncv2.imwrite(preprocessed_image_path, preprocessed_image)\n\n# OCR処理を行う\nresults = reader.readtext(preprocessed_image_path, detail=0) # detail=0 で文字のみ取得\n\n# 文字列として出力\nfor text in results:\n print(f\"{text}\\n\", end='')\n","continuous":false,"x":2190,"y":5660,"wires":[["25ab6b29149609cb","45ff17b9119baf32"]]},{"id":"25ab6b29149609cb","type":"debug","z":"22eb2b8f4786695c","name":"debug 504","active":true,"tosidebar":true,"console":false,"tostatus":false,"complete":"false","statusVal":"","statusType":"auto","x":2350,"y":5660,"wires":[]},{"id":"5b61894784d153dc","type":"ui-group","name":"EasyOCR","page":"42252fd6f309916f","width":"6","height":"1","order":2,"showTitle":true,"className":"","visible":"true","disabled":"false","groupType":"default"},{"id":"015784e9e3e0310a","type":"venv-config","venvname":"AI","version":"3.10"},{"id":"42252fd6f309916f","type":"ui-page","name":"Detection","ui":"ba89d595c555beb9","path":"/page3","icon":"home","layout":"grid","theme":"e2c9a4f37a42314e","breakpoints":[{"name":"Default","px":"0","cols":"3"},{"name":"Tablet","px":"576","cols":"6"},{"name":"Small Desktop","px":"768","cols":"9"},{"name":"Desktop","px":"1024","cols":"12"}],"order":3,"className":"","visible":"true","disabled":"false"},{"id":"ba89d595c555beb9","type":"ui-base","name":"My Dashboard","path":"/dashboard","appIcon":"","includeClientData":true,"acceptsClientConfig":["ui-notification","ui-control"],"showPathInSidebar":false,"headerContent":"page","navigationStyle":"default","titleBarStyle":"default","showReconnectNotification":true,"notificationDisplayTime":"1","showDisconnectNotification":true},{"id":"e2c9a4f37a42314e","type":"ui-theme","name":"Default Theme","colors":{"surface":"#ffffff","primary":"#0094CE","bgPage":"#eeeeee","groupBg":"#ffffff","groupOutline":"#cccccc"},"sizes":{"density":"default","pagePadding":"12px","groupGap":"12px","groupBorderRadius":"4px","widgetGap":"12px"}}]The setup involves uploading a file from the dashboard, saving it, and then running EasyOCR on that specific file.
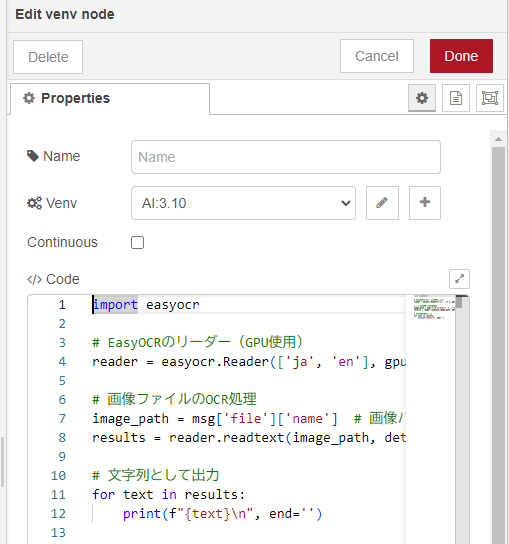
▼I prepared two types of Python code. The upper venv node performs simple processing.
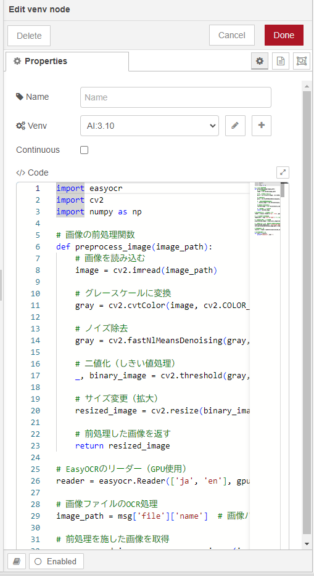
▼The lower venv node performs binarization (thresholding) before processing.
I tested the actual execution.
▼It can be accessed via a smartphone browser.
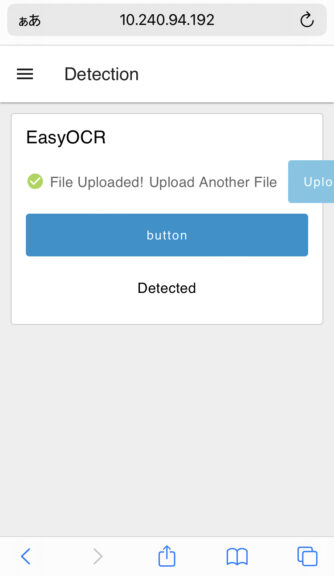
▼Images taken with the smartphone can be uploaded directly.
Note that there is a limit on the file size that can be uploaded. This limit can be edited in the configuration file.
▼Information found on this page:
https://dashboard.flowfuse.com/user/template-examples.html#file-upload
According to the documentation, you should add the following to settings.json:
dashboard: {
    maxHttpBufferSize: 1e8 // size in bytes, example: 100 MB
}
Since I am running Node-RED via Express, I added it to that code.
// 設定オブジェクトの生成 - 他のオプションについてはデフォルトの 'settings.js' ファイルを参照してください
var settings = {
    httpAdminRoot: "/red",
    httpNodeRoot: "/api",
    userDir: path.join(__dirname, '.nodered'),
    dashboard: {
        maxHttpBufferSize: 1e8 // size in bytes, example: 100 MB
    }
};
▼For details on running Node-RED with Express:
Trying Out Embedding Node-RED into Applications Part 1 (Electron, Express)
Info This article is translated from Japanese to English. Introduction In this post, I tried embedding Node-RED into an application I am creating with Electron…
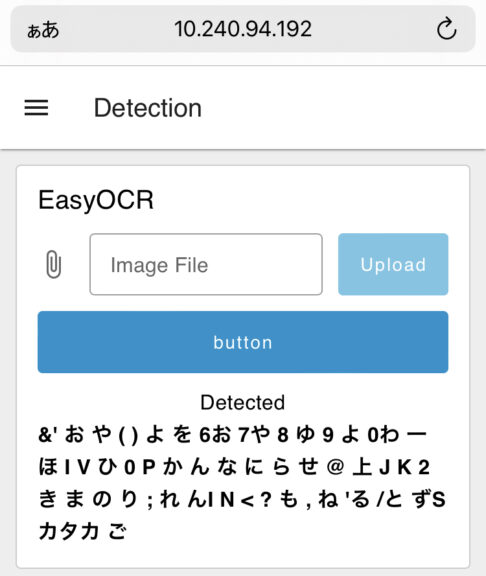
I took a screenshot of the smartphone screen and uploaded it.
▼The binarized image looks like this:
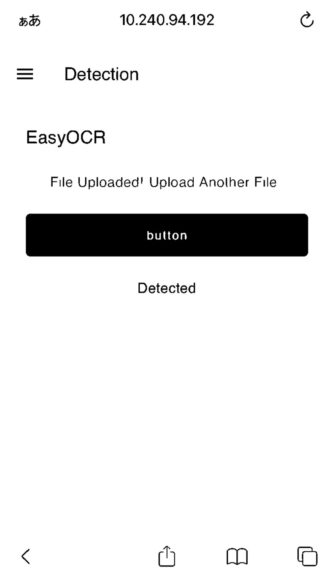
▼Once processing is complete, the detected text is displayed.

I also took photos of other items to test EasyOCR.
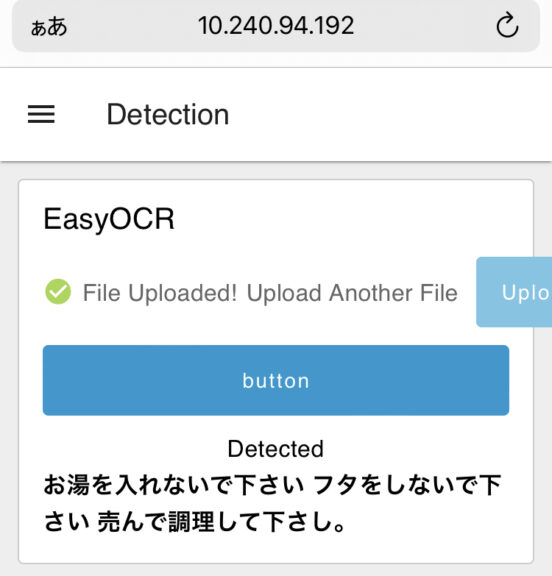
▼This one was an image of a container that looks exactly like cup noodles.
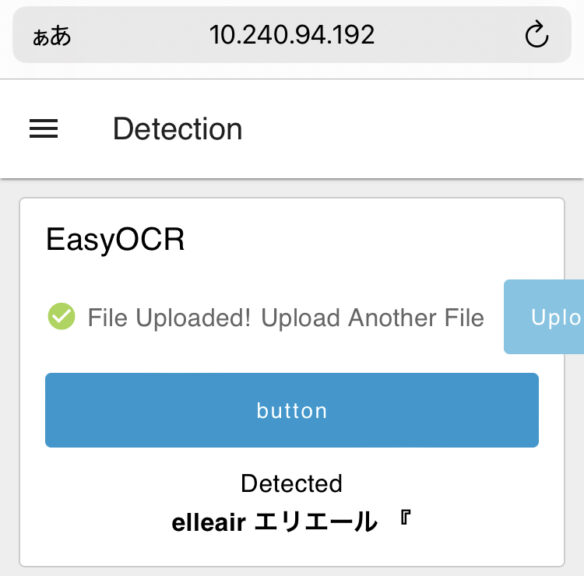
▼This one is a tissue box.
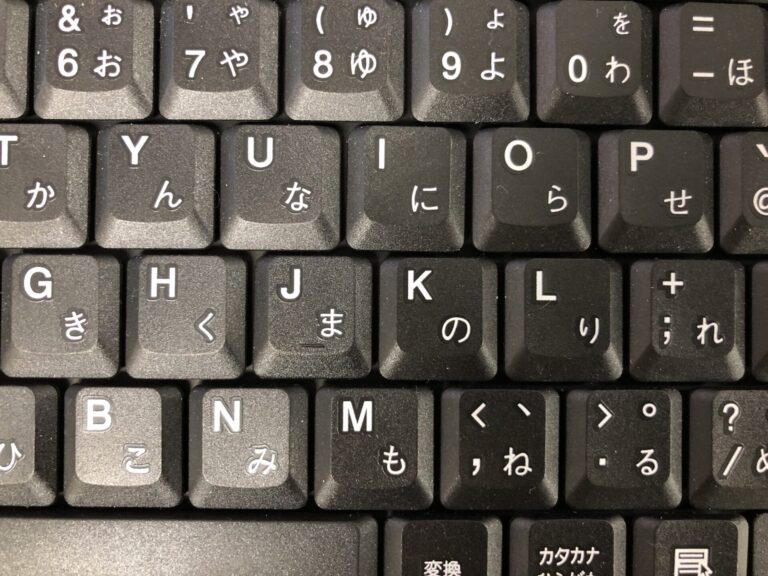
▼I uploaded an image of a keyboard.
▼The binarized version of the keyboard image:
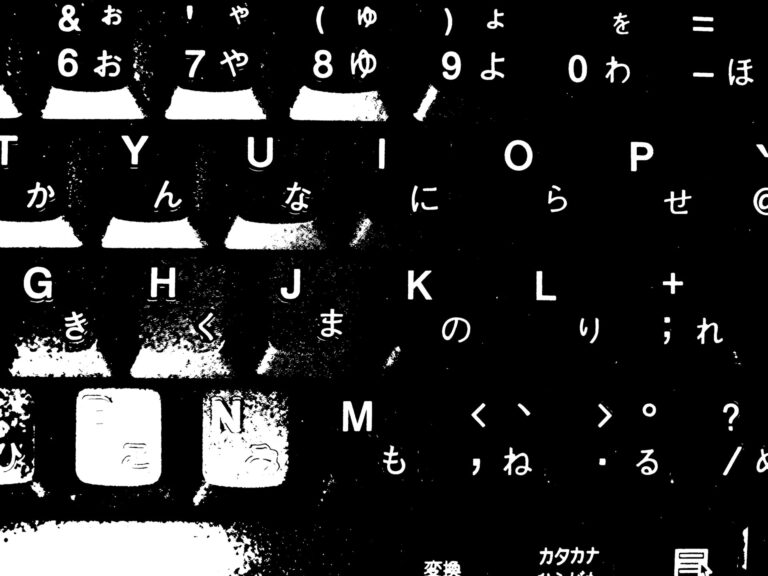
▼The order of the text is scattered, but it is successfully detecting the keys.
While detection is easy to implement, my impression is that the accuracy isn't particularly high.
Finally
I was able to extract text from images using EasyOCR. Overall, the accuracy seems low, which might be partly because I'm using Japanese.
For areas where the context is slightly off, I think it would be a good idea to use a local LLM (Large Language Model) for correction. When performing real-time recognition with a robot, it will likely be necessary to move the robot closer to the target.