Trying Out Raspberry Pi Zero 2 Part 3 (1.3-inch LCD HAT and Close-up Photography)
Introduction
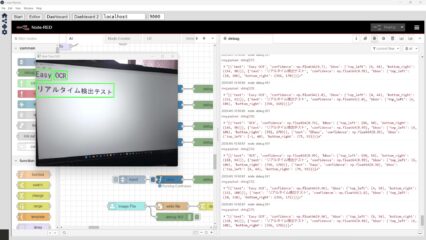
In response to a request, I tried displaying camera footage on a Waveshare 1.3-inch LCD HAT compatible with Raspberry Pi.
The goal was to test close-up photography, and I found that it could capture images even when the lens and the subject were almost touching. I was also able to display the feed on the tiny 1.3-inch screen.
▼Previous articles:
Designing a Case for Raspberry Pi Zero (3D Printing)
Info This article is translated from Japanese to English. Introduction In this post, I tried creating a case for the Raspberry Pi Zero using a 3D printer.Perha…
Trying Out Raspberry Pi Zero 2 Part 1 (Xfce, Vivaldi, and Node-RED)
Info This article is translated from Japanese to English. Introduction In this post, I tried using the Raspberry Pi Zero 2. I picked one up at Maker Faire Toky…
Parts Used
Since I can execute commands via SSH connection, I was able to set everything up without an external display, keyboard, or mouse. Of course, you can also connect it to a monitor and operate via the GUI.
▼For more on SSH connections, please refer to this article:
Setting Up Raspberry Pi Zero Without a Wired Keyboard (SSH Connection, Raspberry Pi Imager)
Info This article is translated from Japanese to English. Introduction In this post, I set up a Raspberry Pi Zero via SSH connection because I didn't have a wi…
I used a Raspberry Pi Zero 2 W, but stock still seems limited.
▼As of October, when this article was written, there appeared to be stock at Raspberry Pi shops.
https://akizukidenshi.com/catalog/g/g117398
Raspberry Pi Zero 2 W — スイッチサイエンス
512 MBのRAMと、Raspberry Pi RP3A0 SiP(Broadcom BCM2710A1ベース)を搭載した小型SBCです。

https://raspberry-pi.ksyic.com/main/index/pdp.id/849,850,851/pdp.open/849
▼Amazon has stock, though prices are slightly higher.

▼An SD card is also required to flash the OS.

Since the Zero 2 W generates significant heat, cooling is necessary if performance becomes unstable.
▼I usually use this heatsink:

▼For the camera, I used one I had previously used.
https://www.digikey.jp/ja/products/detail/seeed-technology-co-ltd/114992264/12396940
▼It is a type similar to this one:

▼It was also featured in this article:
Trying Out Raspberry Pi Zero 2 Part 2 (Camera, Thonny, and Node-RED)
Info This article is translated from Japanese to English. Introduction In this post, I attached a camera to the Raspberry Pi Zero 2. I remember struggling with…
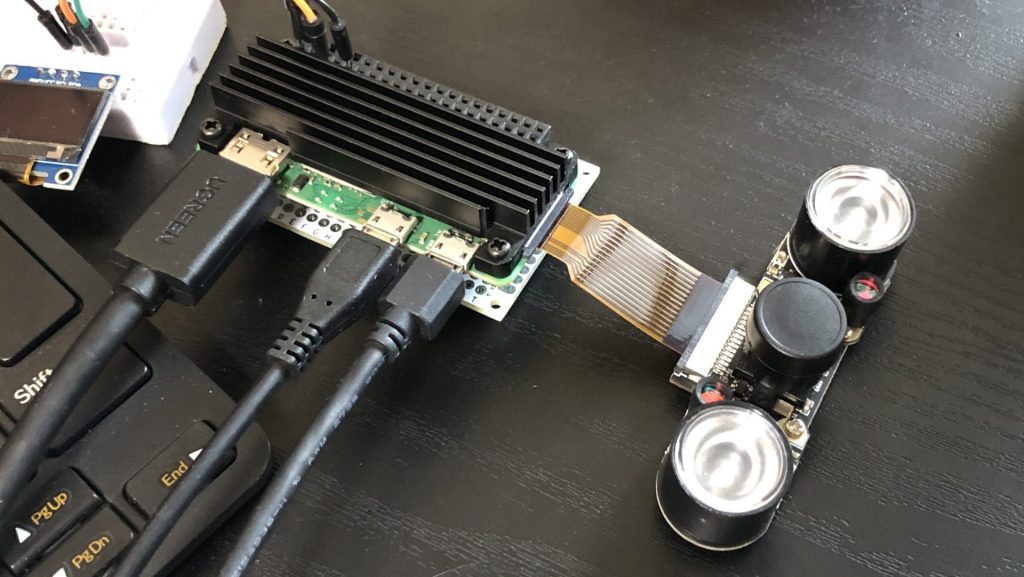
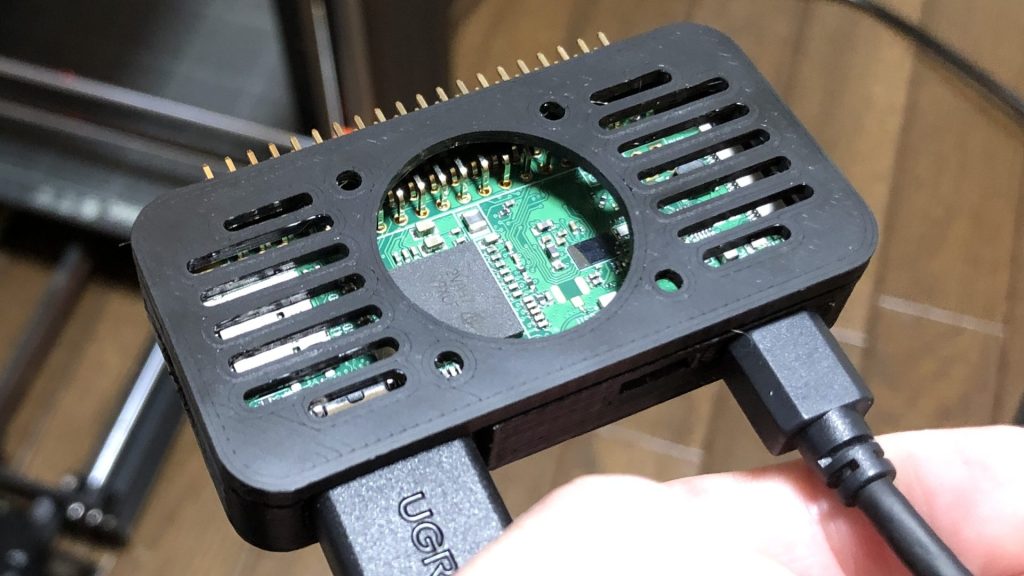
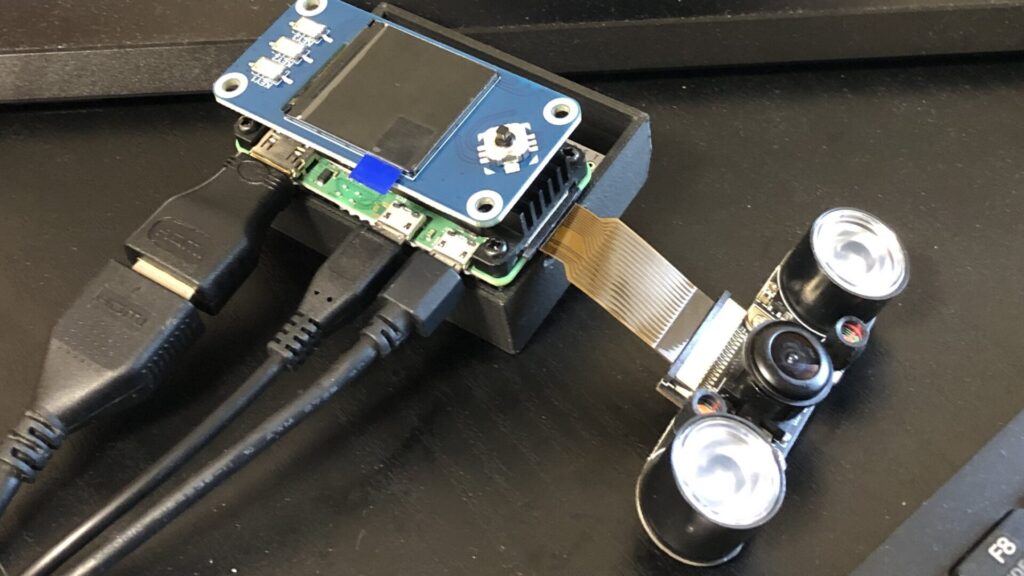
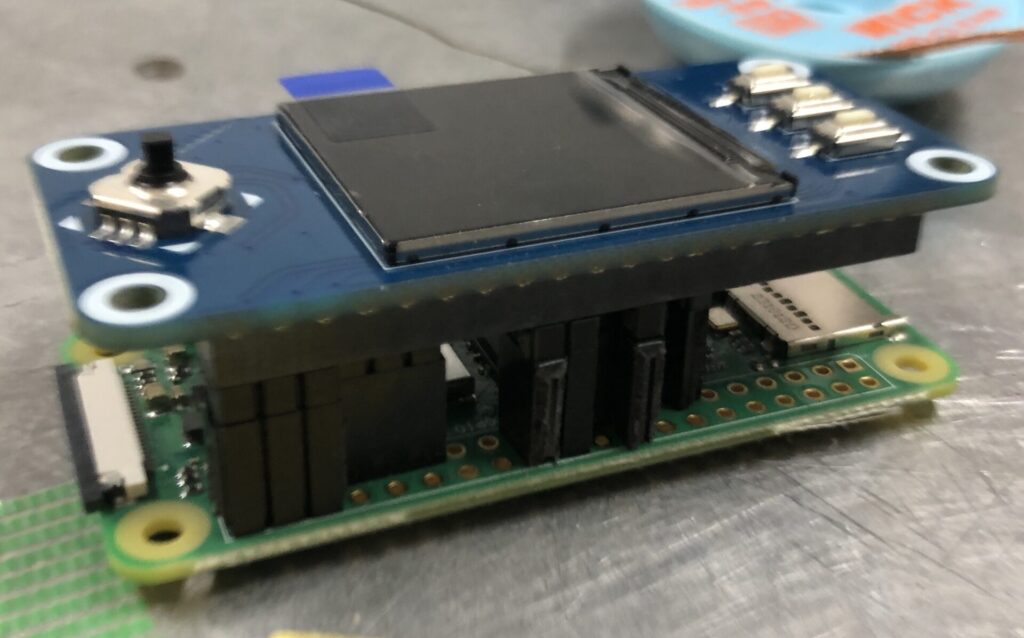
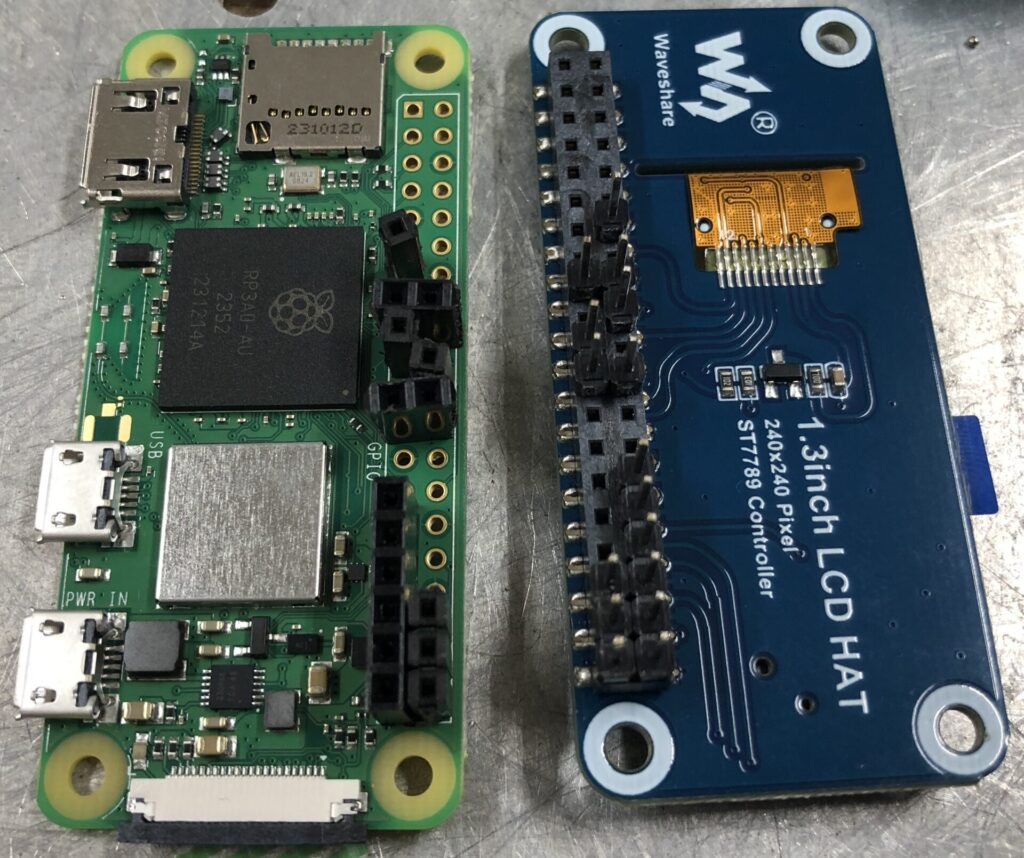
The main component this time is the Waveshare 1.3-inch LCD HAT.
▼This is the display:

Since the HAT is mounted by stacking it on top of the Pi, you need to be careful when attaching a heatsink.
▼A combination of a pin socket and pin header provided just the right height.

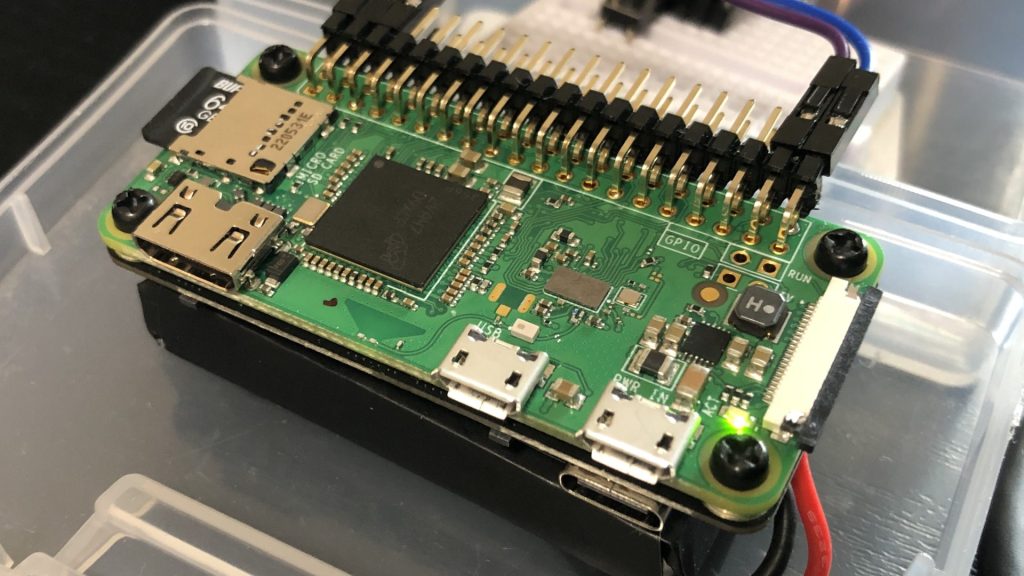
For this project, I used a different Raspberry Pi Zero 2 W than the one from previous posts.
▼I soldered only the necessary pins.
Issues Regarding OS Versions
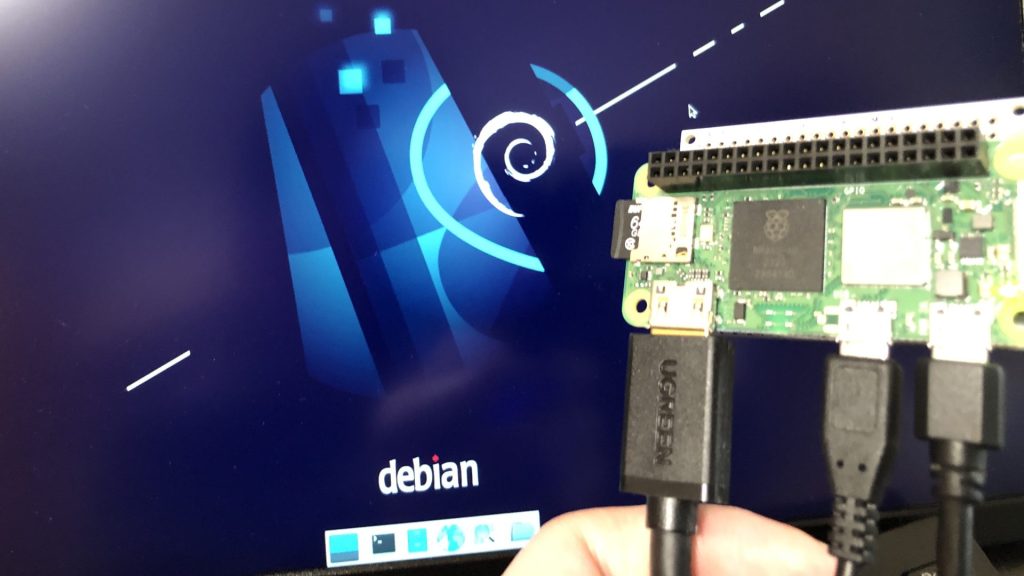
I tested three different OS versions to set up the display and camera. Available features varied depending on the OS version and whether it was 32-bit or 64-bit. It seems not every version is supported for all functions. If you want to display the desktop screen on the 1.3-inch display, please select Bullseye 32-bit at this stage.
▼I tested Bookworm 64-bit/32-bit and Bullseye 32-bit.

▼The device used is a Raspberry Pi Zero 2 W.
Bookworm worked for basic functions, but not for displaying the desktop screen, likely due to a lack of software compatibility.
▼The following setup page contained several notes regarding OS versions:
https://www.waveshare.com/wiki/1.3inch_LCD_HAT
PS: If you are using the system of the Bullseye branch, you need to change "apt-get" to "apt", the system of the Bullseye branch only supports Python3.
If you use bookworm system, only the lgpio library is available, bcm2835 and wiringPi libarary cannot be installed or used. Please note that the python library does not need to install, you can directly run the demo.
FBCP is currently not compatible with 64-bit Raspberry Pi system, it is recommended to use 32-bit system.
https://www.waveshare.com/wiki/1.3inch_LCD_HAT
▼The README for the display driver also states that it currently only works on 32-bit systems:
https://github.com/juj/fbcp-ili9341?tab=readme-ov-file#raspbian--32-bit-only
▼Issues with 64-bit systems were reported on this page:
https://github.com/juj/fbcp-ili9341/issues/43
Setting Up the 1.3-inch LCD HAT
Enabling SPI
I followed the configuration steps on the Waveshare Wiki.
▼Reference page:
https://www.waveshare.com/wiki/1.3inch_LCD_HAT
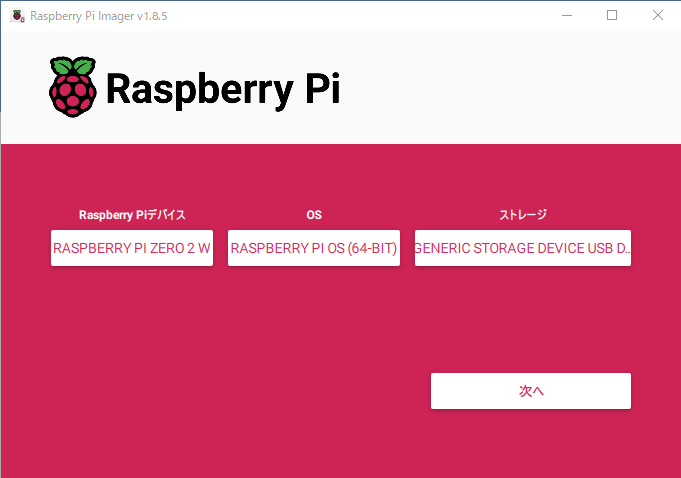
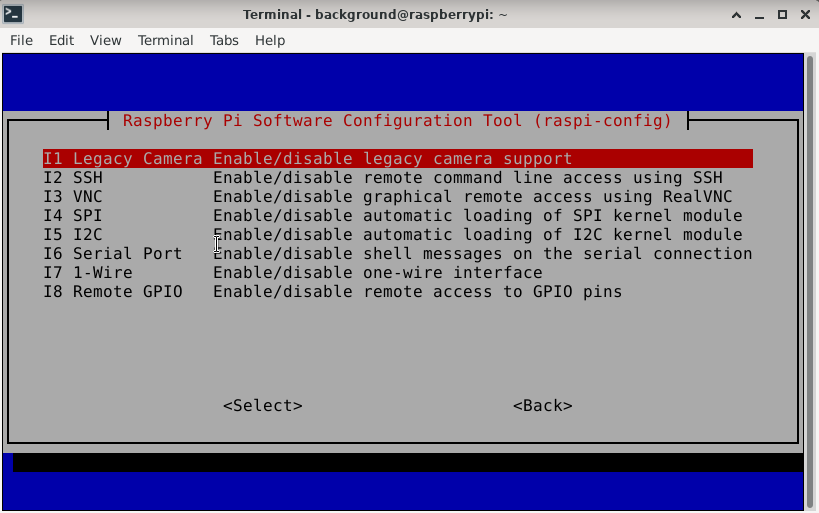
Enable SPI using raspi-config:
sudo raspi-config▼Select Interface Options.
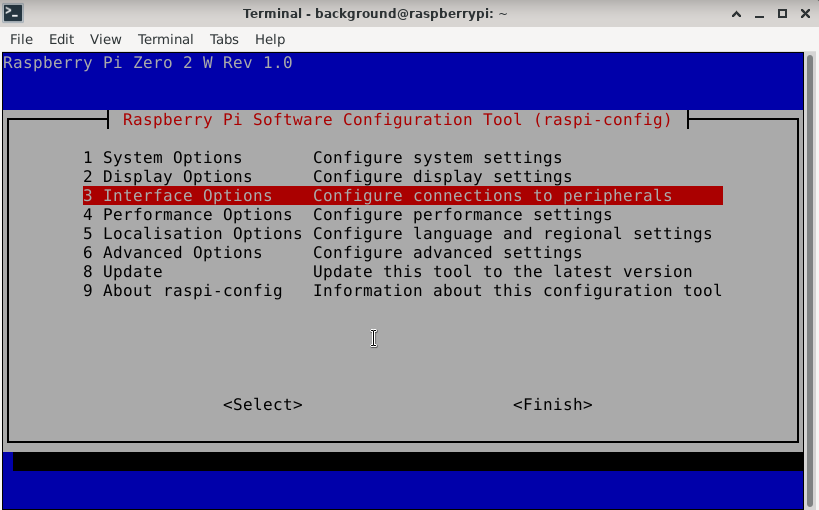
▼Choose the SPI option and enable it.
After rebooting with sudo reboot, execute the following commands.
For Bookworm
Only lgpio can be used on Bookworm.
▼Create a folder and install it there:
cd ~
mkdir lgpio
cd lgpio
wget https://github.com/joan2937/lg/archive/master.zip
unzip master.zip
cd lg-master
sudo make install
I adjusted the sample download command because the one in the wiki (7z x 1.3inch_LCD_HAT_code.7z -r -o./1.3inch_LCD_HAT_code) did not work:
cd ~
mkdir waveshare
cd waveshare
wget https://files.waveshare.com/upload/b/bd/1.3inch_LCD_HAT_code.7z
7z x 1.3inch_LCD_HAT_code.7z
sudo chmod 777 -R 1.3inch_LCD_HAT_code
cd 1.3inch_LCD_HAT_code
Next, I ran the Python demo programs:
cd python
python main.py
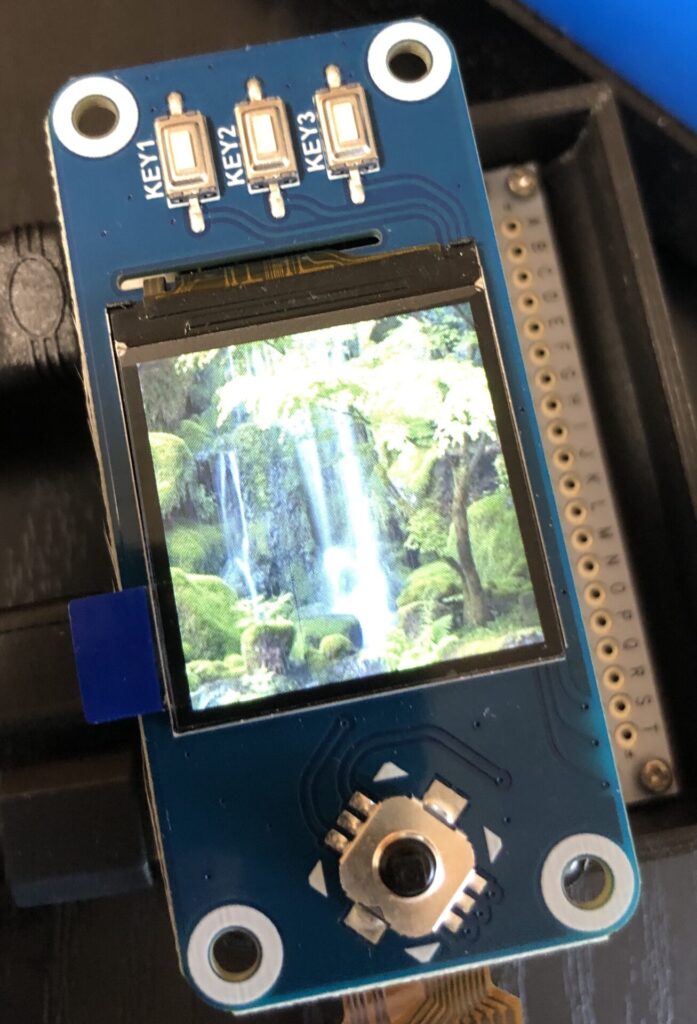
python key_demo.py▼Running main.py displayed text and shapes.
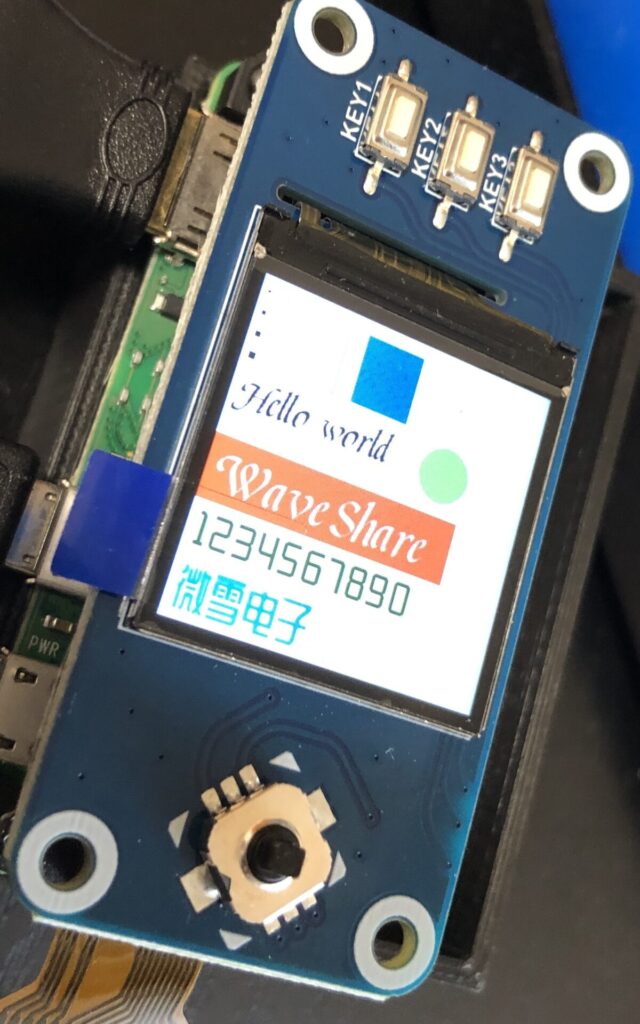
▼After a short while, an image was displayed. For such a small screen, the clarity is impressive.
▼Running key_demo.py showed an interface corresponding to the joystick and button inputs.
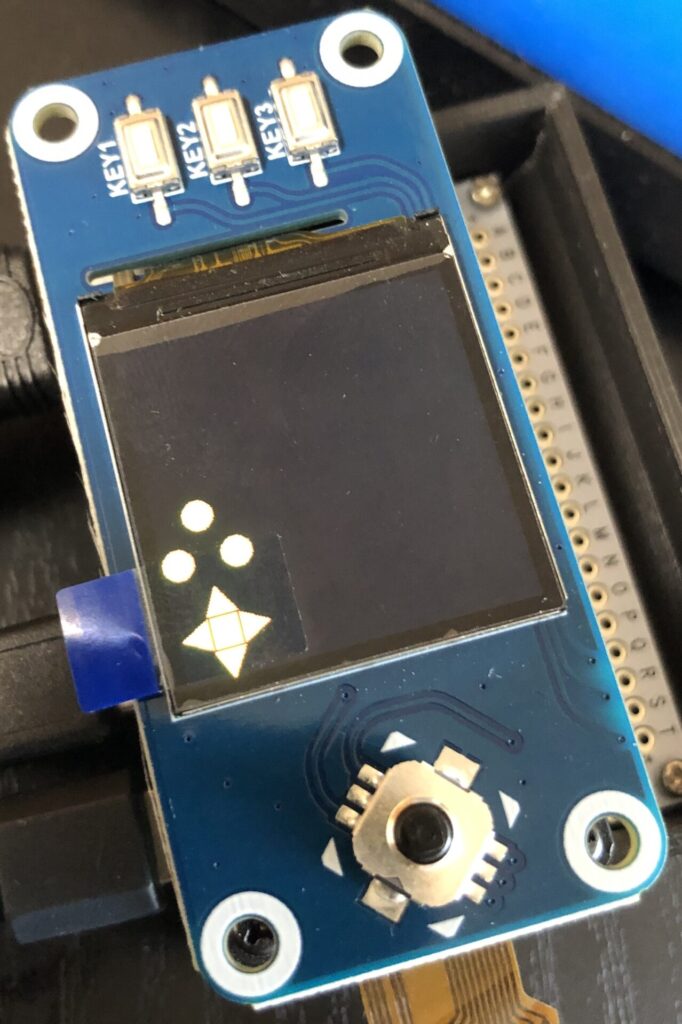
▼Inputs from the joystick and buttons were output correctly.

For Bullseye
Bullseye supports more libraries, so there are more items to install. I created a waveshare folder and downloaded the necessary files there.
cd ~
mkdir waveshare
cd waveshare
Install BCM2835:
wget http://www.airspayce.com/mikem/bcm2835/bcm2835-1.71.tar.gz
tar zxvf bcm2835-1.71.tar.gz
cd bcm2835-1.71/
sudo ./configure && sudo make && sudo make check && sudo make install
Install WiringPi: (Run gpio -v at the end to check the version).
cd ~/waveshare
git clone https://github.com/WiringPi/WiringPi
cd WiringPi
./build
gpio -v
Install lgpio:
cd ~/waveshare
mkdir lgpio
cd lgpio
wget https://github.com/joan2937/lg/archive/master.zip
unzip master.zip
cd lg-master
sudo make install
Install Python and packages:
sudo apt-get update
sudo apt-get install python3-pip
sudo apt-get install python3-pil
sudo apt-get install python3-numpy
sudo pip3 install spidev
Download the samples: (Modified from the wiki version).
cd ~/waveshare
wget https://files.waveshare.com/upload/b/bd/1.3inch_LCD_HAT_code.7z
7z x 1.3inch_LCD_HAT_code.7z
sudo chmod 777 -R 1.3inch_LCD_HAT_code
cd 1.3inch_LCD_HAT_code
At this point, I confirmed the Python demos worked:
cd python
sudo python main.py
sudo python key_demo.py
Now, let's configure the system to mirror the desktop screen to the display. First, install the FBCP driver.
cd ~/waveshare
sudo apt-get install cmake -y
sudo apt-get install p7zip-full -y
wget https://files.waveshare.com/upload/f/f9/Waveshare_fbcp.7z
7z x Waveshare_fbcp.7z
mkdir build
cd build
Execute the command compatible with the 1.3-inch LCD HAT:
cmake -DSPI_BUS_CLOCK_DIVISOR=20 -DWAVESHARE_1INCH3_LCD_HAT=ON -DBACKLIGHT_CONTROL=ON -DSTATISTICS=0 ..Install additional dependencies and build:
sudo apt install libraspberrypi-dev raspberrypi-kernel-headers
make -j
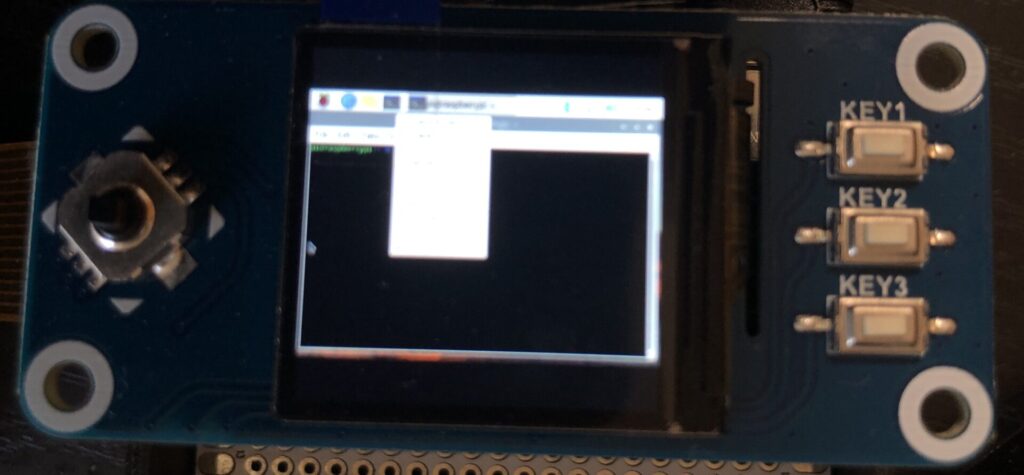
sudo ./fbcp▼After execution, several lines appeared in the terminal.

▼The display turned on. As expected, text and icons are tiny.
Next, I configured the display to turn on automatically at boot. I added fbcp& before exit 0 in the /etc/rc.local file:
sudo cp ~/waveshare/build/fbcp /usr/local/bin/fbcp
sudo nano /etc/rc.local
The documentation suggests editing /boot/config.txt, but its location varies by OS. For some, it has moved to /boot/firmware/config.txt. On Bullseye, I edited it here:
sudo nano /boot/config.txtI added the following five lines:
hdmi_force_hotplug=1
hdmi_cvt=300 300 60 1 0 0 0
hdmi_group=2
hdmi_mode=87
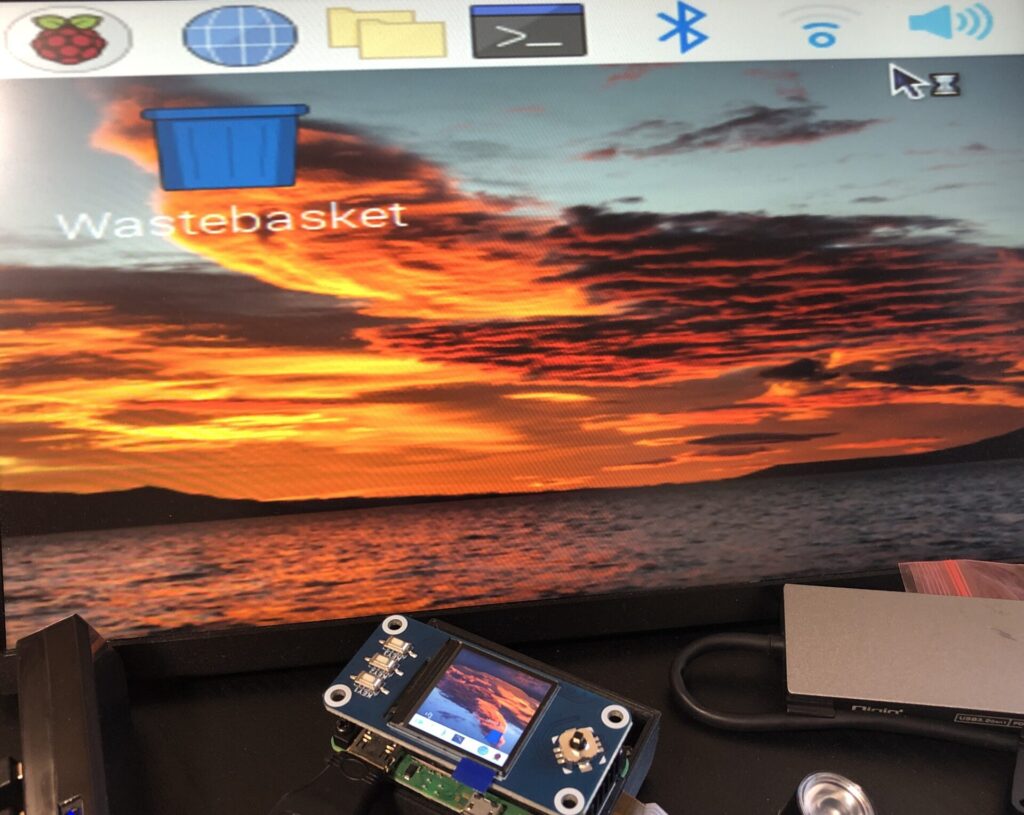
display_rotate=0Then, I rebooted:
sudo reboot▼The display turned on at boot! The icon size looks good. The screen is also mirrored to my mobile monitor.
To use the analog stick as a mouse cursor at boot, you need to create a local.desktop file. I downloaded and installed the requirements:
cd ~/waveshare
sudo apt-get install python3-xlib
sudo pip3 install PyMouse
sudo pip3 install unix
sudo pip3 install PyUserInput
wget http://www.waveshare.net/w/upload/d/d3/Mouse.7z
7z x Mouse.7z
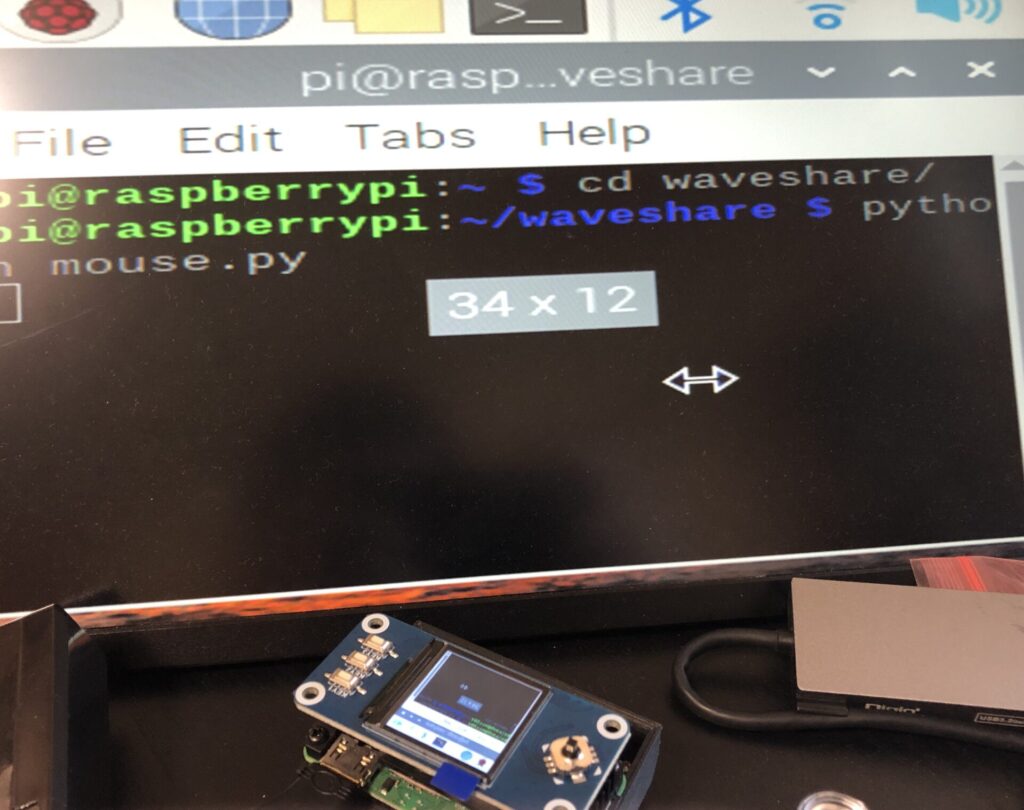
sudo python3 mouse.pycd ~/.config
mkdir autostart
cd autostart/
sudo nano local.desktopI wrote the following three lines into the file:
[Desktop Entry]
Type=Application
Exec=python3 /home/pi/waveshare/mouse.py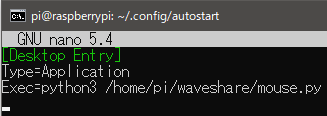
▼I was now able to operate the mouse cursor on boot!
Displaying Camera Footage on the Screen
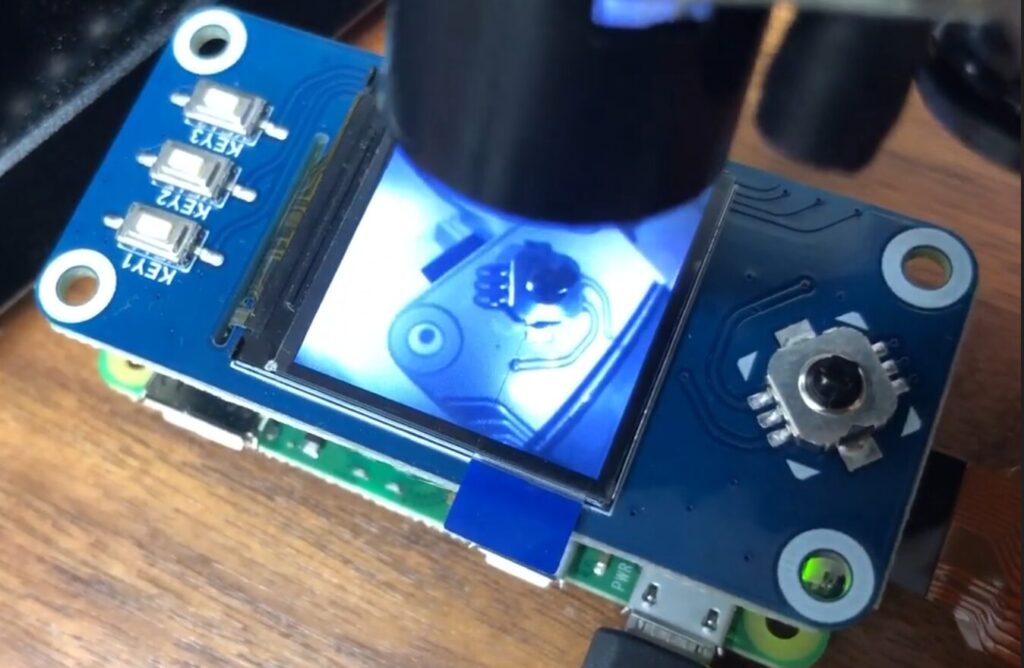
I displayed the camera feed on the LCD. For this, I adjusted the lens for macro photography by rotating it.
▼Capturing while the infrared illuminators (for night vision) were attached. I was able to get a clear shot even with the lens very close.
When I aimed the camera at a flat cable, the lens seemed to reflect off the surface.
▼The traces on the PCB were clearly visible.
▼Capturing with the infrared illuminators removed. As expected, almost nothing is visible in the dark.
Finally
I was surprised at how clearly I could capture images at such a close range. It feels like using a small digital magnifying glass.
Checking the captured images later revealed some distortion. I hadn't paid much attention to distortion before, but its effects seem more pronounced at extremely close ranges. I was able to correct the distorted images using OpenCV in Python.
If you only need to display images, I think there is little need to show the full desktop screen on such a small display. The main focus is whether the environment is easy to develop in!