Trying Out Faster Whisper (Running on GPU, Python, and Node-RED)
Introduction
In this post, I tried performing transcription using Faster Whisper.
I had tried it before because it is faster than transcription with OpenAI's original Whisper, but at that time, I was running it on the CPU. Recently, I configured CUDA and PyTorch for YOLO to enable GPU usage, so I have now made it possible to use the GPU with Faster Whisper as well.
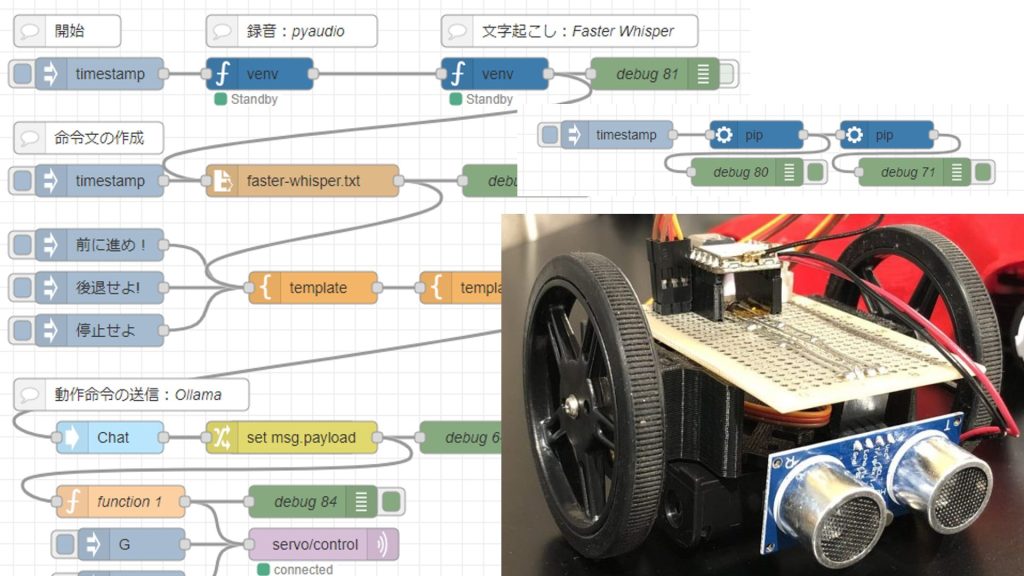
▼I have used it in this article as well. Previously, when the processing was slow, there were instances where the robot would not stop immediately.
Control Microcontrollers with Voice (Node-RED, Gemma2, Faster Whisper, XIAO ESP32C3)
Introduction In this article, I tried to control a small robot using a microcontroller by voice. This is a summary of what I have tried before. To operate …
▼Previous articles are here:
Using OpensAI's Whisper (Speech Recognition, Python)
Introduction In this article, I used OpenAI's Whisper. I thought that OpenAI's service was a paid service with an API key, but the source code is available…

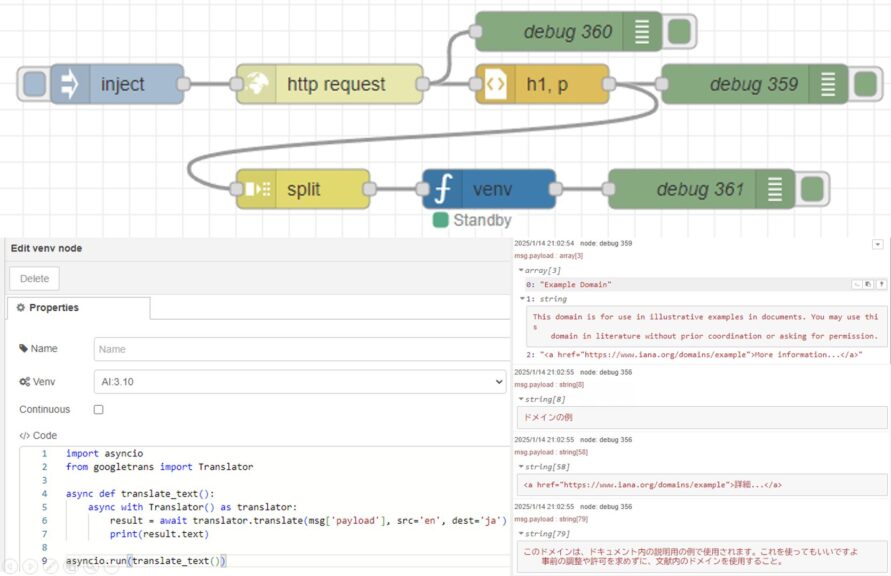
Translating Text with Python (Googletrans, Node-RED)
Info This article is translated from Japanese to English. Introduction In this post, I tried out translation using Googletrans in Python.Although I haven't wri…
Setting Up the Environment
I am using Python 3.10 in a Windows 11 environment.
▼I am using a gaming laptop purchased for around 100,000 yen, running Windows 11.
Shopping: New Laptop and SSD Expansion (ASUS TUF Gaming A15)
Info This article is translated from Japanese to English. Introduction In this post, I’ll be talking about replacing my PC after my previous one broke down. I …


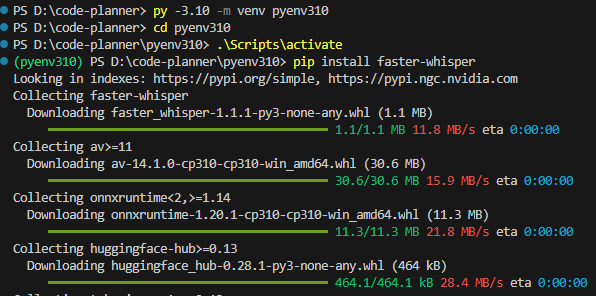
Create a Python virtual environment and install the package using the following commands:
py -3.10 -m venv pyenv310
cd pyenv310
.\Scripts\activate
pip install faster-whisper
▼It was installed without any particular issues.
▼I have summarized the creation of Python virtual environments in the following article:
Create Python Virtual Environments (venv, Windows)
Info This article is translated from Japanese to English. Introduction In this post, I have summarized how to create a Python virtual environment.I was researc…

Trying to Run on CPU
For the audio file to be transcribed, I used one generated by gTTS.
▼I have tried this in the following article:
Using gTTS with Python (Text-to-Speech, Node-RED)
Introduction In this article, I used gTTS (Google Text-to-Speech) with Python. I have used VoiceVox before, but I was looking for something that could also…
▼I tried transcribing the following audio, which is about 9 seconds long.
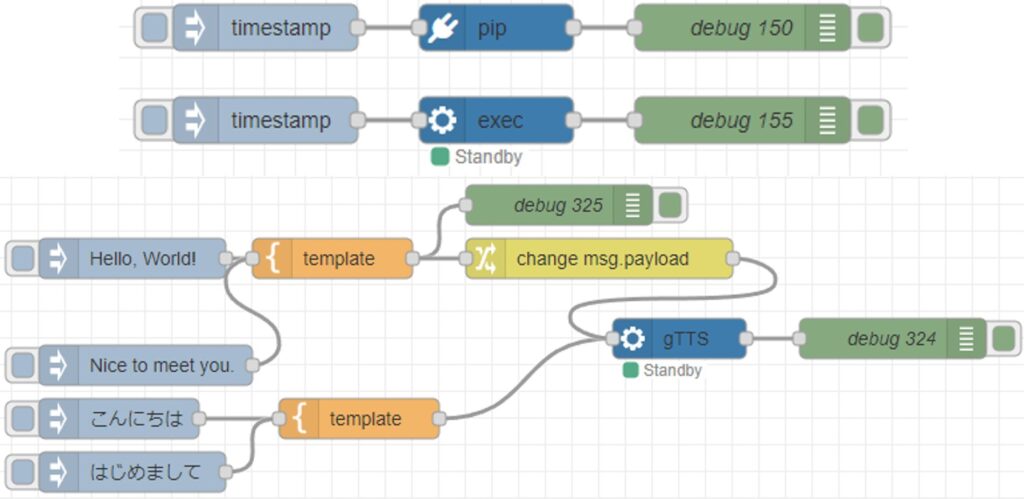
▼It can be generated using the following flow:
[{"id":"35dcc8614a07234a","type":"inject","z":"22eb2b8f4786695c","name":"","props":[{"p":"payload"}],"repeat":"","crontab":"","once":false,"onceDelay":0.1,"topic":"","payload":"Hello, this is a sample voice. May I help you? I can talk to you by voice. My interface will be further extended.","payloadType":"str","x":1830,"y":2760,"wires":[["5d52af097769c75c"]]},{"id":"64b94f8f700be65e","type":"venv-exec","z":"22eb2b8f4786695c","name":"gTTS","venvconfig":"36c2cf6f351fdc6e","mode":"execute","executable":"gtts-cli.exe","arguments":"","x":1970,"y":2820,"wires":[["1fd3d1f5c03a5732"]]},{"id":"1fd3d1f5c03a5732","type":"debug","z":"22eb2b8f4786695c","name":"debug 427","active":true,"tosidebar":true,"console":false,"tostatus":false,"complete":"false","statusVal":"","statusType":"auto","x":2130,"y":2820,"wires":[]},{"id":"5d52af097769c75c","type":"template","z":"22eb2b8f4786695c","name":"","field":"payload","fieldType":"msg","format":"handlebars","syntax":"mustache","template":"'{{payload}}' --output voice.mp3","output":"str","x":1980,"y":2760,"wires":[["3dd3393f1f930dac","dee234e23e403bf1"]]},{"id":"3dd3393f1f930dac","type":"debug","z":"22eb2b8f4786695c","name":"debug 428","active":true,"tosidebar":true,"console":false,"tostatus":false,"complete":"false","statusVal":"","statusType":"auto","x":2150,"y":2720,"wires":[]},{"id":"dee234e23e403bf1","type":"change","z":"22eb2b8f4786695c","name":"","rules":[{"t":"change","p":"payload","pt":"msg","from":"\"","fromt":"str","to":"","tot":"str"}],"action":"","property":"","from":"","to":"","reg":false,"x":2180,"y":2760,"wires":[["64b94f8f700be65e"]]},{"id":"36c2cf6f351fdc6e","type":"venv-config","venvname":"AI","version":"3.8"}]First, I will try the sample program from the documentation.
▼The Faster Whisper GitHub repository is here. It also contains information about model comparisons.
https://github.com/SYSTRAN/faster-whisper
The program adjusted for CPU is as follows. The audio file is named voice.mp3 and is placed in the directory of the Python virtual environment.
from faster_whisper import WhisperModel

model_size = "large-v3"
model = WhisperModel(model_size, device="cpu", compute_type="int8")

segments, info = model.transcribe("voice.mp3", beam_size=5)

print("Detected language '%s' with probability %f" % (info.language, info.language_probability))

for segment in segments:
    print("[%.2fs -> %.2fs] %s" % (segment.start, segment.end, segment.text))
▼It seems the model needs to be downloaded for the first time.

▼It ran successfully! Although the language was not specified, it was detected as "en".
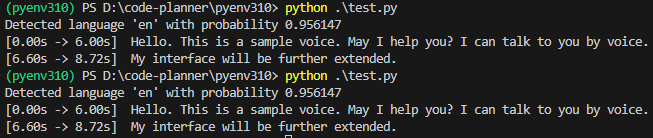
However, since the model is "large-v3", the processing is slow. It took about 30 seconds. Thinking that the language detection might also be taking time, I passed language="en" as an argument to transcribe.
segments, info = model.transcribe("voice.mp3", beam_size=5, language="en")▼It detected it as "en" with 100% probability. In this state, it took about 22 seconds.

I tried changing the model from "large-v3" to others.
▼With "base", it could detect in about 2 seconds.

▼"tiny" was also about 2 seconds. Since "base" is also fast, there doesn't seem to be a difference for an audio file of this length.

▼With "small", it took about 4 seconds.

▼With "medium", it took about 10 seconds.

Perhaps because the audio was generated by gTTS, the detection accuracy did not particularly change.
However, if I change the device of WhisperModel to "cuda", an error occurs.
▼The following error occurred:

Trying to Run on GPU
I will now resolve the error encountered when running on the GPU.
▼I previously encountered and resolved an error when trying to use YOLO on the GPU.
Object Detection with YOLO Part 4 (GPU Setup, CUDA 12.6)
Info This article is translated from Japanese to English. Introduction In this post, I tried object detection with YOLO using a GPU.According to the Ultralytic…
In the case of YOLO, I installed ultralytics in a Python virtual environment with CUDA 12.6, uninstalled torchvision once, and then reinstalled the torch-related packages.
I tried the same procedure this time by executing the following commands:
pip uninstall torchvision
pip3 install torch torchvision torchaudio --index-url https://download.pytorch.org/whl/cu126
▼It seems torchvision was not installed to begin with. The packages were installed by the subsequent command.

After this, when I ran the following program, it worked.
from faster_whisper import WhisperModel

model_size = "large-v3"
model = WhisperModel(model_size, device="cuda", compute_type="int8")

segments, info = model.transcribe("voice.mp3", beam_size=5, language="en")

for segment in segments:
    print("[%.2fs -> %.2fs] %s" % (segment.start, segment.end, segment.text))
▼It ran successfully! It took about 11 seconds with large-v3.

Compared to when running on the CPU, it seems to be faster when the model is large. Conversely, for smaller models, the CPU was faster.
▼It took about 4 seconds with "base". "tiny" was similar.

▼With "medium", it took about 10 seconds, which was about the same as with the CPU.

I tried setting the model to "large-v3" and changing the compute_type from "int8".
▼In the case of "float16", it took about 9.5 seconds.

▼In the case of "int8_float16", it was about 11 seconds.

While float16 was slightly faster, I lack knowledge regarding the specific differences, so I intend to research this in more detail later.
Executing in Node-RED
I used Faster Whisper by utilizing the "python-venv" node I developed, which allows executing Python code in Node-RED.
▼I have written about the transition and mechanism of the "python-venv" node development in the following Qiita article:
https://qiita.com/background/items/d2e05e8d85427761a609
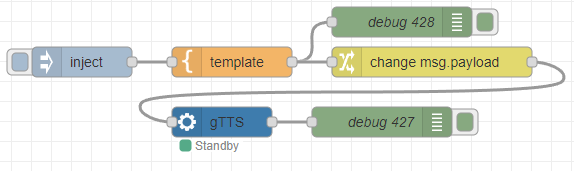
Based on the programs so far, I created the following flow.
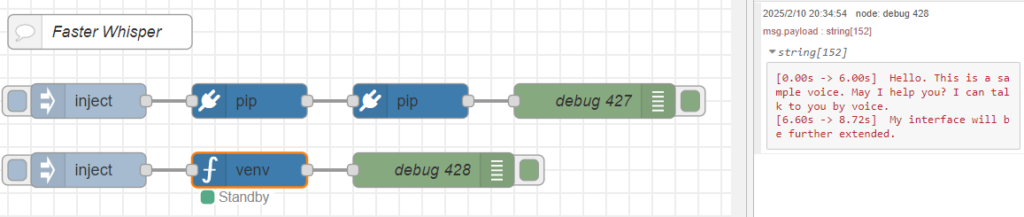
▼The overall flow is here:
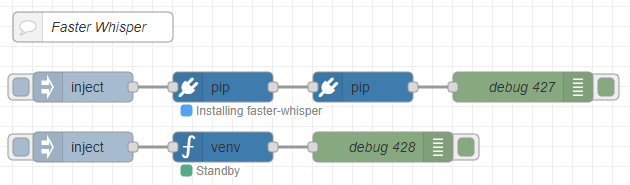
[{"id":"d34b1c24f210765d","type":"comment","z":"22eb2b8f4786695c","name":"Faster Whisper","info":"","x":1800,"y":2720,"wires":[]},{"id":"00832978f0f1b880","type":"pip","z":"22eb2b8f4786695c","venvconfig":"6fee16ddf4b551d4","name":"","arg":"faster-whisper","action":"install","tail":false,"x":1930,"y":2780,"wires":[["cfb8692e8f555b75"]]},{"id":"bae2d94ba8963138","type":"inject","z":"22eb2b8f4786695c","name":"","props":[],"repeat":"","crontab":"","once":false,"onceDelay":0.1,"topic":"","x":1790,"y":2780,"wires":[["00832978f0f1b880"]]},{"id":"b8890ca52996e4b4","type":"debug","z":"22eb2b8f4786695c","name":"debug 427","active":true,"tosidebar":true,"console":false,"tostatus":false,"complete":"false","statusVal":"","statusType":"auto","x":2230,"y":2780,"wires":[]},{"id":"cfb8692e8f555b75","type":"pip","z":"22eb2b8f4786695c","venvconfig":"6fee16ddf4b551d4","name":"","arg":"torch torchvision torchaudio --index-url https://download.pytorch.org/whl/cu126","action":"install","tail":false,"x":2070,"y":2780,"wires":[["b8890ca52996e4b4"]]},{"id":"2fdbcc97e5a92ab2","type":"inject","z":"22eb2b8f4786695c","name":"","props":[{"p":"model","v":"large-v3","vt":"str"},{"p":"voice_path","v":"voice.mp3","vt":"str"}],"repeat":"","crontab":"","once":false,"onceDelay":0.1,"topic":"","x":1790,"y":2840,"wires":[["8b29ca988c0d3af3"]]},{"id":"045ca9bc4dc2d245","type":"debug","z":"22eb2b8f4786695c","name":"debug 428","active":true,"tosidebar":true,"console":false,"tostatus":false,"complete":"false","statusVal":"","statusType":"auto","x":2090,"y":2840,"wires":[]},{"id":"8b29ca988c0d3af3","type":"venv","z":"22eb2b8f4786695c","venvconfig":"6fee16ddf4b551d4","name":"","code":"from faster_whisper import WhisperModel\n\nmodel_size = msg['model']\nmodel = WhisperModel(model_size, device=\"cuda\", compute_type=\"float16\")\n\nsegments, info = model.transcribe(msg['voice_path'], beam_size=5, language=\"en\")\n\nfor segment in segments:\n print(\"[%.2fs -> %.2fs] %s\" % (segment.start, segment.end, segment.text))","continuous":false,"x":1930,"y":2840,"wires":[["045ca9bc4dc2d245"]]},{"id":"6fee16ddf4b551d4","type":"venv-config","venvname":"FasterWhisper","version":"3.10"}]It is set up to install faster-whisper and torch-related packages using the "pip" node.
You can execute Python code in the "venv" node.
▼I wrote the code as follows:
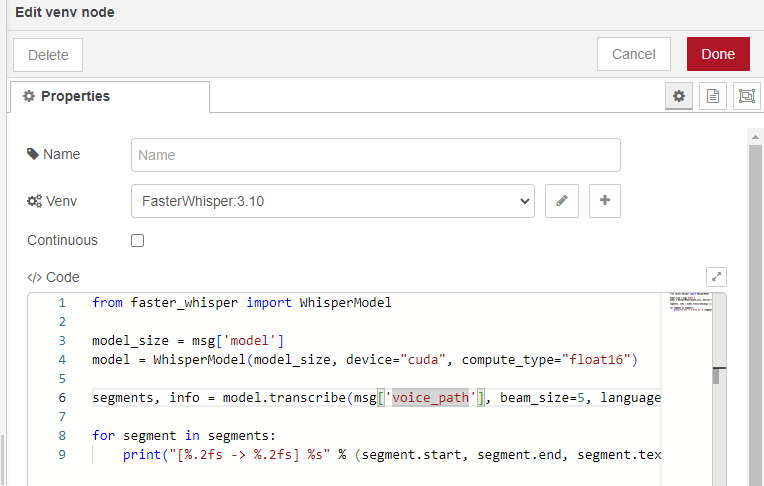
The notation msg['model'] is unique to this node and allows it to receive Node-RED messages.
▼It is specified in the "inject" node as follows:
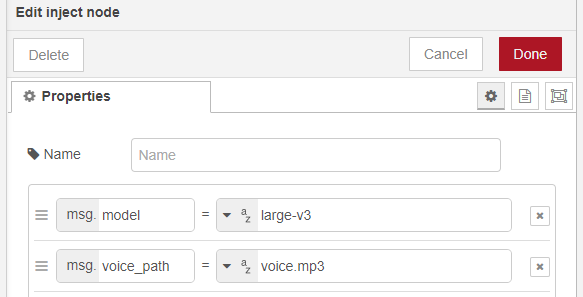
I tried running it with the device set to "cuda".
▼It ran successfully on the GPU!
Since I was able to execute it with the "python-venv" node, it seems possible to combine it with other nodes.
Finally
I compared the processing speeds and found that the GPU was faster for larger model sizes. The CPU was also sufficiently fast, taking about 2 seconds with the "base" model. Since this was a short audio of about 9 seconds, it might change with longer audio. Also, perhaps because the audio was generated by gTTS, the transcription results did not particularly change. The accuracy might vary with human voices. I would like to check the accuracy while enabling actual dialogue with a robot.