Trying Out Embedding Node-RED into Applications Part 1 (Electron, Express)
Introduction
In this post, I tried embedding Node-RED into an application I am creating with Electron.
I followed a sample for embedding into an Express application, which was available in the Node-RED User Guide.
▼It was described on this page:
https://nodered.jp/docs/user-guide/runtime/embedding
Like Electron, Express is a framework for Node.js. Since both use npm commands, I was able to integrate them smoothly.
▼For information on setting up the Electron environment, see here:
Electronでデスクトップアプリケーションを開発してみる:チュートリアル編
はじめに 今回はElectronを使ってみました。デスクトップアプリケーションを開発してみたいなと思っています。他のソフトウェアのほうが良いかもしれませんが、とりあえ…

▼The desktop application currently under development is here. It includes various features:
https://github.com/404background/code-planner
Embedding into an Express Application
Starting Node-RED
For the program, I used the one from the "Embedding into an existing application" page in the user guide mentioned above. I saved it as node-red.js.
If you plan to display it later with Electron, save it in the directory where your package.json is located.
First, install Express and Node-RED:
npm install express && npm install node-red
Running the following command starts Node-RED:
node ./node-red.js
If you want to start it in a separate command prompt, run it with "start":
start node ./node-red.js
Displaying the Editor Screen
When starting Node-RED through Express, the standard settings.js is not used, so the configuration must be written directly inside node-red.js. This is already handled in the sample program.
Accordingly, while the editor screen is usually opened at http://127.0.0.1:1880/ or http://localhost:1880, the address is different this time.
Since the program specifies server.listen(8000), the port number is 8000. Additionally, because httpAdminRoot is set to "/red" in the settings, you can access the editor by going to http://localhost:8000/red in your browser.
Let's look at the settings a bit more:
var settings = {
    httpAdminRoot:"/red",
    httpNodeRoot: "/api",
    userDir:"/home/nol/.nodered/",
    functionGlobalContext: { }    // Enable global context
};
The userDir is set to /home/nol/.nodered. On Windows, a C:\home\nol.nodered folder will be created, and flows will be saved there.
Since you can specify a relative path, it might be easier to save it directly within your Electron application's directory. I set mine to "./.node-red/".
Displaying the Dashboard Screen
I often use node-red-dashboard, but its address is also different in this setup.
▼The node-red-dashboard page is here:
node-red-dashboard (node) - Node-RED (nodered.org)
As noted in the settings section of the dashboard, you can access the dashboard screen by appending "/ui" to the http Root.
The http Root address is "/api", as configured in the settings of the sample program. Therefore, it will be displayed when you access http://localhost:8000/api/ui.
Displaying within an Electron Application
There are three ways to embed web pages in Electron: iframe, WebView, and BrowserView. This time, I am using WebView.
▼For more details, please see here:
https://www.electronjs.org/ja/docs/latest/tutorial/web-embeds
Note that WebView is not recommended in Electron because it is based on Chromium's webview tag.
▼It is mentioned here:
https://www.electronjs.org/ja/docs/latest/api/webview-tag#warning
I wrote my application using webview, and it works without any particular problems.
Since it only involves writing the following element in HTML, it is almost the same as using an iframe:
<webview src="URL_TO_DISPLAY" id="ELEMENT_ID"></webview>I specified an ID so that I can perform actions such as "changing the URL when a button is pressed" later. For the URL, specify the Node-RED editor screen or similar.
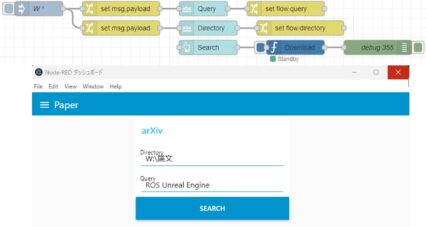
▼Here is how it looks actually embedded in the application:
Finally
Since I can now specify the directory for saving flows, I can save them for each application. Managing too many flows can be difficult, so this should be very convenient.
In the application I am developing, I can also display Jupyter Lab. This means I can execute both JavaScript and Python.