Using Ollama Part 2 (Local LLM for Code Generation and Execution, qwen2.5-coder, Node-RED)
Introduction
This time, I tried generating code with a local LLM and created a Node-RED flow so that it can be executed immediately.
Usually, I copy and paste code generated through ChatGPT prompts to run it. I wanted to see if this process could be automated.
I tried using my custom python-venv node to feed back execution results and install missing packages automatically.
▼Previous articles:
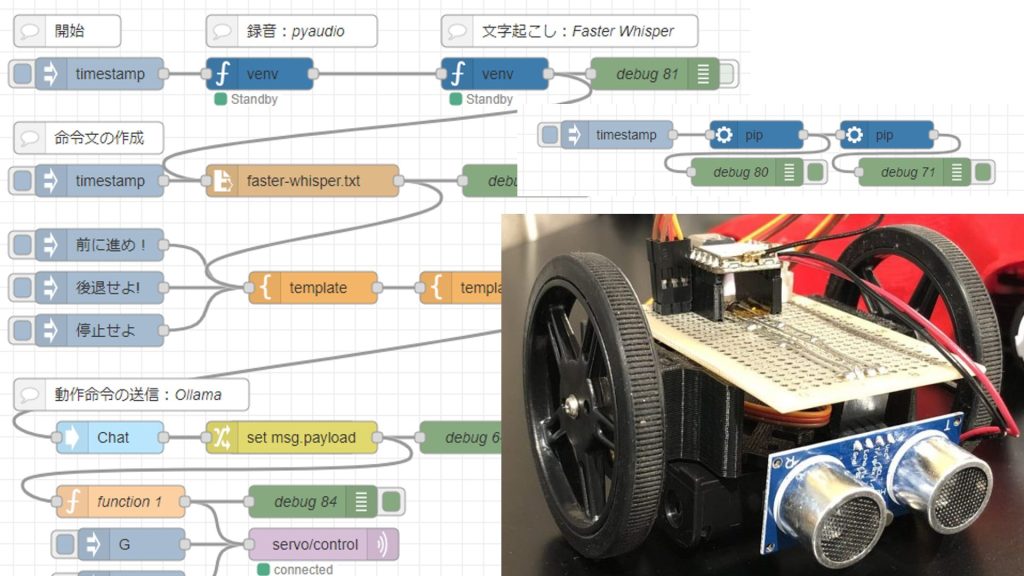
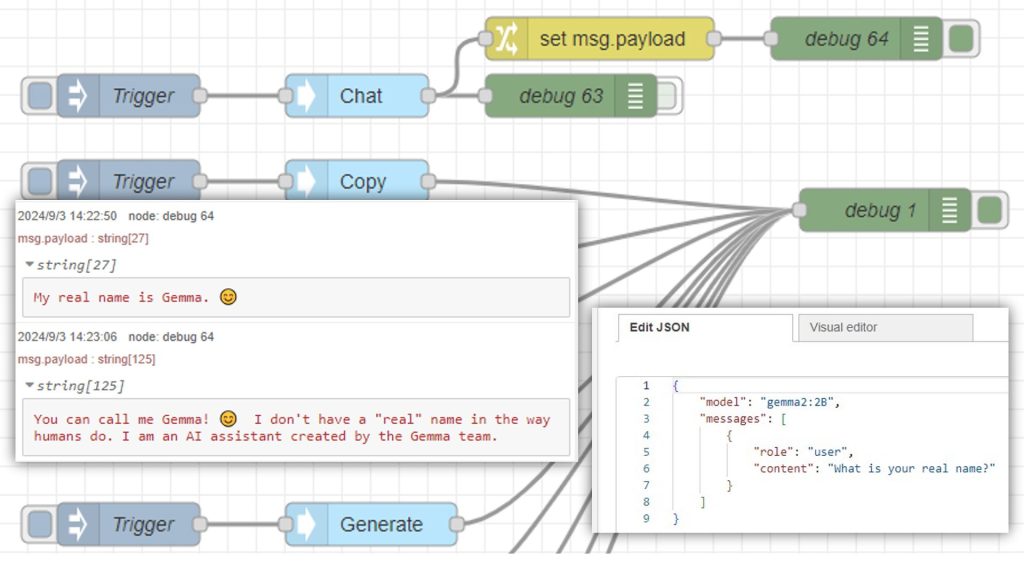
Control Microcontrollers with Voice (Node-RED, Gemma2, Faster Whisper, XIAO ESP32C3)
Introduction In this article, I tried to control a small robot using a microcontroller by voice. This is a summary of what I have tried before. To operate …
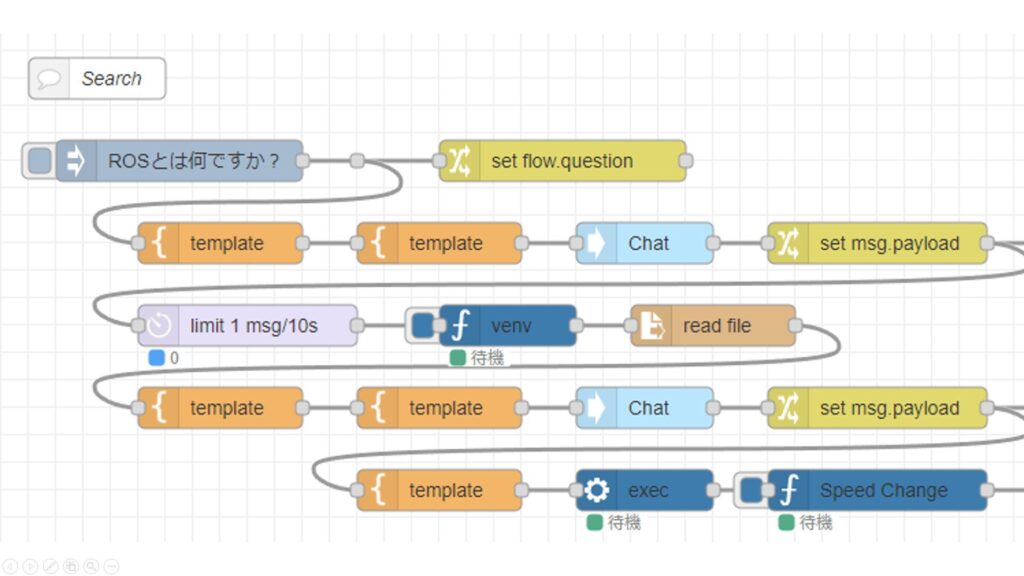
Pythonで検索してローカルLLMで要約してみる(Ollama、Node-RED)
はじめに 今回は情報収集を自動化したかったので、Pythonで検索するプログラムを試してみました。 いつも通りNode-REDで実行できるようにして、他のノードと組み合わ…
Trying qwen2.5-coder
For the local LLM model, I used qwen2.5-coder. There are so many models available in Ollama that it’s hard to know which is optimal, but this one seemed suited for code.
▼This time, I downloaded the 7b model:
https://ollama.com/library/qwen2.5-coder:7b
I installed and started it with the following command:
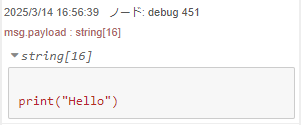
ollama run qwen2.5-coder:7bIt generated a Python program that prints “Hello” in Japanese.
▼The responses were natural in Japanese, fast, and streamed sequentially.
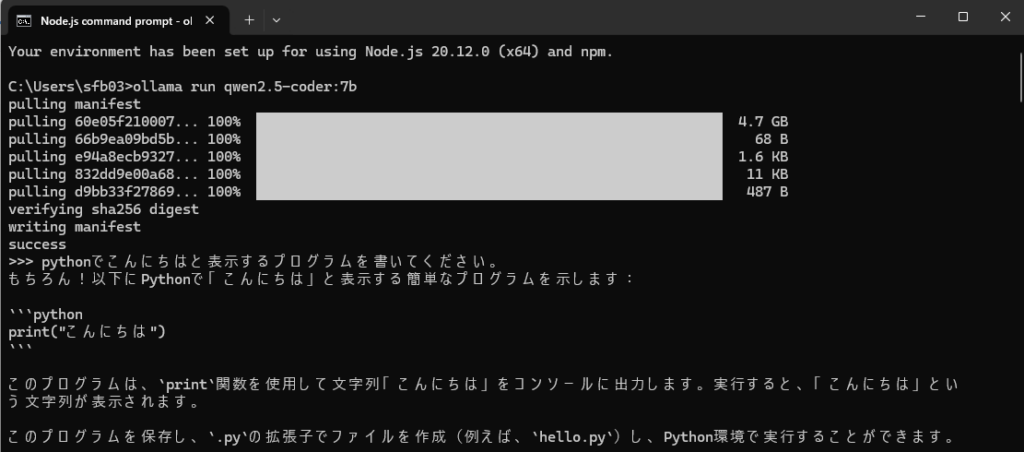
▼When I asked it to provide only code, it included triple backticks (```), which may need processing later in Node-RED.

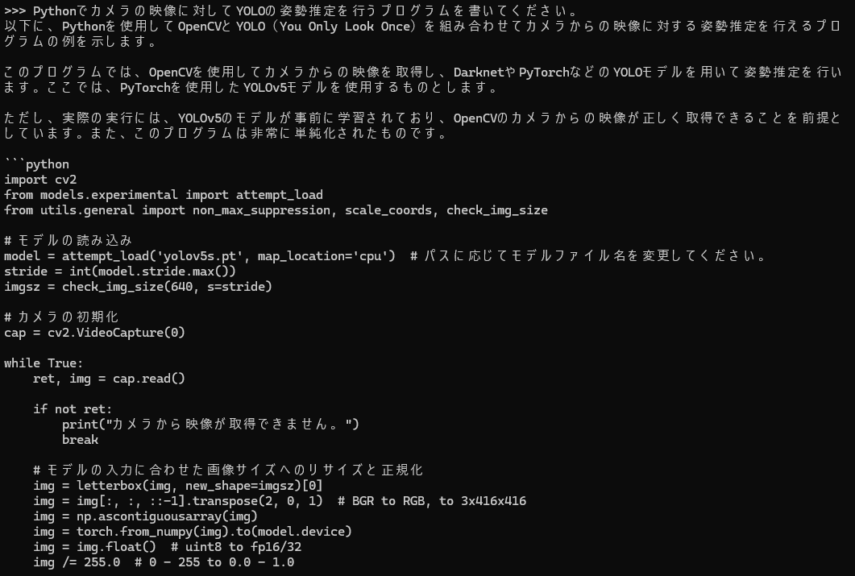
I also tried generating a YOLO program that I usually use for image processing.
▼It suggested a version using YOLOv5 and OpenCV.
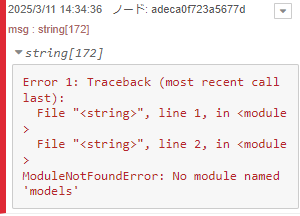
▼When I ran it, I encountered a ModuleNotFoundError.
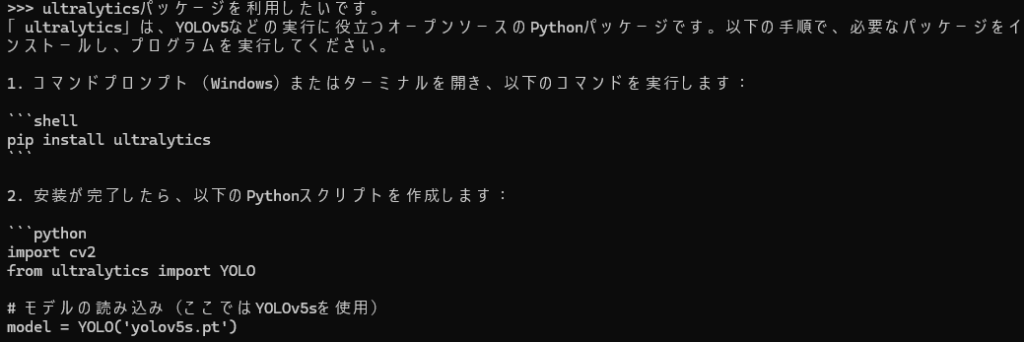
Since I usually use the ultralytics package, I asked the model to generate code using that package.
▼It generated code using ultralytics, and I was able to run it using the already installed YOLOv8n model:
import cv2
from ultralytics import YOLO

# モデルの読み込み(ここではYOLOv5sを使用)
model = YOLO('yolov5s.pt')

# カメラの初期化
cap = cv2.VideoCapture(0)

while True:
    ret, frame = cap.read()

    if not ret:
        print("カメラから映像が取得できません。")
        break

    # モデルの予測
    results = model(frame)

    # 結果を描画
    for result in results:
        boxes = result.boxes.cpu().numpy()
        for box in boxes:
            x1, y1, x2, y2 = map(int, box.xyxy[0])
            cv2.rectangle(frame, (x1, y1), (x2, y2), (0, 255, 0), thickness=3)

    # フレームを表示
    cv2.imshow('Video', frame)

    if cv2.waitKey(1) & 0xFF == ord('q'):
        break

cap.release()
cv2.destroyAllWindows()
Later, I asked it to output JSON since it would be easier to handle in Node-RED.
▼The output included required package names and Python code in JSON format.

This confirmed that Node-RED could use the output.
Using Node-RED
Basic command test
I used the Ollama node, which I have used previously, to interact with the local LLM.
▼Previous usage:
Using Ollama – Part 1 (Gemma2, Node-RED)
Info This article is translated from Japanese to English. Introduction This time, I tried using Ollama, a tool that lets you run LLMs locally. You can install …
For Python execution, I used my custom python-venv node.
▼Development history:
https://qiita.com/background/items/d2e05e8d85427761a609
First, I created a simple flow to check the response from the Ollama node.
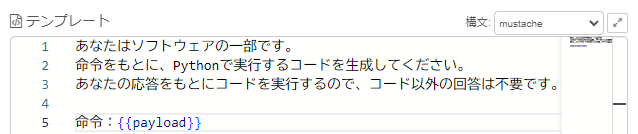
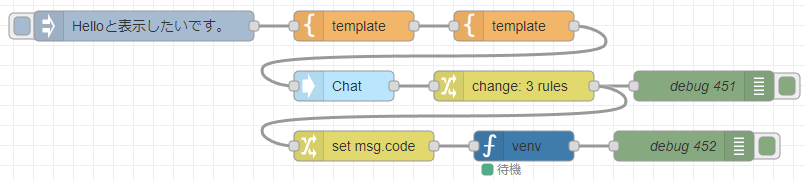
▼Flow example: Sending a command to display “Hello”

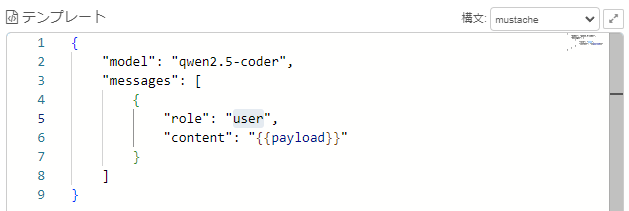
[{"id":"3d7edf383c255911","type":"template","z":"22eb2b8f4786695c","name":"","field":"payload","fieldType":"msg","format":"handlebars","syntax":"mustache","template":"{\n \"model\": \"qwen2.5-coder\",\n \"messages\": [\n {\n \"role\": \"user\",\n \"content\": \"{{payload}}\"\n }\n ]\n}","output":"json","x":1820,"y":3260,"wires":[["b2bed944826694b1"]]},{"id":"b2bed944826694b1","type":"ollama-chat","z":"22eb2b8f4786695c","name":"Chat","server":"","model":"","modelType":"str","messages":"","messagesType":"msg","format":"","stream":false,"keepAlive":"","keepAliveType":"str","tools":"","options":"","x":1650,"y":3320,"wires":[["1b0face17407124f"]]},{"id":"1b0face17407124f","type":"change","z":"22eb2b8f4786695c","name":"","rules":[{"t":"set","p":"payload","pt":"msg","to":"payload.message.content","tot":"msg"},{"t":"change","p":"payload","pt":"msg","from":"```python","fromt":"re","to":"","tot":"str"},{"t":"change","p":"payload","pt":"msg","from":"```","fromt":"str","to":"","tot":"str"}],"action":"","property":"","from":"","to":"","reg":false,"x":1820,"y":3320,"wires":[["94af02c6d4aea6ef"]]},{"id":"aa64a21b2f9adfec","type":"inject","z":"22eb2b8f4786695c","name":"","props":[{"p":"payload"}],"repeat":"","crontab":"","once":false,"onceDelay":0.1,"topic":"","payload":"Helloと表示したいです。","payloadType":"str","x":1450,"y":3260,"wires":[["cec439e00a4acf38"]]},{"id":"cec439e00a4acf38","type":"template","z":"22eb2b8f4786695c","name":"","field":"payload","fieldType":"msg","format":"handlebars","syntax":"mustache","template":"あなたはソフトウェアの一部です。\n命令をもとに、Pythonで実行するコードを生成してください。\nあなたの応答をもとにコードを実行するので、コード以外の回答は不要です。\n\n命令:{{payload}}","output":"str","x":1660,"y":3260,"wires":[["3d7edf383c255911"]]},{"id":"94af02c6d4aea6ef","type":"debug","z":"22eb2b8f4786695c","name":"debug 451","active":true,"tosidebar":true,"console":false,"tostatus":false,"complete":"false","statusVal":"","statusType":"auto","x":2010,"y":3320,"wires":[]}]▼The first template node specifies the role, and the second formats the data for the Ollama node.
The change node removes unnecessary parts from the response.
▼Without this, the response still included ``` markers.
▼The change node removes them.
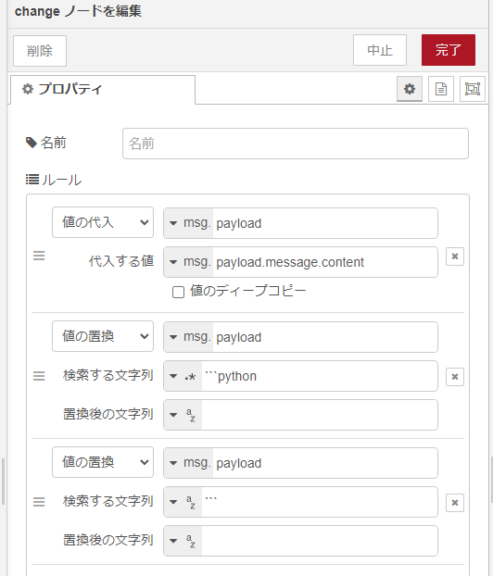
▼As a result, the code can be extracted with line breaks intact.
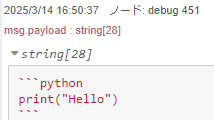
This output is passed to the venv node, which can execute Python code from msg.code.
▼The following flow was created.
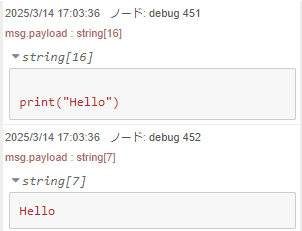
[{"id":"3d7edf383c255911","type":"template","z":"22eb2b8f4786695c","name":"","field":"payload","fieldType":"msg","format":"handlebars","syntax":"mustache","template":"{\n \"model\": \"qwen2.5-coder\",\n \"messages\": [\n {\n \"role\": \"user\",\n \"content\": \"{{payload}}\"\n }\n ]\n}","output":"json","x":1820,"y":3260,"wires":[["b2bed944826694b1"]]},{"id":"b2bed944826694b1","type":"ollama-chat","z":"22eb2b8f4786695c","name":"Chat","server":"","model":"","modelType":"str","messages":"","messagesType":"msg","format":"","stream":false,"keepAlive":"","keepAliveType":"str","tools":"","options":"","x":1650,"y":3320,"wires":[["1b0face17407124f"]]},{"id":"1b0face17407124f","type":"change","z":"22eb2b8f4786695c","name":"","rules":[{"t":"set","p":"payload","pt":"msg","to":"payload.message.content","tot":"msg"},{"t":"change","p":"payload","pt":"msg","from":"```python","fromt":"re","to":"","tot":"str"},{"t":"change","p":"payload","pt":"msg","from":"```","fromt":"str","to":"","tot":"str"}],"action":"","property":"","from":"","to":"","reg":false,"x":1820,"y":3320,"wires":[["94af02c6d4aea6ef","1557307e33fbd272"]]},{"id":"aa64a21b2f9adfec","type":"inject","z":"22eb2b8f4786695c","name":"","props":[{"p":"payload"}],"repeat":"","crontab":"","once":false,"onceDelay":0.1,"topic":"","payload":"Helloと表示したいです。","payloadType":"str","x":1450,"y":3260,"wires":[["e5abb95362f98b24"]]},{"id":"94af02c6d4aea6ef","type":"debug","z":"22eb2b8f4786695c","name":"debug 451","active":true,"tosidebar":true,"console":false,"tostatus":false,"complete":"false","statusVal":"","statusType":"auto","x":2010,"y":3320,"wires":[]},{"id":"fa4619be43ee2e11","type":"venv","z":"22eb2b8f4786695c","venvconfig":"c99155da59825db2","name":"","code":"","continuous":true,"x":1830,"y":3380,"wires":[["61cb970e3c67a69b"]]},{"id":"1557307e33fbd272","type":"change","z":"22eb2b8f4786695c","name":"","rules":[{"t":"set","p":"code","pt":"msg","to":"payload","tot":"msg"}],"action":"","property":"","from":"","to":"","reg":false,"x":1670,"y":3380,"wires":[["fa4619be43ee2e11"]]},{"id":"61cb970e3c67a69b","type":"debug","z":"22eb2b8f4786695c","name":"debug 453","active":true,"tosidebar":true,"console":false,"tostatus":false,"complete":"false","statusVal":"","statusType":"auto","x":1990,"y":3380,"wires":[]},{"id":"e5abb95362f98b24","type":"template","z":"22eb2b8f4786695c","name":"","field":"payload","fieldType":"msg","format":"handlebars","syntax":"mustache","template":"あなたはソフトウェアの一部です。\n命令をもとに、Pythonで実行するコードを生成してください。\nあなたの応答をもとにコードを実行するので、コード以外の回答は不要です。\n\n命令:{{payload}}","output":"str","x":1660,"y":3260,"wires":[["3d7edf383c255911"]]},{"id":"c99155da59825db2","type":"venv-config","venvname":"pyenv","version":"default"}]▼The output confirms that print("Hello") executed correctly.
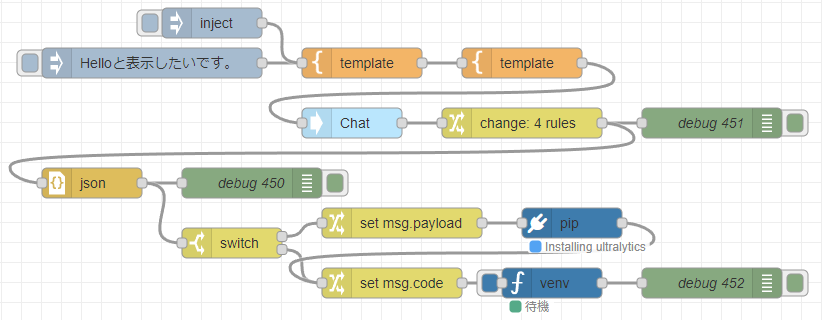
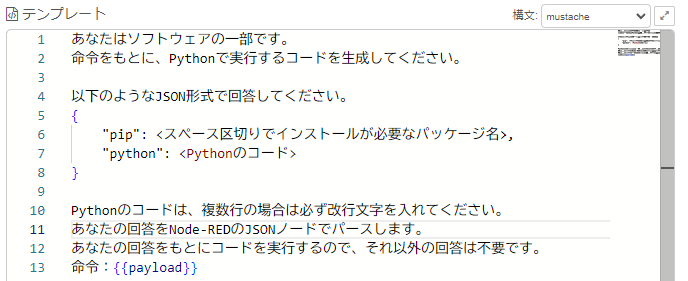
Creating a flow including package installation
I modified the previous flow by changing only the instruction.
▼It is instructed to output the necessary packages and Python code in JSON format.
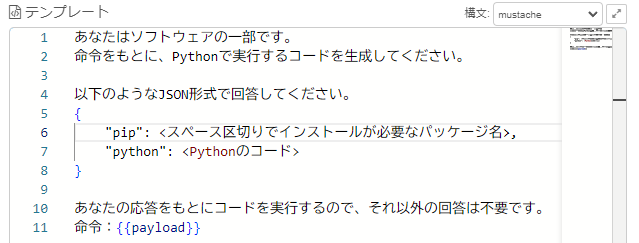
▼The reply came back as a string.
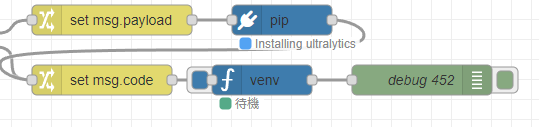
This string is parsed as JSON, packages are installed if necessary, and Python code is executed.
▼The following flow was created.
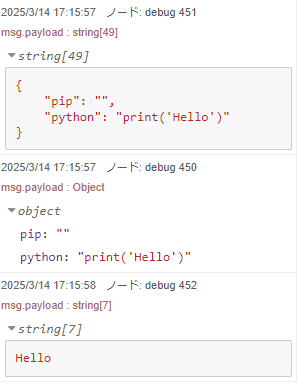
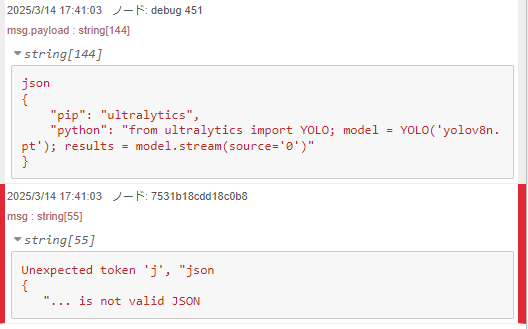
The code to print “Hello” ran without problems.
▼The output confirmed correct execution.
Next, I tried giving the command: “I want to perform real-time object detection with YOLO on the camera using yolov8n.pt, using ultralytics, and view the camera feed with OpenCV.” Various errors occurred, which I addressed step by step. The final flow is shown at the end.
▼The generated code used pip to install ultralytics, but errors occurred.
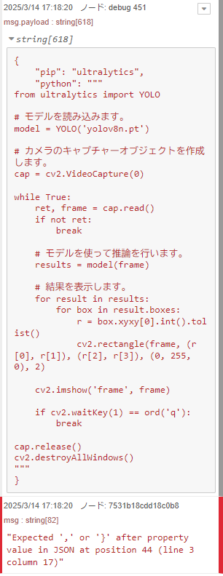
It included """ markers. Since multi-line code needs line breaks when parsed as JSON, I specified this in the instruction.
▼I indicated to parse it using a JSON node in Node-RED.
After correcting, I ran it again.
▼Packages were installed.
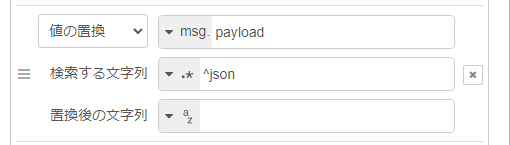
▼Sometimes “json” appeared at the start of the first line, sometimes not.
▼The change node removes the leading “json” text.
The generated code did not display a window using OpenCV, so I added the instruction: “I want to view the camera feed using OpenCV.”
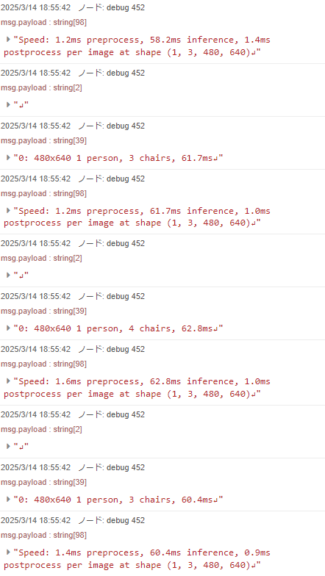
▼The code ran and detection worked, though errors occurred along the way.

Various issues arose with properties, but I was eventually able to run it.
▼The detection state was displayed in real time, and results were output!
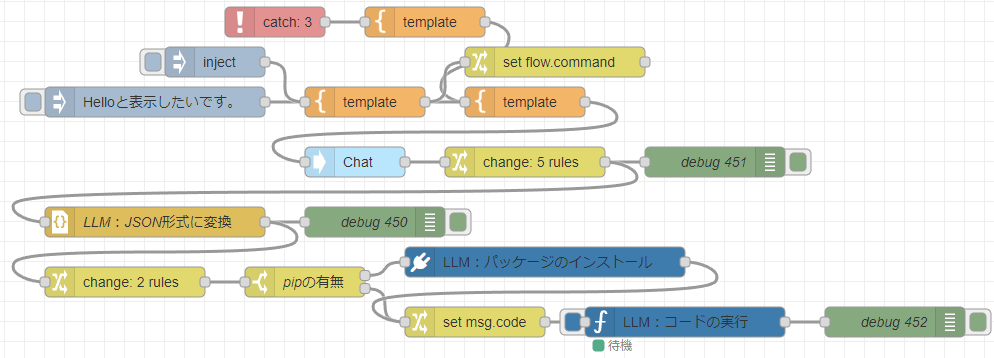
Because execution was needed each time an error occurred, I connected an error node. This allowed automatic execution until the code ran correctly.
▼The final flow looked like this.
[{"id":"4670a91b11fe217a","type":"catch","z":"22eb2b8f4786695c","name":"","scope":["51bf2cfb9a7e738f","7531b18cdd18c0b8","dd6f7612338bcd1f"],"uncaught":false,"x":1570,"y":3180,"wires":[["97ea72a11a11f075"]]},{"id":"97ea72a11a11f075","type":"template","z":"22eb2b8f4786695c","name":"","field":"payload","fieldType":"msg","format":"handlebars","syntax":"mustache","template":"エラーが起きました:{{payload}}\n直前の命令:{{flow.command}}","output":"str","x":1720,"y":3180,"wires":[["3d7edf383c255911"]]},{"id":"3d7edf383c255911","type":"template","z":"22eb2b8f4786695c","name":"","field":"payload","fieldType":"msg","format":"handlebars","syntax":"mustache","template":"{\n \"model\": \"qwen2.5-coder\",\n \"messages\": [\n {\n \"role\": \"user\",\n \"content\": \"{{payload}}\"\n }\n ]\n}","output":"json","x":1820,"y":3260,"wires":[["b2bed944826694b1"]]},{"id":"b2bed944826694b1","type":"ollama-chat","z":"22eb2b8f4786695c","name":"Chat","server":"","model":"","modelType":"str","messages":"","messagesType":"msg","format":"","stream":false,"keepAlive":"","keepAliveType":"str","tools":"","options":"","x":1650,"y":3320,"wires":[["1b0face17407124f"]]},{"id":"1b0face17407124f","type":"change","z":"22eb2b8f4786695c","name":"","rules":[{"t":"set","p":"payload","pt":"msg","to":"payload.message.content","tot":"msg"},{"t":"change","p":"payload","pt":"msg","from":"```python","fromt":"str","to":"","tot":"str"},{"t":"change","p":"payload","pt":"msg","from":"```","fromt":"str","to":"","tot":"str"},{"t":"change","p":"payload","pt":"msg","from":"^json","fromt":"re","to":"","tot":"str"},{"t":"change","p":"payload","pt":"msg","from":"\"\"\"","fromt":"str","to":"\"","tot":"str"}],"action":"","property":"","from":"","to":"","reg":false,"x":1820,"y":3320,"wires":[["94af02c6d4aea6ef","7531b18cdd18c0b8"]]},{"id":"7531b18cdd18c0b8","type":"json","z":"22eb2b8f4786695c","name":"LLM:JSON形式に変換","property":"payload","action":"obj","pretty":false,"x":1450,"y":3380,"wires":[["b7a3e4a8bc54bccf","73914d706c4e8af3"]]},{"id":"aa64a21b2f9adfec","type":"inject","z":"22eb2b8f4786695c","name":"","props":[{"p":"payload"}],"repeat":"","crontab":"","once":false,"onceDelay":0.1,"topic":"","payload":"Helloと表示したいです。","payloadType":"str","x":1450,"y":3260,"wires":[["cec439e00a4acf38"]]},{"id":"cec439e00a4acf38","type":"template","z":"22eb2b8f4786695c","name":"","field":"payload","fieldType":"msg","format":"handlebars","syntax":"mustache","template":"あなたはソフトウェアの一部です。\n命令をもとに、Pythonで実行するコードを生成してください。\n\n以下のようなJSON形式で回答してください。\n{\n \"pip\": <スペース区切りでインストールが必要なパッケージ名>,\n \"python\": <Pythonのコード>\n}\n\nPythonのコードは、複数行の場合は必ず改行文字を入れてください。\nあなたの回答をNode-REDのJSONノードでパースします。\nあなたの回答をもとにコードを実行するので、それ以外の回答は不要です。\n命令:{{payload}}","output":"str","x":1660,"y":3260,"wires":[["3d7edf383c255911","b4563966bae22d59"]]},{"id":"b7a3e4a8bc54bccf","type":"debug","z":"22eb2b8f4786695c","name":"debug 450","active":true,"tosidebar":true,"console":false,"tostatus":false,"complete":"false","statusVal":"","statusType":"auto","x":1670,"y":3380,"wires":[]},{"id":"94af02c6d4aea6ef","type":"debug","z":"22eb2b8f4786695c","name":"debug 451","active":true,"tosidebar":true,"console":false,"tostatus":false,"complete":"false","statusVal":"","statusType":"auto","x":2010,"y":3320,"wires":[]},{"id":"dd6f7612338bcd1f","type":"venv","z":"22eb2b8f4786695c","venvconfig":"c99155da59825db2","name":"LLM:コードの実行","code":"","continuous":true,"x":1980,"y":3480,"wires":[["9cbd84a26d1c55f1"]]},{"id":"9cbd84a26d1c55f1","type":"debug","z":"22eb2b8f4786695c","name":"debug 452","active":true,"tosidebar":true,"console":false,"tostatus":false,"complete":"false","statusVal":"","statusType":"auto","x":2190,"y":3480,"wires":[]},{"id":"e91fc18c6dd51401","type":"switch","z":"22eb2b8f4786695c","name":"pipの有無","property":"payload","propertyType":"msg","rules":[{"t":"nempty"},{"t":"else"}],"checkall":"true","repair":false,"outputs":2,"x":1600,"y":3440,"wires":[["f133f395ac894a59"],["b15f647449aca0ed"]]},{"id":"f133f395ac894a59","type":"pip","z":"22eb2b8f4786695c","venvconfig":"4657b6fbdbaf6f7e","name":"LLM:パッケージのインストール","arg":"","action":"install","tail":false,"x":1840,"y":3420,"wires":[["b15f647449aca0ed"]]},{"id":"61090aee4620d386","type":"inject","z":"22eb2b8f4786695c","name":"","props":[{"p":"payload"}],"repeat":"","crontab":"","once":false,"onceDelay":0.1,"topic":"","payload":"ultralyticsを利用した、yolov8n.ptによるYOLOのカメラに対するリアルタイム物体検出を行いたいです。カメラの映像はOpenCVで確認したいです。","payloadType":"str","x":1510,"y":3220,"wires":[["cec439e00a4acf38"]]},{"id":"b4563966bae22d59","type":"change","z":"22eb2b8f4786695c","name":"","rules":[{"t":"set","p":"command","pt":"flow","to":"payload","tot":"msg"}],"action":"","property":"","from":"","to":"","reg":false,"x":1850,"y":3220,"wires":[[]]},{"id":"73914d706c4e8af3","type":"change","z":"22eb2b8f4786695c","name":"","rules":[{"t":"set","p":"code","pt":"flow","to":"payload.python","tot":"msg"},{"t":"set","p":"payload","pt":"msg","to":"payload.pip","tot":"msg"}],"action":"","property":"","from":"","to":"","reg":false,"x":1420,"y":3440,"wires":[["e91fc18c6dd51401"]]},{"id":"b15f647449aca0ed","type":"change","z":"22eb2b8f4786695c","name":"","rules":[{"t":"set","p":"code","pt":"msg","to":"code","tot":"flow"}],"action":"","property":"","from":"","to":"","reg":false,"x":1770,"y":3480,"wires":[["dd6f7612338bcd1f"]]},{"id":"c99155da59825db2","type":"venv-config","venvname":"pyenv","version":"default"},{"id":"4657b6fbdbaf6f7e","type":"venv-config","venvname":"pyenv","version":"default"}]▼Here is a video of the actual execution.
I recorded about three runs, all successful without errors. Ideally, I would also capture the feedback when errors occur.
Conclusion
I was able to directly link local LLM code generation with execution. I plan to combine this with other nodes and flows I have tested so far.
It seems possible to input instructions via a dashboard, save working code, and automate tasks.
Because accidental file deletion is possible, it may be wise to isolate the environment to some degree.
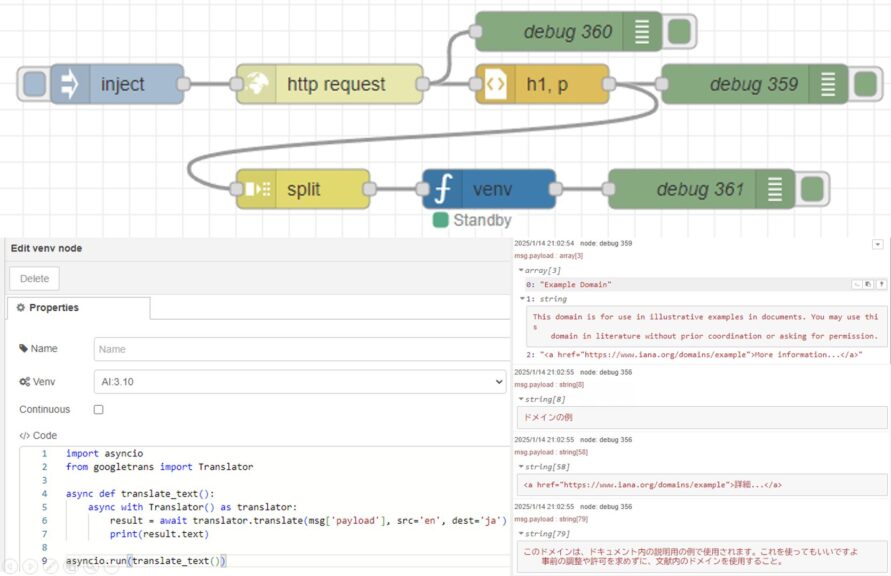
▼There is an increasing variety of input and output options, such as voice commands, translation, and speech synthesis. These can also be combined.
Faster Whisperを使ってみる(GPUでの実行、Python、Node-RED)
はじめに 今回はFaster Whisperを利用して文字起こしをしてみました。 Open AIのWhisperによる文字起こしよりも高速ということで試したことがあったのですが、以前はC…
Pythonでテキストを翻訳する(Googletrans、Node-RED)
はじめに 今回はPythonでGoogletransを利用した翻訳を試してみました。 書いてはいないのですが、これまで翻訳するのにdeep-translatorも使ったことがあります。他に…
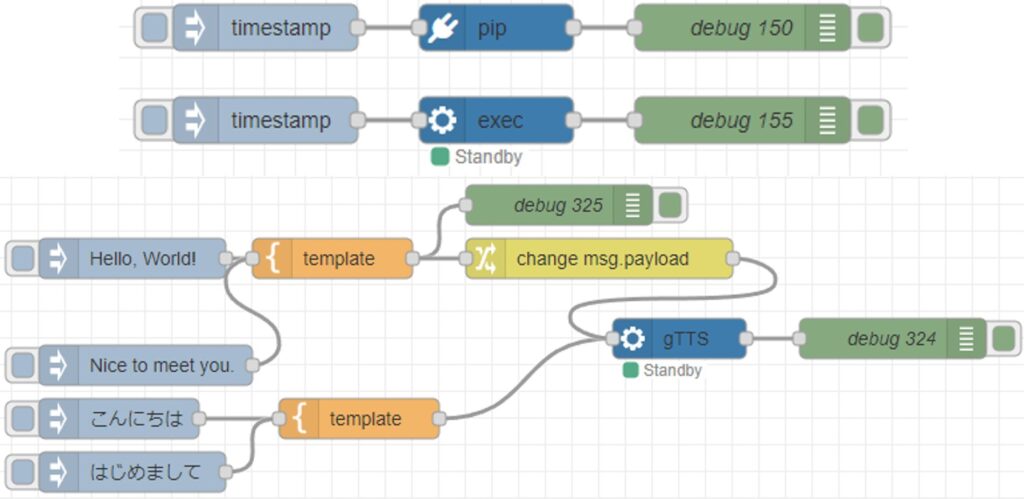
Using gTTS with Python (Text-to-Speech, Node-RED)
Introduction In this article, I used gTTS (Google Text-to-Speech) with Python. I have used VoiceVox before, but I was looking for something that could also…