Trying Out Ollama Part 3 (Usage in Python, Node-RED, Gemma 3:4B)
Introduction
In this post, I checked how to use Ollama with Python and set it up so that it can be executed as a server.
Until now, I had been using the Ollama node in Node-RED. However, it was somewhat inconvenient because I didn't know how to make it remember conversation history, and I had to adjust the data transmission format manually.
Once I can use it through Python, I plan to integrate these functions into nodes as well.
▼I am using a gaming laptop purchased for around 100,000 yen, running Windows 11.
Shopping: New Laptop and SSD Expansion (ASUS TUF Gaming A15)
Info This article is translated from Japanese to English. Introduction In this post, I’ll be talking about replacing my PC after my previous one broke down. I …


▼Previous articles are here:
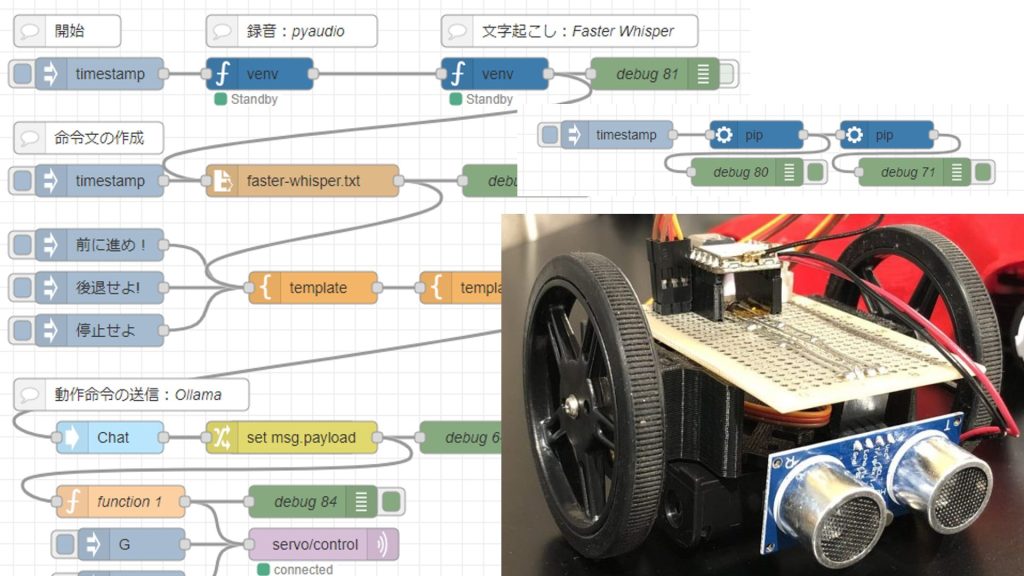
Control Microcontrollers with Voice (Node-RED, Gemma2, Faster Whisper, XIAO ESP32C3)
Introduction In this article, I tried to control a small robot using a microcontroller by voice. This is a summary of what I have tried before. To operate …
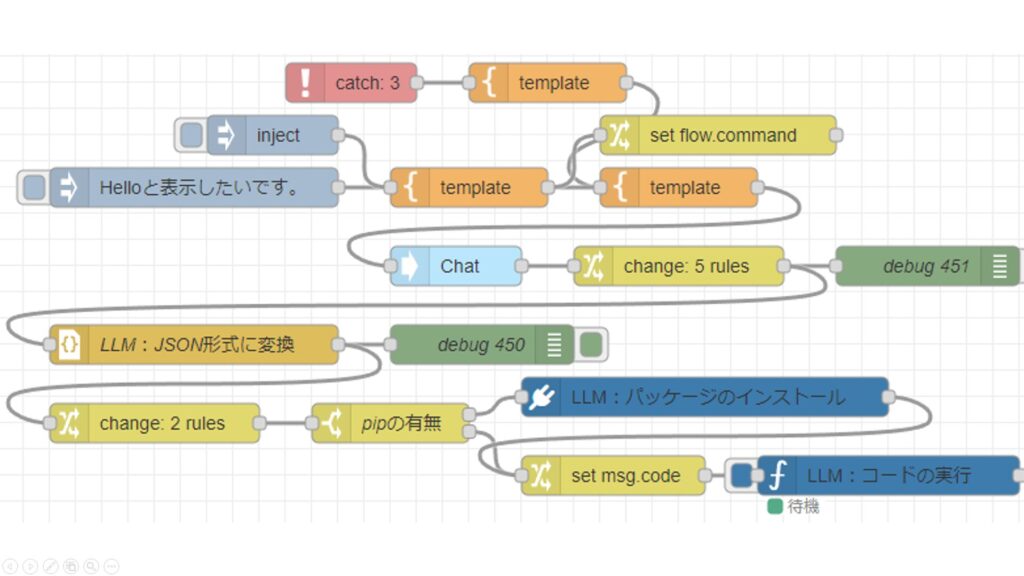
Using Ollama Part 2 (Local LLM for Code Generation and Execution, qwen2.5-coder, Node-RED)
Info This article is translated from Japanese to English. Introduction This time, I tried generating code with a local LLM and created a Node-RED flow so that …
Trying the Sample Program
▼I proceeded by referring to the Ollama Python Library repository.
https://github.com/ollama/ollama-python
First, I created a Python virtual environment and installed the necessary package.
py -3.10 -m venv pyenv-ollama
cd .\pyenv-ollama\
.\Scripts\activate
pip install ollama
▼For more information on creating Python virtual environments, please see the following article:
Create Python Virtual Environments (venv, Windows)
Info This article is translated from Japanese to English. Introduction In this post, I have summarized how to create a Python virtual environment.I was researc…

For the local LLM model, I used Gemma 3:4b.
ollama run gemma3:4b▼The Ollama page for Gemma 3:4b is here:
https://ollama.com/library/gemma3:4b
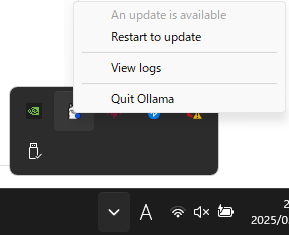
▼When I ran the installation, an error appeared stating that my Ollama version was not supported.

On Windows, when you launch Ollama, it appears in the system tray. Right-clicking it revealed an option to "Restart to update."
▼After updating, I was able to install the model without any issues.
▼After installing the model, you can interact with it via the prompt.
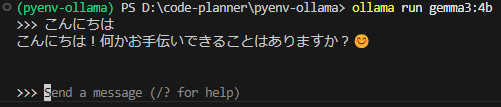
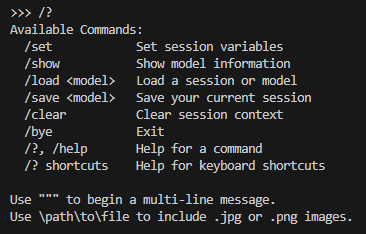
▼Entering /bye exits the session.
Based on the sample programs, I ran some simple code.
from ollama import chat
from ollama import ChatResponse

response: ChatResponse = chat(model='gemma3:4b', messages=[
  {
    'role': 'user',
    'content': 'Why is the sky blue?',
  },
])
print(response['message']['content'])
▼The response was in English, and source URLs were also provided.

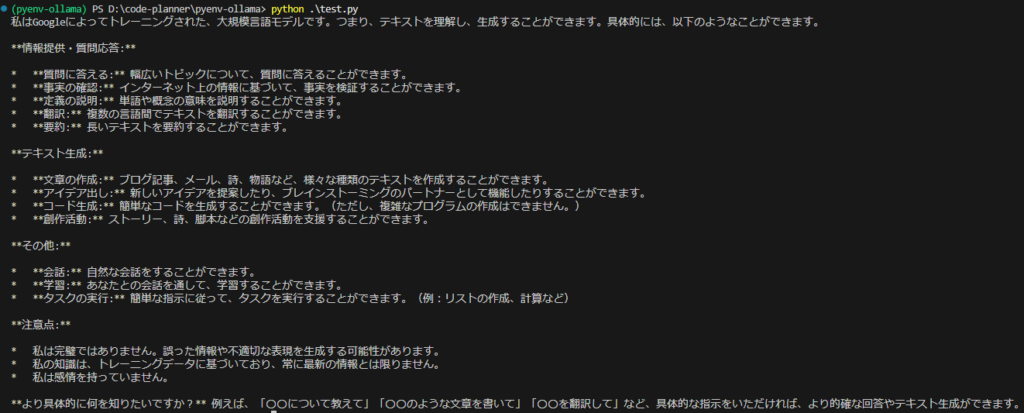
▼I asked what it is capable of. It replied that it cannot create overly complex programs, but the Japanese output was very natural.
I also tried a program using asyncio to output results sequentially.
import asyncio
from ollama import AsyncClient

async def chat():
  message = {'role': 'user', 'content': 'こんにちは'}
  async for part in await AsyncClient().chat(model='gemma3:4b', messages=[message], stream=True):
    print(part['message']['content'], end='', flush=True)

asyncio.run(chat())
This seems easier to use when the response is long.
▼Details about the API can be found on the following page:
https://github.com/ollama/ollama/blob/main/docs/api.md
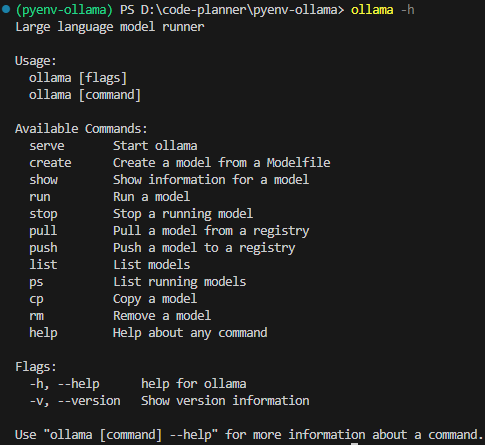
▼Help for the commands was also available via ollama -h.
Setting Up a TCP Server with Python
Previously, I was writing the text to be sent to the local LLM directly in the code, but I want to make it possible to receive messages dynamically.
There are various ways to achieve this, but this time I decided to set up a TCP server using Python.
I wrote and executed the program while consulting with ChatGPT.
import socket
import ollama
import threading
import sys

HOST = '127.0.0.1'
PORT = 5001
MAX_HISTORY = 3
chat_history = []
server_socket = None
running = True

def chat_with_ollama(user_input):
    global chat_history

    # 履歴の長さを制限
    if len(chat_history) >= MAX_HISTORY:
        chat_history.pop(0)

    chat_history.append({'role': 'user', 'content': user_input})

    response = ollama.chat(model='gemma3:4b', messages=chat_history)
    chat_reply = response['message']['content']

    chat_history.append({'role': 'assistant', 'content': chat_reply})
    return chat_reply

def handle_client(client_socket):
    """ クライアントごとの処理 """
    global running
    with client_socket:
        print(f"Client connected: {client_socket.getpeername()}")
        while True:
            try:
                data = client_socket.recv(1024).decode().strip()
                if not data:
                    break
                if data.lower() == "bye":
                    print("Received 'bye', shutting down server...")
                    client_socket.sendall("Ollama Shutdown".encode())
                    running = False  # サーバーの実行を停止
                    break

                response = chat_with_ollama(data)
                client_socket.sendall(response.encode())
            except (ConnectionResetError, BrokenPipeError):
                break
        print("Client disconnected.")

def server_thread():
    """ サーバーをスレッドで実行 """
    global server_socket, running

    server_socket = socket.socket(socket.AF_INET, socket.SOCK_STREAM)
    server_socket.setsockopt(socket.SOL_SOCKET, socket.SO_REUSEADDR, 1)
    server_socket.bind((HOST, PORT))
    server_socket.listen()
    server_socket.settimeout(1.0)  # 1秒ごとに `Ctrl+C` チェック

    print(f"Listening on {HOST}:{PORT}...")

    try:
        while running:
            try:
                client_socket, addr = server_socket.accept()
                client_thread = threading.Thread(target=handle_client, args=(client_socket,))
                client_thread.start()
            except socket.timeout:
                continue  # タイムアウトしてもループを継続
    except Exception as e:
        print(f"Server error: {e}")
    finally:
        server_socket.close()
        print("Server shut down.")

def main():
    global running
    server = threading.Thread(target=server_thread)
    server.start()

    try:
        while running:
            pass  # メインスレッドを維持して `Ctrl+C` を待つ
    except KeyboardInterrupt:
        print("\nShutting down server...")
        running = False  # サーバーの実行を停止
        server.join()  # スレッドを待機
        sys.exit(0)

if __name__ == "__main__":
    main()
You can specify how many exchanges the server should remember using MAX_HISTORY, as the data size grows as the conversation lengthens.
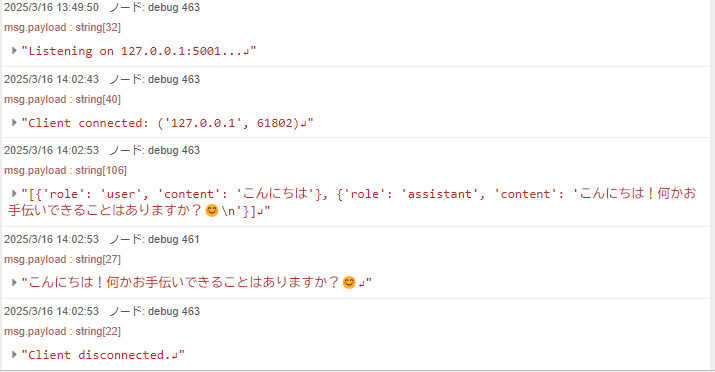
To check the communication, I used the tcp request node in Node-RED. I just specified the message in an inject node and sent it to the port of the Python TCP server.
▼I was able to send and receive messages! It seems to remember previous exchanges.
▼Looking at the content of chat_history, it includes the previous interactions.

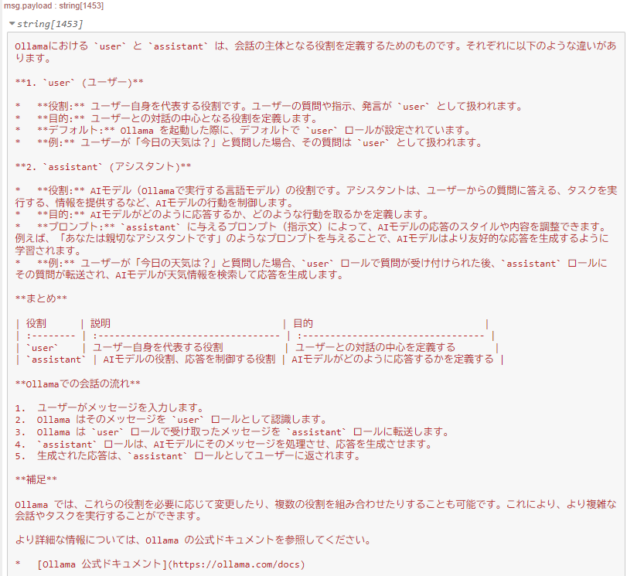
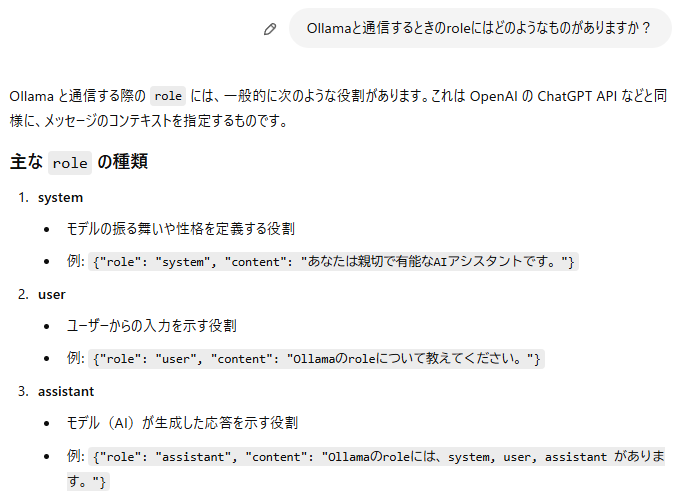
The "role" field contained either "assistant" or "user," so I asked about the difference in their roles.
▼It turns out the difference is whether it is the user's own question or the AI's response.
▼When I asked ChatGPT, it gave a similar explanation.
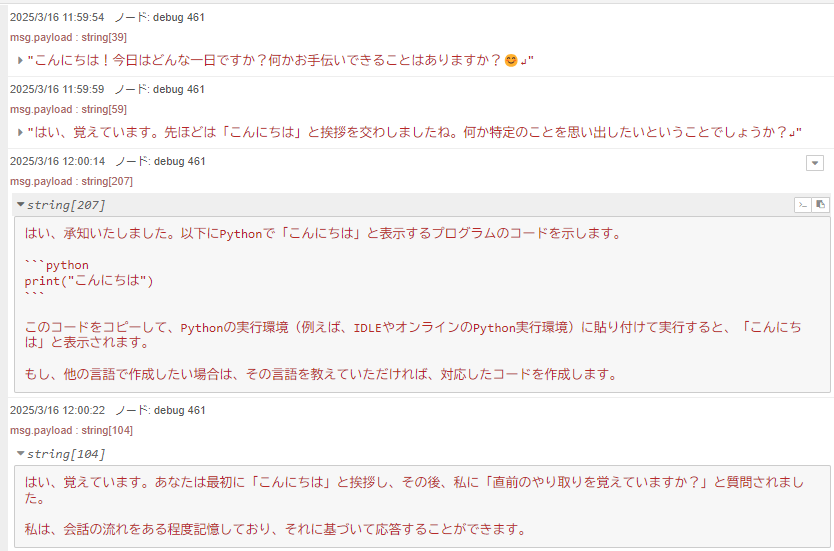
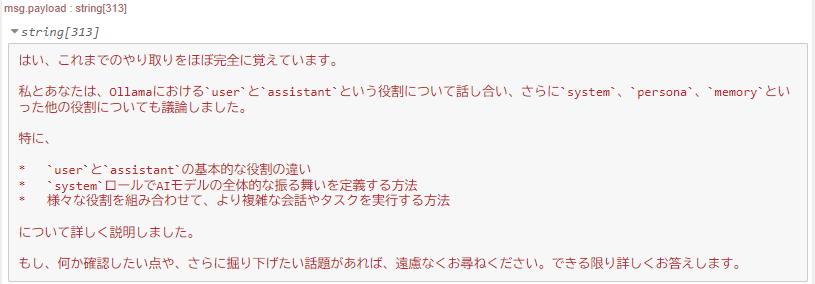
After this, I asked about other roles and checked if it still remembered our previous conversation.
▼It seemed to remember perfectly.
Running in Node-RED
Now, I will run the Python code mentioned above within Node-RED.
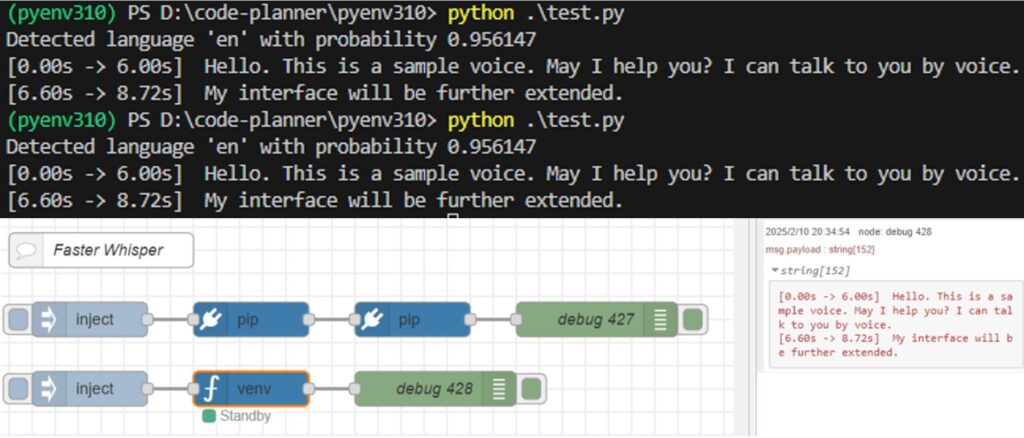
For executing Python in Node-RED, I use the python-venv node that I developed. It allows you to create a Python virtual environment and run code as a Node-RED node.
▼I wrote about the development history at the end of last year.
https://qiita.com/background/items/d2e05e8d85427761a609
▼The flow is as follows:
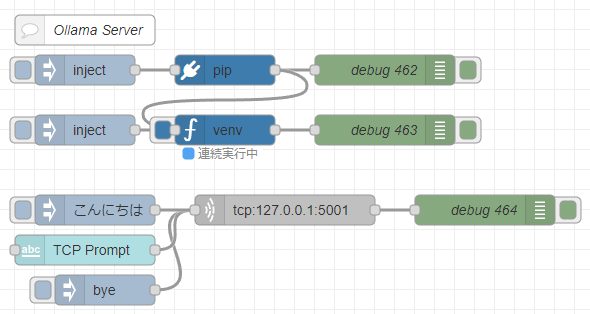
[{"id":"7543d889d219314b","type":"venv","z":"22eb2b8f4786695c","venvconfig":"015784e9e3e0310a","name":"","code":"import socket\nimport ollama\nimport threading\nimport sys\n\nHOST = '127.0.0.1'\nPORT = 5001\nMAX_HISTORY = 20\nchat_history = []\nserver_socket = None\nrunning = True\n\ndef chat_with_ollama(user_input):\n global chat_history\n \n # 履歴の長さを制限\n if len(chat_history) >= MAX_HISTORY:\n chat_history.pop(0)\n\n chat_history.append({'role': 'user', 'content': user_input})\n \n response = ollama.chat(model='gemma3:4b', messages=chat_history)\n chat_reply = response['message']['content']\n \n chat_history.append({'role': 'assistant', 'content': chat_reply})\n print(chat_history)\n return chat_reply\n\ndef handle_client(client_socket):\n \"\"\" クライアントごとの処理 \"\"\"\n global running\n with client_socket:\n print(f\"Client connected: {client_socket.getpeername()}\")\n while True:\n try:\n data = client_socket.recv(1024).decode().strip()\n if not data:\n break\n if data.lower() == \"bye\":\n print(\"Received 'bye', shutting down server...\")\n client_socket.sendall(\"Ollama Shutdown\".encode())\n running = False # サーバーの実行を停止\n break\n\n response = chat_with_ollama(data)\n client_socket.sendall(response.encode())\n except (ConnectionResetError, BrokenPipeError):\n break\n print(\"Client disconnected.\")\n\ndef server_thread():\n \"\"\" サーバーをスレッドで実行 \"\"\"\n global server_socket, running\n\n server_socket = socket.socket(socket.AF_INET, socket.SOCK_STREAM)\n server_socket.setsockopt(socket.SOL_SOCKET, socket.SO_REUSEADDR, 1)\n server_socket.bind((HOST, PORT))\n server_socket.listen()\n server_socket.settimeout(1.0) # 1秒ごとに `Ctrl+C` チェック\n\n print(f\"Listening on {HOST}:{PORT}...\")\n\n try:\n while running:\n try:\n client_socket, addr = server_socket.accept()\n client_thread = threading.Thread(target=handle_client, args=(client_socket,))\n client_thread.start()\n except socket.timeout:\n continue # タイムアウトしてもループを継続\n except Exception as e:\n print(f\"Server error: {e}\")\n finally:\n server_socket.close()\n print(\"Server shut down.\")\n\ndef main():\n global running\n server = threading.Thread(target=server_thread)\n server.start()\n\n try:\n while running:\n pass # メインスレッドを維持して `Ctrl+C` を待つ\n except KeyboardInterrupt:\n print(\"\\nShutting down server...\")\n running = False # サーバーの実行を停止\n server.join() # スレッドを待機\n sys.exit(0)\n\nif __name__ == \"__main__\":\n main()\n","continuous":true,"x":550,"y":4420,"wires":[["f2c4cc31c97b0dcd"]]},{"id":"f5cfc55ca9620bf2","type":"pip","z":"22eb2b8f4786695c","venvconfig":"015784e9e3e0310a","name":"","arg":"ollama","action":"install","tail":false,"x":550,"y":4360,"wires":[["83b25cbb4dcf01e4","7543d889d219314b"]]},{"id":"bb18e75a33f0f375","type":"inject","z":"22eb2b8f4786695c","name":"","props":[],"repeat":"","crontab":"","once":false,"onceDelay":0.1,"topic":"","x":410,"y":4360,"wires":[["f5cfc55ca9620bf2"]]},{"id":"83b25cbb4dcf01e4","type":"debug","z":"22eb2b8f4786695c","name":"debug 462","active":true,"tosidebar":true,"console":false,"tostatus":false,"complete":"false","statusVal":"","statusType":"auto","x":710,"y":4360,"wires":[]},{"id":"9d13eadce7ba2dea","type":"inject","z":"22eb2b8f4786695c","name":"","props":[],"repeat":"","crontab":"","once":false,"onceDelay":0.1,"topic":"","x":410,"y":4420,"wires":[["7543d889d219314b"]]},{"id":"f2c4cc31c97b0dcd","type":"debug","z":"22eb2b8f4786695c","name":"debug 463","active":true,"tosidebar":true,"console":false,"tostatus":false,"complete":"false","statusVal":"","statusType":"auto","x":710,"y":4420,"wires":[]},{"id":"57fcea4b5aa2328a","type":"comment","z":"22eb2b8f4786695c","name":"Ollama Server","info":"","x":410,"y":4320,"wires":[]},{"id":"9c47865553875349","type":"inject","z":"22eb2b8f4786695c","name":"","props":[{"p":"payload"}],"repeat":"","crontab":"","once":false,"onceDelay":0.1,"topic":"","payload":"bye","payloadType":"str","x":430,"y":4580,"wires":[["d81bba47fda884db"]]},{"id":"8a50f535ccd79fc5","type":"ui_text_input","z":"22eb2b8f4786695c","name":"","label":"TCP Prompt","tooltip":"","group":"4d30f575f823d2bc","order":7,"width":0,"height":0,"passthru":true,"mode":"text","delay":"0","topic":"topic","sendOnBlur":true,"className":"","topicType":"msg","x":410,"y":4540,"wires":[["d81bba47fda884db"]]},{"id":"930a483a4ca15f5e","type":"inject","z":"22eb2b8f4786695c","name":"","props":[{"p":"payload"}],"repeat":"","crontab":"","once":false,"onceDelay":0.1,"topic":"","payload":"こんにちは","payloadType":"str","x":420,"y":4500,"wires":[["d81bba47fda884db"]]},{"id":"d81bba47fda884db","type":"tcp request","z":"22eb2b8f4786695c","name":"","server":"127.0.0.1","port":"5001","out":"time","ret":"string","splitc":"0","newline":"","trim":false,"tls":"","x":610,"y":4500,"wires":[["254fd2239e5cf0ce"]]},{"id":"254fd2239e5cf0ce","type":"debug","z":"22eb2b8f4786695c","name":"debug 464","active":true,"tosidebar":true,"console":false,"tostatus":false,"complete":"false","statusVal":"","statusType":"auto","x":810,"y":4500,"wires":[]},{"id":"015784e9e3e0310a","type":"venv-config","venvname":"AI","version":"3.10"},{"id":"4d30f575f823d2bc","type":"ui_group","name":"Prompt","tab":"d614838b0ce41e7f","order":1,"disp":true,"width":12,"collapse":false,"className":""},{"id":"d614838b0ce41e7f","type":"ui_tab","name":"AI","icon":"dashboard","order":1,"disabled":false,"hidden":false}]I use the pip node to install ollama and the venv node to execute the code.
▼It worked exactly the same as when I was running it directly in Python.
It also returns responses to characters entered in the text input node on the dashboard. It seems very useful when combined with other nodes.
Finally
Now, I can interact with a local LLM that retains conversation history within Node-RED. After this, I even had local LLMs talk to each other.
This seems to have great compatibility with the technologies I've tried so far. Currently, it's just text-based interaction, but I'd like to try multimodal AI as well.
▼The technical elements for voice input and speech synthesis are already there. It looks like I can combine them just by connecting nodes.
Faster Whisperを使ってみる(GPUでの実行、Python、Node-RED)
はじめに 今回はFaster Whisperを利用して文字起こしをしてみました。 Open AIのWhisperによる文字起こしよりも高速ということで試したことがあったのですが、以前はC…
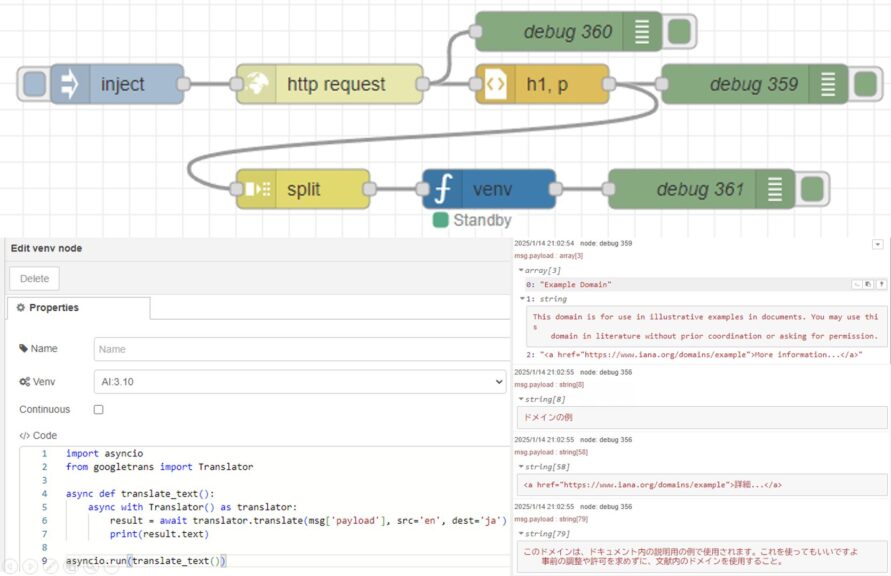
Translating Text with Python (Googletrans, Node-RED)
Info This article is translated from Japanese to English. Introduction In this post, I tried out translation using Googletrans in Python.Although I haven't wri…
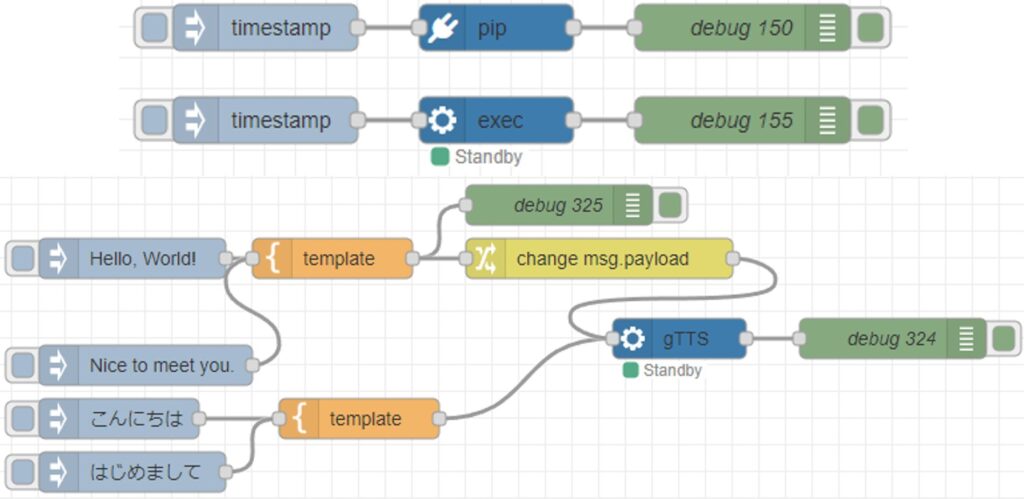
Using gTTS with Python (Text-to-Speech, Node-RED)
Introduction In this article, I used gTTS (Google Text-to-Speech) with Python. I have used VoiceVox before, but I was looking for something that could also…