Object Detection with YOLO Part 2 (Python, Node-RED)
Introduction
In this post, I tried running YOLO using Python.
When I tried YOLO in my previous article, I only used simple commands, but to actually mount it on a robot and process data, it seems necessary to execute it via Python.
I wanted to obtain the coordinates of the detected objects on the image, so I gave it a try.
▼Previous articles are here:
Object Detection with YOLO Part 1 (Ultralytics, YOLO11)
Info This article is translated from Japanese to English. Introduction In this post, I tried using YOLO, a well-known object detection algorithm.Since this is …
Control Microcontrollers with Voice (Node-RED, Gemma2, Faster Whisper, XIAO ESP32C3)
Introduction In this article, I tried to control a small robot using a microcontroller by voice. This is a summary of what I have tried before. To operate …
Setting Up the Environment
Again, I am using a Windows 10 laptop.
First, I'll create a virtual environment and install the packages. Since a warning recommended Python version 3.10 or higher, I recommend specifying the version when creating the environment.
▼I was able to run it on Python 3.8 and 3.9 as well.

To specify Python version 3.10, run the following commands:
py -3.10 -m venv yolo310
cd yolo310
.\Scripts\activate
pip install ultralytics
Trying the Sample Program
▼There was Python sample code on the following Ultralytics page:
https://docs.ultralytics.com/ja/usage/python
While "Train" and "Val" are for when using datasets, I executed "Predict" this time.
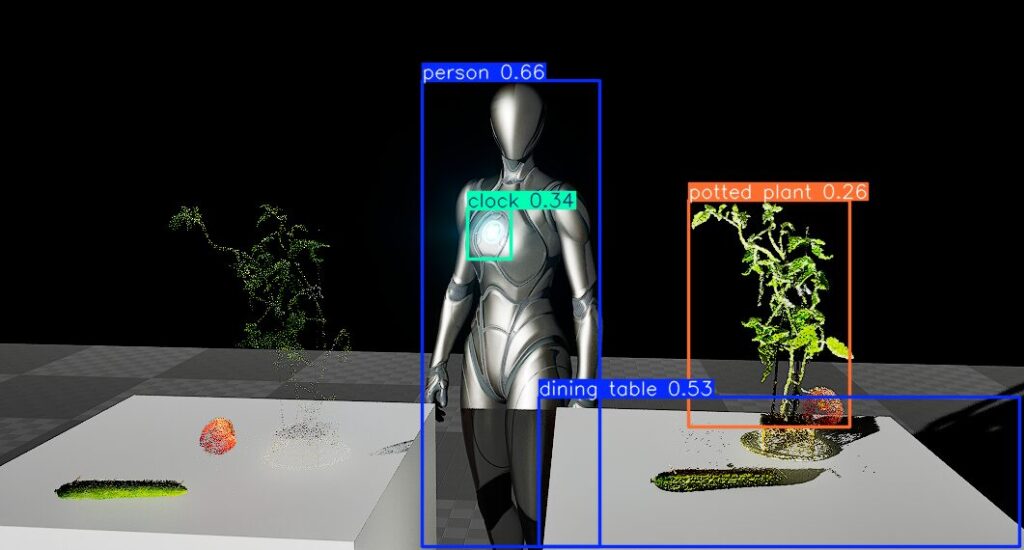
▼This is an Unreal Engine screen, but I tried performing prediction on this image.
Unreal Engine 5を使ってみる その10(Scaniverse、点群データの取り込み)
はじめに 今回はiPhone 15 ProでScaniverseというアプリを使って3Dスキャンしたデータを、Unreal Engine 5(UE5)に取り込んでみました。 データを取り込むにあたって…
▼Here is the program to perform object detection from an image file:
import cv2
from PIL import Image

from ultralytics import YOLO

model = YOLO("yolov8n.pt")
# accepts all formats - image/dir/Path/URL/video/PIL/ndarray. 0 for webcam
results = model.predict(source="C:/Users/mgs_1/Downloads/unreal.png", save=True)

# from PIL
im1 = Image.open("bus.jpg")
results = model.predict(source=im1, save=True)  # save plotted images

# from ndarray
im2 = cv2.imread("bus.jpg")
results = model.predict(source=im2, save=True, save_txt=True)  # save predictions as labels

# from list of PIL/ndarray
results = model.predict(source=[im1, im2])
▼The detection results are displayed.
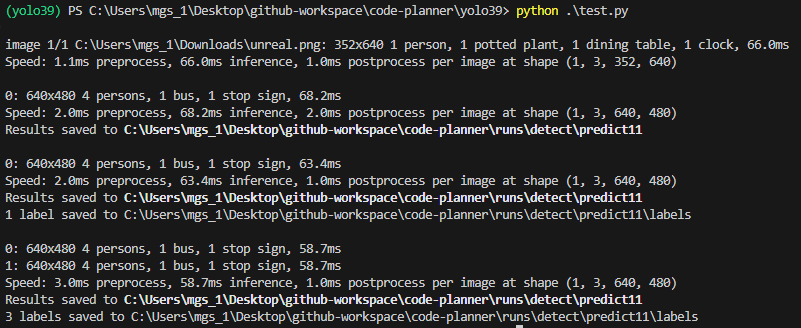
For those including save=True in model.predict, the detected images were saved in the runs/detect/predict11 folder. The number after "predict" in the folder name increases each time it is saved.
▼Even in the Unreal Engine image, objects are detected as "person" or "potted plant."
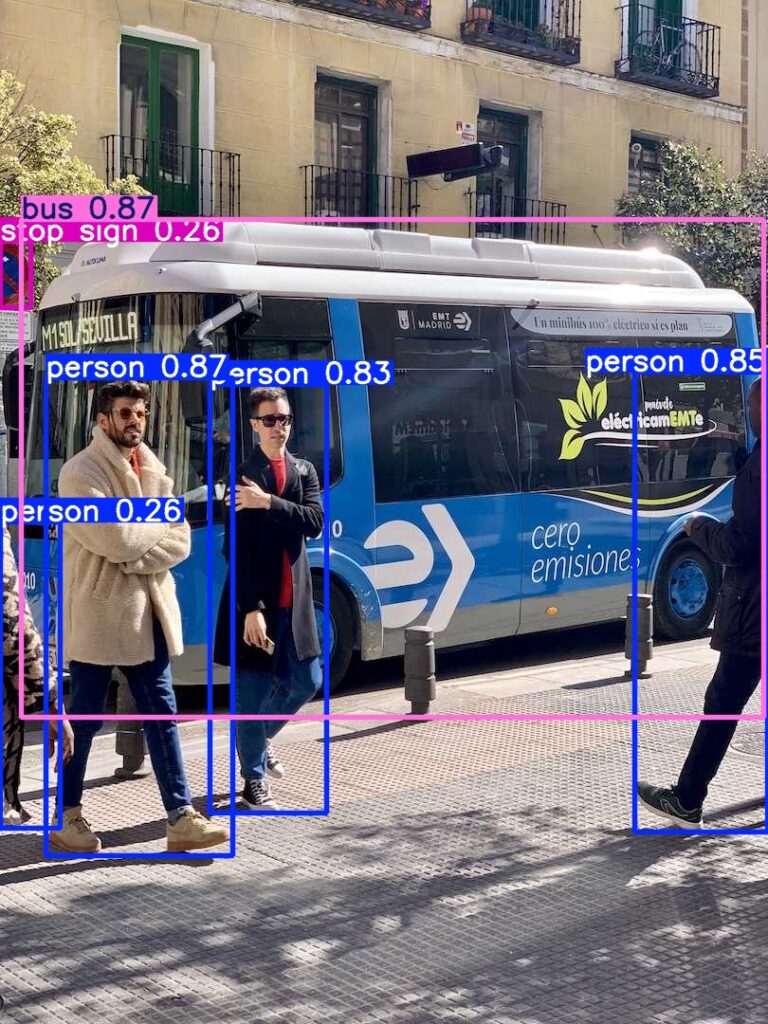
▼The bus image I tried previously was also detected.
The documentation mentioned that when the source for model.predict is "0," it uses the webcam, so I left only that part.
▼Here is the program:
import cv2
from PIL import Image
from ultralytics import YOLO

model = YOLO("yolov8n.pt")
results = model.predict(source="0")
▼The camera launched, and a list of detected objects was displayed.
I believe it detected me appearing on the laptop's front camera. When I moved out of frame, the chair was detected.
Running the Program to Obtain Coordinates
I consulted with ChatGPT to create a program that obtains the coordinates of detected objects. I'm using OpenCV to draw the camera footage and bounding boxes around the detected areas.
▼Here is the program:
import cv2
from ultralytics import YOLO

# YOLO モデルのロード
model = YOLO("yolov8n.pt")  # 必要に応じてモデルを変更

# カメラのキャプチャ(デフォルトカメラを使用)
cap = cv2.VideoCapture(0)

if not cap.isOpened():
    print("カメラを開くことができませんでした")
    exit()

while True:
    ret, frame = cap.read()
    if not ret:
        print("フレームを取得できませんでした")
        break

    # フレームの推論
    results = model(frame)

    # 検出結果の処理
    for result in results:
        boxes = result.boxes  # バウンディングボックスの情報
        for box in boxes:
            # 座標の取得
            x1, y1, x2, y2 = box.xyxy[0]  # 左上と右下の座標
            x1, y1, x2, y2 = int(x1), int(y1), int(x2), int(y2)

            # クラスとスコアの取得
            cls = int(box.cls[0])  # クラスID
            score = float(box.conf[0])  # 信頼度

            # クラス名の取得(モデルによって異なります)
            class_name = model.names[cls]

            # 座標の表示
            cv2.rectangle(frame, (x1, y1), (x2, y2), (0, 255, 0), 2)
            label = f"{class_name} {score:.2f}"
            cv2.putText(frame, label, (x1, y1 - 10),
                        cv2.FONT_HERSHEY_SIMPLEX, 0.5, (0, 255, 0), 2)

            # 座標の出力(必要に応じて利用)
            print(f"検出: {class_name}, 座標: ({x1}, {y1}), ({x2}, {y2}), 信頼度: {score}")

    # フレームの表示
    cv2.imshow("YOLO Real-Time Detection", frame)

    # 'q' キーで終了
    if cv2.waitKey(1) & 0xFF == ord('q'):
        break

# リソースの解放
cap.release()
cv2.destroyAllWindows()
I actually executed it.
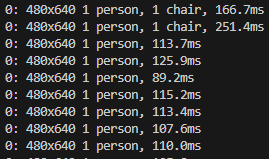
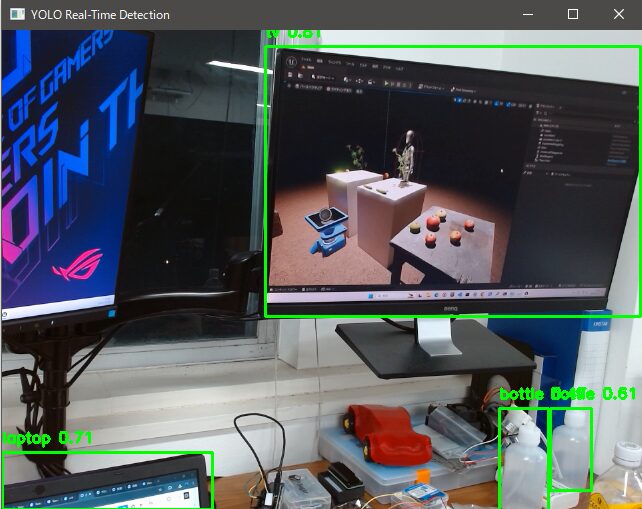
▼It is able to detect objects almost in real-time.
▼In the terminal, the types and coordinates of the detected objects are displayed.
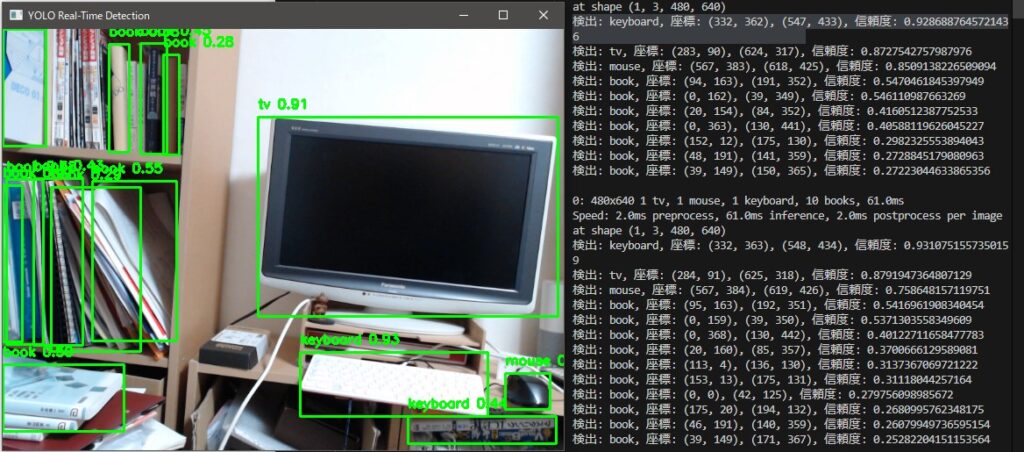
▼I’ll need to think about how to pass the obtained coordinates to the next program.
Running in Node-RED
Since it can be executed in Python, it means it can also be executed in Node-RED. I tried using the python-venv node I developed.
▼I recently updated it so that executable files added to the virtual environment can also be run. yolo.exe can also be executed.
https://flows.nodered.org/node/@background404/node-red-contrib-python-venv
▼Here is the complete flow:
[{"id":"7e90aba4fd463188","type":"venv","z":"790506c326ae6cc7","venvconfig":"a567c3477dd0b46c","name":"","code":"import cv2\nfrom ultralytics import YOLO\n\n# YOLO モデルのロード\nmodel = YOLO(\"yolov8n.pt\") # 必要に応じてモデルを変更\n\n# カメラのキャプチャ(デフォルトカメラを使用)\ncap = cv2.VideoCapture(0)\n\nif not cap.isOpened():\n print(\"カメラを開くことができませんでした\")\n exit()\n\nwhile True:\n ret, frame = cap.read()\n if not ret:\n print(\"フレームを取得できませんでした\")\n break\n\n # フレームの推論\n results = model(frame)\n\n # 検出結果の処理\n for result in results:\n boxes = result.boxes # バウンディングボックスの情報\n for box in boxes:\n # 座標の取得\n x1, y1, x2, y2 = box.xyxy[0] # 左上と右下の座標\n x1, y1, x2, y2 = int(x1), int(y1), int(x2), int(y2)\n \n # クラスとスコアの取得\n cls = int(box.cls[0]) # クラスID\n score = float(box.conf[0]) # 信頼度\n\n # クラス名の取得(モデルによって異なります)\n class_name = model.names[cls]\n\n # 座標の表示\n cv2.rectangle(frame, (x1, y1), (x2, y2), (0, 255, 0), 2)\n label = f\"{class_name} {score:.2f}\"\n cv2.putText(frame, label, (x1, y1 - 10), \n cv2.FONT_HERSHEY_SIMPLEX, 0.5, (0, 255, 0), 2)\n\n # 座標の出力(必要に応じて利用)\n print(f\"検出: {class_name}, 座標: ({x1}, {y1}), ({x2}, {y2}), 信頼度: {score}\")\n\n # フレームの表示\n cv2.imshow(\"YOLO Real-Time Detection\", frame)\n\n # 'q' キーで終了\n if cv2.waitKey(1) & 0xFF == ord('q'):\n break\n\n# リソースの解放\ncap.release()\ncv2.destroyAllWindows()\n","continuous":true,"x":790,"y":3120,"wires":[["4ce42358d13464f6"]]},{"id":"d70969095d48b329","type":"inject","z":"790506c326ae6cc7","name":"","props":[{"p":"payload"},{"p":"topic","vt":"str"}],"repeat":"","crontab":"","once":false,"onceDelay":0.1,"topic":"","payload":"","payloadType":"date","x":620,"y":3120,"wires":[["7e90aba4fd463188"]]},{"id":"4ce42358d13464f6","type":"debug","z":"790506c326ae6cc7","name":"debug 168","active":true,"tosidebar":true,"console":false,"tostatus":false,"complete":"false","statusVal":"","statusType":"auto","x":950,"y":3120,"wires":[]},{"id":"0d7f40cf0fc91a4e","type":"pip","z":"790506c326ae6cc7","venvconfig":"a567c3477dd0b46c","name":"","arg":"ultralytics","action":"install","tail":false,"x":790,"y":3060,"wires":[["793ea04a919a8d51"]]},{"id":"7d15423c58236d08","type":"inject","z":"790506c326ae6cc7","name":"","props":[{"p":"payload"},{"p":"topic","vt":"str"}],"repeat":"","crontab":"","once":false,"onceDelay":0.1,"topic":"","payload":"","payloadType":"date","x":620,"y":3060,"wires":[["0d7f40cf0fc91a4e"]]},{"id":"793ea04a919a8d51","type":"debug","z":"790506c326ae6cc7","name":"debug 169","active":true,"tosidebar":true,"console":false,"tostatus":false,"complete":"false","statusVal":"","statusType":"auto","x":950,"y":3060,"wires":[]},{"id":"67008fa0e8463cf5","type":"comment","z":"790506c326ae6cc7","name":"YOLO Stream","info":"","x":610,"y":3000,"wires":[]},{"id":"a567c3477dd0b46c","type":"venv-config","venvname":"YOLO","version":"3.10"}]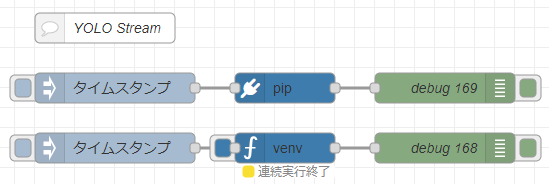
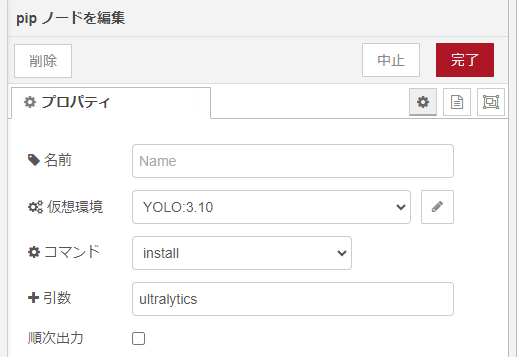
▼In the pip node, I am only installing ultralytics.
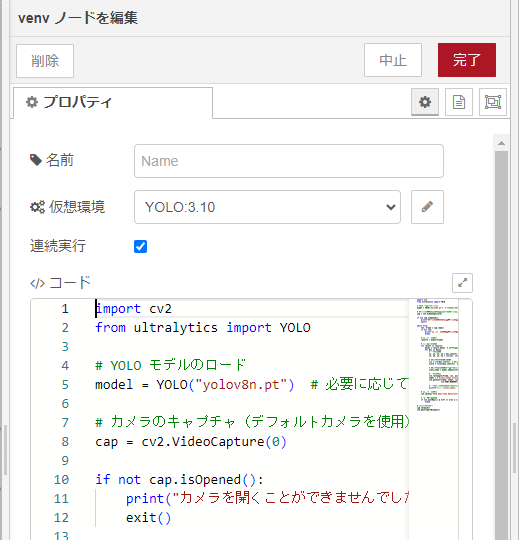
▼Setting it to continuous execution mode allows it to send any output as a message immediately.
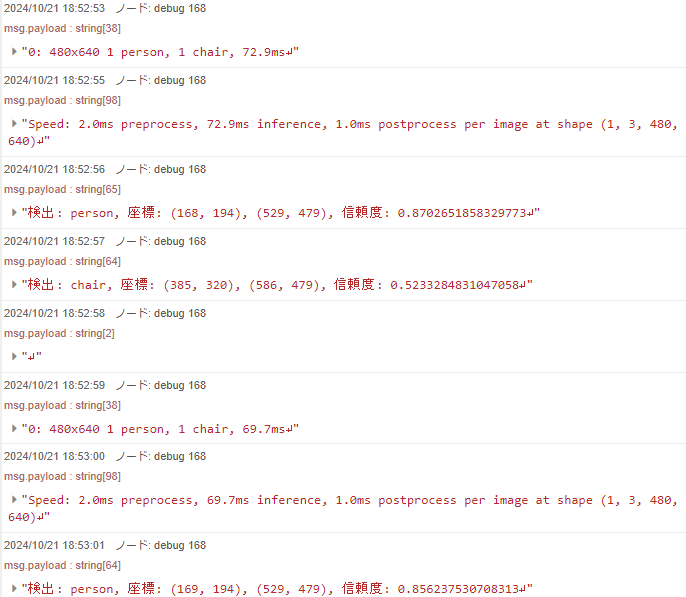
▼Upon execution, detected objects are sequentially sent to the debug node.

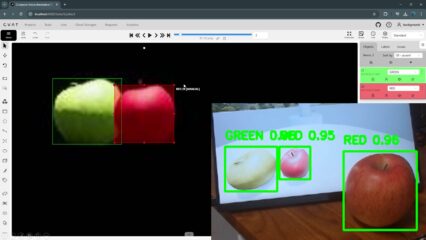
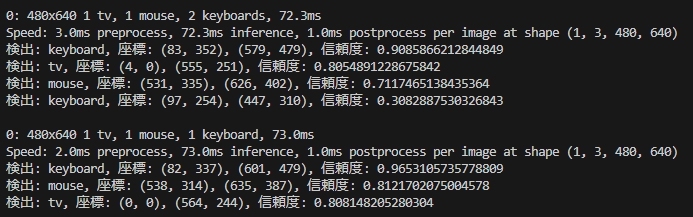
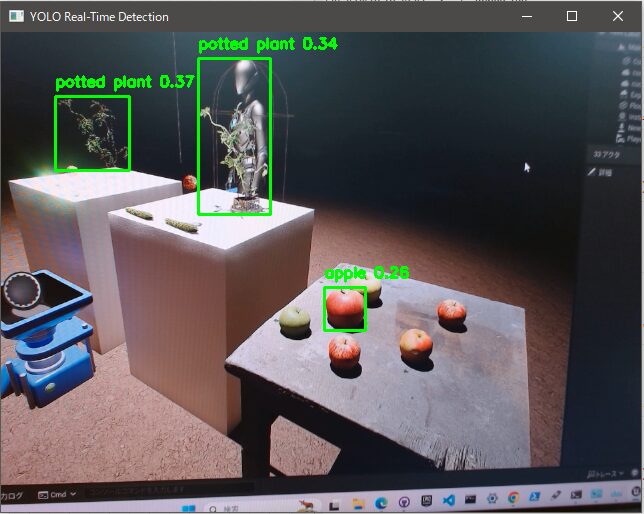
I tried performing detection on an Unreal Engine screen where I added some objects.
▼Detection accuracy seems poor when it's something displayed on a monitor. Apples aren't being detected very well.
Finally
It’s interesting to see objects being detected in real-time. The program generated by ChatGPT worked perfectly, so it seems like I can tailor the program to specific needs by adding more requirements.
I've heard that you can determine distance by matching the coordinates of the detected object with those of a depth camera. I don't have a depth camera on hand right now, but I'd like to try it once I get one.